
Self-diagnosis of laptop overheating. Checking the functionality of the laptop cooler Is there a cooler in the laptop?
The noise and slow operation of a laptop may be the result of an increase in temperature and subsequent increased work of the cooler of the laptop cooling system, which cannot cope with the resulting load due to a decrease in its own efficiency.
Thus, a slowdown in the operation of applications can be noticeable after the temperature rises above 70-75 degrees. This is a consequence of dynamically reducing the frequency of the laptop's central processor (so-called CPU throttling or throttling).
If the temperature rises further, the laptop may shut down to protect the system from overheating.
Permanent use of a laptop with such a malfunction will lead to failure of the motherboard. Most often, the north bridge or video card fails. I must say that the service is not cheap. Therefore, it is better to carry out express diagnostics and prevent expensive repairs.
Common signs of a laptop overheating:
- the laptop begins to make more and more noise;
- the keyboard gets hot;
- Windows, games and other applications begin to slow down.
Some inconveniences while working on a laptop that overheats (can help with diagnostics)
- The laptop is very noisy. This is how the cooler constantly operates at high speeds, which shortens its service life;
- The keyboard, touchpad and case get noticeably warm. Working with such a device becomes uncomfortable;
- The laptop is very slow. Programs stop responding to requests (freeze) - performance decreases.
- The laptop may turn off suddenly. User data may be lost due to sudden device shutdown. It is often not possible to turn it on immediately after turning it off - it takes time for the processor and radiator to cool down.
To correctly diagnose and identify laptop overheating, some prerequisites are necessary:
- The person conducting the diagnosis has minimal knowledge. You need to know and be able to correctly measure the temperature of the processor and video card of a laptop. You will also have to evaluate the degree of heating of the chipset over time, taking into account time and load - mandatory requirements. It is advisable to be familiar with the following concepts: normal temperature readings of a laptop when idle and under load;
- A program for monitoring temperature over time and recording readings;
- A program for creating a controlled load on the CPU and GPU.
Testing program
Download the AIDA64 Extreme Edition program from the link http://www.lavalys.com/support/downloads/;
Install on your laptop (the program is in Russian, free for 30 days).
AIDA64 allows you to simultaneously load the central processor and monitor the CPU warm-up dynamics in real time. Sometimes you can also monitor the operation of the video card (GPU) - it all depends on the type of sensor in a particular laptop model.
Instructions for self-diagnosis of laptop overheating
We launch the program and check the correct operation of the sensors and the program. Temperature readings should be between 35 and 55 degrees Celsius. If the readings are very different, perhaps the sensors are not working quite correctly, or are not being read correctly by the program - this happens. In this case, you will have to find another software;

Go to the Tools -> System Stability Test tab. Click the Start button.


Under the influence of the load created by AIDA64, the central processor begins to warm up. An accurate test requires 5 to 10 minutes. There is no point in loading the laptop any more. In this case, it is worth paying more attention not even to the temperature, but to the dynamics of its growth. If the growth is very rapid, most likely the laptop needs preventive cleaning of dust and replacement of thermal paste. Ideally, the temperature curve should be as flat as possible. They can help us in this case too.

The processor temperature for a regular laptop should not exceed 75-85 degrees - this is the maximum.
If AIDA64 is not suitable?
If for some reason you were unable to use AIDA64 (the trial period has ended), pay attention to a tiny utility for measuring the temperature of a laptop or computer - Open Hardware Monitor. You can download it. The program has a very small distribution size, only about 500Kb (~0.5Mb). It has a simple, intuitive and pleasant interface. The language is English, but it is very easy to understand, since you only need to find the thermometer icon and the temperature values for the CPU. A simple and understandable tool for diagnosing possible overheating, especially since its readings and AIDA64 readings on a relatively old Lenovo G580 laptop were completely consistent.

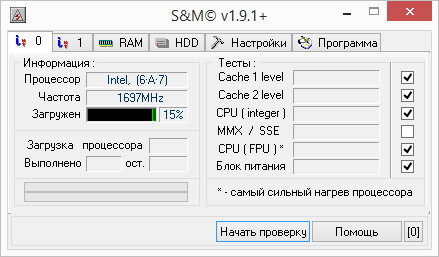
All that remains is to find an effective program for warming up the processor to the maximum possible values and working on all Windows platforms from Windows 98 to Windows 8 (the program starts with a driver error - but the main functionality is normal). A veteran program, S&M, is suitable for this role. The utility is very good at loading the CPU, does not require installation, and at the same time has a size of 150Kb. You can download the S&M program using a direct link from our website -.
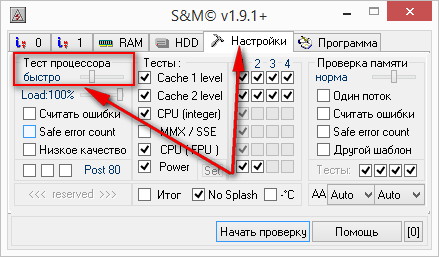
For the test, you need to run both S&M and Open Hardware Monitor programs and monitor the sensor readings. Approximate testing time is 3 - 5 minutes. To quickly complete the tests, before starting the test, it is advisable to go to the S&M settings and move the CPU Test slider to the Fast position.
Click the Start test button and wait for the test results.

The temperature range for the central processing unit (CPU) should be between 45 and 75 degrees. Above these values - overheating.
In the same way, you can test overheating for a desktop computer. If necessary, other software will be required, but the algorithm will remain the same: monitoring the node under load and correct interpretation of the received data.
When actively using any laptop, especially in the summer, their users may often encounter the problem of overheating. Such an “embarrassment” can lead not only to minor slowdowns of the operating system, but also to damage to the main parts of the system unit - the processor (read our article about that), video card and motherboard. In order to lower the temperature inside the laptop, you can force the fan to turn on as needed. Read our article on how to do this.
Please note that before performing any manipulations with the laptop, you must first make sure that the cooler as a whole is working. Also, do not forget to check the fan for dirt, because due to excess accumulated dust, debris can interfere with the operational operation of the blades.
So, let's start by considering the issue of forcing the fan to start using the BIOS system. In practice, when starting a device, regardless of its model or brand, the cooling process first starts, which can be easily confirmed by the presence of corresponding noise.

It is worth noting that in some cases the fan may be installed incorrectly due to polarity connection problems. This can be checked again by starting the cooling system when turning on the laptop. Hold a thread or piece of paper near the vent and watch for the object to vibrate. In this case, the system works correctly. Otherwise, the object will stick to the hole, which will confirm cooling problems.
The ability to control fan functions using commands in the BIOS is quite common.


Obviously, for better cooling of the laptop you will need to enable Turbo mode. However, you should also understand that the wear resistance of the fan itself will be significantly reduced during constant operation and can lead to failure.
On a note! Not all laptops have the ability to configure the fan using the BIOS, so in some cases you have to use special programs, which will be discussed later.
Starting the fan using the SpeedFan program
So, if your laptop does not support setting the fan speed and operating time through the BIOS, you can use the free SpeedFan program. To set the ventilation speed using this software you will need:
- Download SpeedFan from the developer's website or other reliable source.


- Install SpeedFan on your laptop following the installer's instructions.


- Launch the program via a shortcut on the desktop.

- Go to the “Indicators” section. In this section you will be given the opportunity to set the percentage of fan power.

- In addition, this program allows you to configure the operating criteria of other components of the laptop. In the “Configuration” section, you can specify the operating temperature of the hard drive, processor and motherboard, as well as specify the temperature parameters at which the system will notify you of overheating.

Note! It is worth noting that in addition to SpeedFan, you can find other similar programs on the Internet. For example, the AMD OverDrive utility will allow you to configure any system operation criteria if your laptop has an AMD chipset installed. There is also specially developed software for Intel processors - Riva Tunes.
Starting a fan on a laptop using Windows commands
Windows operating systems, starting from version 7, also have built-in utilities for managing the power criteria of a laptop. To configure them you will need:
- Open “Control Panel” and select the “Power Options” section.


- Select any power plan and you will be taken to the settings section, where you will need to find the “Change advanced power settings” option.


- In the list of settings, select “Processor power management”.

- In it, select the “System cooling policy” sub-item.

- Set all settings to Active. Click Apply, then OK.

Now the fan will be constantly on, which will allow you to avoid unnecessary overcooling of the system and various “slowdowns”.
Video - How to set up automatic cooling on a computer or laptop?
If problems arise in the functioning of the cooling system, the first thing you should do is check the operation of the cooler. In most cases, such problems are associated with this particular part. To check the health of a laptop cooler, you do not need special knowledge or special equipment. This can be done at home in the following ways:
- Using the SpeedFan program;
- By connecting to another device;
If any problems are detected with the cooling system, it is recommended to eliminate them as quickly as possible to prevent overheating and subsequent failure of components. The methods presented below are suitable for laptops from a variety of companies: samsung, acer, asus, hp, lenovo, so you don’t have to worry about compatibility.
Checking through the program
SpeedFan is a special program for testing all installed fans, allowing you to quickly determine the condition and degree of performance of the device without disassembling it. Using this utility, the user gains full control over and can adjust the rotation speed at a particular temperature.
For this it is necessary:

Of course, you don’t have to change the language, because the SpeedFan interface is already quite understandable, and you can see which components have a normal temperature and which ones heat up too much. However, for maximum convenience, you should do all the above steps
Hardware check
The second option for checking the functionality of a laptop cooler is a hardware test by disassembling the laptop. Before you disassemble and find out if the fan is working, carefully review the disassembly instructions for your device so as not to spoil anything. If the laptop is still under warranty, then do not disassemble it yourself. It is better to take it to a service center so as not to lose the warranty. Experienced technicians will find and solve the problem that has arisen, and you won’t have to rack your brains about how to check whether the cooler is spinning.
If you decide to disassemble the laptop yourself, then keep in mind that it is not necessary to remove the fan. It is enough to gain access to the wires with which it could be connected to another device. This may help save you valuable time. To check if the cooler is working, you only need a USB cable with a plug on one side and two wires (+) and (-) on the other. Next, connect the wires of the USB cable to the fan wires (black to black, red to red), after which the USB cable is connected to another computer.

What do we get? If the cooler does not spin, then the whole problem lies in its performance, in which case it is required, but if, on the contrary, it rotates without any problems, then the reason for overheating is completely different. Alternatively, you should replace the thermal paste on the processor and carefully. If this does not help, you will have to contact a specialized service.

Now you know how to check the operation of the fan in two simple but effective ways. Choose the most suitable one and be sure that with their help you will definitely find the cause of the problem.
Not a very pleasant situation, but probably familiar to every experienced motorist: the car “boils”, the needle on the engine temperature indicator, for no apparent reason, creeps up. What to do? The very first thing is to immediately stop the car and turn off the engine, since its overheating can lead to jamming, with all the ensuing “delights” of a major overhaul. Well, now, it’s time to remember how to diagnose the cooling system, in particular, how to check the radiator fan. You need to check the bottom of the radiator by touch: if it is cold, there is a malfunction in the thermostat, if it is as hot as the top, everything is clear, most likely the fan is not working.
You should go from simple to complex, starting with the most banal reasons. For example, the integrity of the fuse. The replacement did not help - check the functionality of the electric motor by connecting the fan directly to the battery. In case of failure - only replacement. Check the temperature sensor by removing its terminals and short-circuiting them. If the fan starts working in this position, the sensor needs to be replaced. If this does not help, you should look for an open in the power circuit by checking the fan relay and electrical wiring. Sometimes it is easier to lay a new wire than to find a break in the old one.
Any driver should always remember that when deciding on issues such as how to repair, flush the radiator, how to check its tightness, how to connect the radiator, and many others related to the engine cooling system, one must fully comply with safety regulations. This is due to increased temperature and pressure of the coolant in the system, and the toxicity of the liquid. In addition, it is necessary to monitor the safety of the system elements, in particular the integrity of the radiator heat exchanger tubes. Well, if the car owner solves the problem of how to replace the heater radiator, then in this case, often, you will have to remove the interior parts of the cabin. That is, in addition to safety precautions, it is necessary to be careful when working so as not to disturb the interior design of the car. When changing the heater radiator, you should carefully ensure the tightness of the connections of the coolant passage channels. A leak of antifreeze in the cabin from somewhere under the trim is not the most pleasant sight.
A car radiator is a thoughtful design solution that takes into account many operational factors. Therefore, if a car enthusiast may have problems with minor repairs to the cooling system, flushing it, or filling small holes, then the question of how to disassemble the radiator should neither be asked nor formulated. It is impossible to “disassemble and reassemble” a radiator at home and achieve its full functionality. If such a question arises, most likely it’s time to replace the radiator with a new one. This will be more reliable, and taking into account possible engine breakdowns, it will also be much cheaper. When choosing a new radiator, many people think about which one is better – copper or aluminum. It's difficult to advise on this matter. Based on maintainability, copper alloys that can be soldered at home are preferable. Aluminum seems to have higher heat transfer and a lower price. It is worth realistically assessing your financial capabilities and repair skills.
Masters of home microclimate systems already have dilemmas - how to choose bimetallic heating radiators that combine the strength of steel with the high heat transfer coefficient of aluminum. It’s hard to keep up with the emergence of new technologies. Maybe someday car enthusiasts will be freed from an alternative choice, and will wait for radiators with the maintainability of copper and the price of aluminum?
You can check the functionality of the laptop cooler using the SpeedFan program or connecting it to another computer. Any problems found in fan operation must be corrected as soon as possible to avoid overheating of components.
Software check
You can make sure that the fan is working without using special software. It is enough to bring your hand to the hole of the cooling system on the case, having first loaded the system. Try, for example, to run a resource-intensive game - the noise from the cooler will indicate that the laptop is trying to cool the components.
If the fan cannot cope with the load and the component overheats, the laptop may freeze or turn off on its own. This is how the overheating prevention system works, but if it had to come into play, then the problem with the cooler is very bad, and it needs to be cleaned or replaced urgently. But this way you can only determine the fact that the fan is operating. You can find out whether it is functioning well through the SpeedFan program.
There is no need to change the language: SpeedFan uses icons to clearly demonstrate which components are heating within normal limits and which are too hot. For example, in the example given, the cooler cannot cope with cooling the processor, so there is a fire icon next to the CPU. 
Try to fix this using the SpeedFan program by increasing the laptop fan speed. Find the cooler at the bottom of the main utility window, which is responsible for cooling the CPU. If it is not running at 100%, increase its power to see if the CPU temperature drops. If even at maximum speed the fan cannot provide normal cooling of the laptop component, then it is necessary to determine the reason for the laptop overheating.
Hardware check
If it is difficult to understand whether the fan is working, you will have to disassemble the laptop and check its functionality. Before removing the cooler, read the disassembly instructions for your laptop model. If the laptop is still under warranty, then you should not disassemble it. Take your overheating problem to a service center to avoid voiding your warranty due to mechanical interference.
If you are still going to disassemble the laptop yourself, then remember that it is not necessary to remove the cooler from the case; it is enough to free the wires so that you can test the fan on another device. To check, you will need a USB cable with a plug on one side and two wires on the other, red (+) and black (-). It is necessary to connect the wires of the USB cable with the wires of the cooler - black to black, red to red. The USB is then inserted into another computer. 
If the laptop fan is spinning, then the cause of the increase in temperature must be looked for elsewhere. Try replacing the thermal paste on the processor and thoroughly cleaning the cooling system again.
Cleaning or replacing the cooler
If you get to the laptop cooler, you can try to clean it from dust or replace it yourself. Radiators with fans should be looked for in the hottest spots - near the video card, processor, hard drive. The cooler itself will be secured with screws. 
You can clean the fan using a regular napkin or a special brush. Then you need to remove the radiators and also remove accumulated dust from them. In principle, cleaning the cooler is complete; all that remains is to install the cooling system in place without mixing anything up. If you do not have experience in carrying out such operations, then it is better to immediately trust the professionals and contact a service center. 
It is recommended to carry out such cleaning regularly, even if you do not notice problems with overheating of the equipment. Close attention to the condition of the cooling system should also be paid if there are animals in the house or if renovation work has recently been carried out with “dusty” work - for example, rubbing down plastered walls. If after cleaning the cooler, your laptop's components are still not cooling properly, replace the fan with a more powerful one, or consider purchasing a cooling pad.