
How to run a windows 10 recovery disk. Windows System Restore
And so, you spend a pleasant evening at the computer - play, chat, surf the Internet, and Windows promptly carries out your commands. Everything is fine! Idyll! However, you should not think that this will always be the case. Know: the insidious Windows is preparing a dirty trick for you. She is just waiting for the moment when some urgent matters overtake you in order to... show you nothing. More precisely, it won’t boot.
Windows boot failure is an ordinary occurrence, but according to the law of meanness, it usually happens when the computer is really needed. So that the situation does not take you by surprise, it is important to prepare for it in advance. Let's talk about what to do if Windows 10 won't boot, why this happens, and what every user should have to solve this problem as quickly as possible.
Why won't it load?
The reasons for the “dozens” being unbootable can be software or hardware. Software problems are associated with the deletion (damage) of boot and system files and/or registry sections responsible for launching. They are usually to blame for:- Installing another operating system on another partition of the drive (the new OS replaces the old bootloader with its own).
- Experiments with disk partitions - compression, merging, partitioning, formatting, etc. A typical error, which is precisely a consequence of this, is “ ” (the system bootloader is compressed).

- Unskilled manual editing of the system registry.
- Using various “tweak cleaners” to speed up and decorate the system, which “accidentally” change the registry keys responsible for startup, patch files, etc.
- Windows updates installed incorrectly or the PC shuts down during the installation of updates.
- Viruses and antiviruses. Don't be surprised, the latter can cause no less harm than the former if used thoughtlessly. It's like swallowing pills indiscriminately, hoping that the right one will be among them.
- Faulty hardware drivers. Booting in such cases is usually interrupted by a blue screen of death, sometimes indicating the name of the driver that caused the problem.
- "Clumsy" applications in autostart. The failure occurs in the late stages of loading - shortly before the desktop appears.
Hardware reasons for Windows 10 not starting:
- Changing the order in which bootable media is polled in the BIOS (the computer searches for the Windows boot loader not on the system disk, but, for example, on flash drives).
- Connecting the drive to a port on the motherboard that is different from the one on which it worked before - if the failure occurred after removing and reinstalling the hard drive into the computer. It appears as an INACCESSIBLE_BOOT_DEVICE error on the blue screen of death.

- Faulty or poor connection of the system drive. Often appears with the message “ ” (bootloader unavailable) on a black screen. Sometimes - stops, restarts, BSoDs at any stage of loading.

- RAM malfunction. As with disk problems, it manifests itself with reboots and blue screens at any stage of startup.
- Failure of video subsystem elements. Windows may boot, but you won't see it because the screen will remain black. Sometimes you can tell that the system has booted only by a characteristic sound.
- Other hardware problems, such as motherboard, peripherals, etc.
It's better to prepare for the worst in advance
Since 80-90% of cases of Windows 10 not starting are due to software failures, today’s article is devoted to methods of dealing with them.So, to restore Windows to normal startup, you need to boot your computer into the recovery environment. If you have previously used Windows 7, then you know that this very environment is installed on the disk along with the main system. And to enter it, you need to open the menu of additional boot methods (by pressing F8 after turning on the computer) and go to the “ Troubleshooting».
The “top ten” also has a recovery environment, but since its loading time has significantly decreased compared to Windows 7, the interval when you can call the boot menu has also become much shorter. There is only one chance left at this time to press the desired key (more precisely, the combination of F8 and Shift): if the system is installed on an MBR hard drive and the fast startup option is disabled in the power settings of the PC or laptop. If the system is on an SSD or GPT hard drive, you will need bootable media.
For disaster recovery of Windows 10, it is optimal to keep its official distribution on a DVD or flash drive, and of the same bit size as installed on the PC. As an alternative, you can use the downloadable utility package MS DaRT 10 (Microsoft Diagnostic and Recovery Toolset for Windows 10 ).
MS DaRT distributions (formerly called “ERD Commander”) are officially distributed only through a paid subscription, but they are easy to find on the Internet. For example, on torrent trackers. Windows 10 images are available for download from .
As an example, I will use the home edition of Ten, recorded on a bootable USB flash drive, since it has everything you need.
Booting into the Windows 10 recovery environment
If the download fails, the “ten”, as a rule, tries to self-repair. When she succeeds, the user does not receive any notifications; it just takes longer to start the computer than usual. If unsuccessful, a message may appear on the screen, as in the screenshot below, but more often it will just be a “Malevich square” with or without a cursor, or a blue screen of death with a sad emoticon.
The failure option shown in the screenshot can be considered relatively favorable. By clicking, " Extra options"You will be taken to the recovery environment installed on your hard drive, and you will not have to boot into it from external media. But we will consider a more severe case, when the system does not show any signs of life.
Connect the media to your computer, reboot, and make it the first boot device.
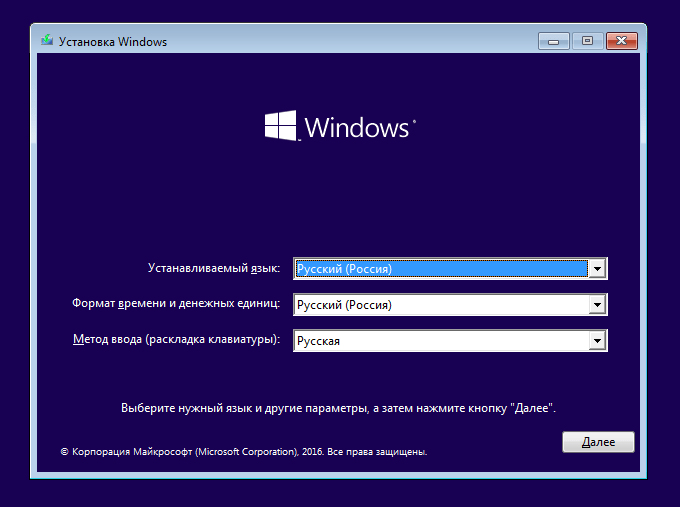
The window that you will see first after booting from a flash drive (DVD) will prompt you to select the system language. If Russian is selected, click " Further».

You will then be prompted to proceed to install or restore Windows. Click " System Restore».

On the screen " Action selection» click « Troubleshooting" Here you are.

Tens startup recovery options
In the recovery options section (screen " Extra options") there are 5 subsections:- System Restore. When you select this option, a standard Windows utility is launched. rstrui.exe, the purpose of which is to roll back the system to one of the saved checkpoints.
- Restoring the system image. Launches the Windows Deployment Wizard from a backup created by the OS's own tools.
- Startup recovery. Corrects errors in boot files and partitions.
- Command line. Allows you to run various system utilities.
- Return to the previous build. Rolls back to a previously installed version of the OS if it was updated to Windows 10.
Rollback to a checkpoint
Returning to a newly created checkpoint is the best first aid remedy for all types of system failures, including when you do not know their cause.
Clicking on the first item most likely launches the recovery utility you are already familiar with. All you have to do is select the date and time you want to rollback to and follow the on-screen instructions.

To use this option, you must have at least one saved checkpoint and a properly working system restore function. If the latter was disabled before the failure, skip this step and try other methods.
Startup Recovery
This option effectively helps in case of damage or deletion of boot files, for example, when installing an additional OS on another disk partition after Windows 10. And also in case of accidental formatting or other manipulations with the “System Reserved” partition.
Command line
The command line itself does not restore anything, but it makes it possible to launch other tools. So, with its help we can open Windows Explorer to see the installation location (partition letters in the recovery environment and during normal system booting usually do not match), run the system file error fixer, registry editor and bootloader recovery utilities.
If rollback to a checkpoint and auto-recovery at startup (the first and second options) did not give the desired result, a console utility often helps to raise the “tens” load BCDBoot. It recreates the hidden “System Reserved” partition and copies boot files from the Windows directory to it.
For BCDBoot to work correctly, you must specify the location of the Windows folder on your hard drive. To find out, you can use the utility Diskpart, but I think it’s more convenient to do this through Explorer.
So, to get into Explorer, open the command line and run Notepad in it ( notepad).

While in notepad, go to the menu “ File", select " Open" and go to the folder " This computer" Next, let's go through the disk partitions and determine which of them contains the system directory. In my example this is drive D.

Next we return to the command line and execute the instructions:
BCDboot D:\Windows

Please note that your path to the system folder may be different.
In 80% of cases, this is enough for the “ten” to start normally. But in about 20% of cases the command does not work correctly - it does not restore all boot files. To help the utility a little, before executing the instructions on the command line, you need to format the reserved boot partition (in my example, drive C) in FAT32. This can also be done using diskpart, but I find it more convenient through Explorer.

The following two console commands recreate the boot records of the entire drive (MBR) and the system partition (VBR). They are used to solve problems with running Windows on MBR disks.
Execute commands one after another in this order:
bootrec/fixmbr
bootrec/fixboot

If you accidentally run them on a GPT disk, nothing bad will happen.
In some cases, startup problems arise due to damage not to boot files, but to the main system files, for example, after a virus attack. As you may know, there is a special utility in Windows to fix them Sfc.exe. So, thanks to the command line, you can also run it in the recovery environment.
The command to find and fix errors in protected system files in the recovery environment looks like this:
sfc /scannow /offbootdir=D:\ /offwindir=D:\
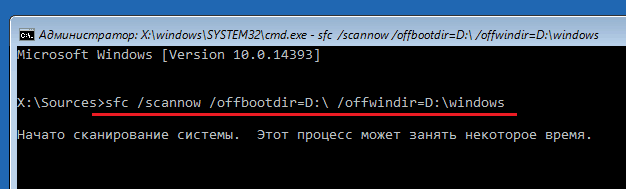
Parameter offbootdir determines the location of the main boot partition (in my example, as you remember, this is drive D), and offwindir– path to the system folder.
Using the command line, you can also fix registry errors on an unbootable system. But, unlike previous instructions, this requires certain experience and qualifications, because the user needs to know exactly what to correct and what erroneous entries should look like normally.
I will not dwell on registry errors that lead to Windows 10 boot failure, since this is the topic of a separate large article. I will only describe the method for launching the editor RegEdit.exe in the recovery environment and open the registry files in it so that you have the opportunity to fix the errors that you are aware of.
So, to launch the editor, write the word on the command line regedit and press Enter.
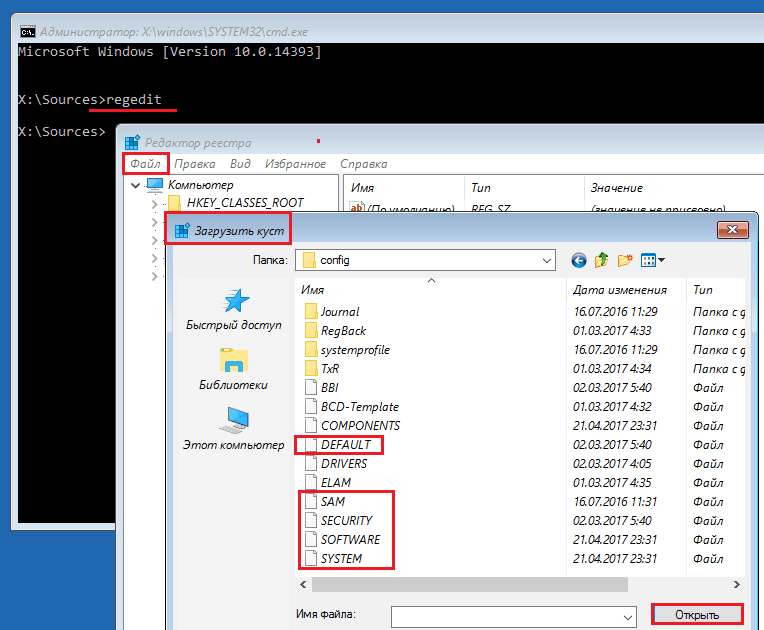
You will see that in the utility window that opens there is already some kind of registry, but not the one you need. Before us is our own registry of the recovery environment, and we are interested in the main system.
To load Windows 10 registry files into RegEdit, select the section in the left half of the editor window HKEY_LOCAL_MACHINE or HKEY_USERS, open the menu “ File" and click on the item " Load bush».
In the Explorer window that opens after this, go to the folder D:\Windows\System32\Config(your drive letter may be different) and select the desired file.
Files without an extension in the \System32\Config folder are the components (hives) of the Windows 10 registry. The main ones are circled.
Give the hive any meaningful name (it will be temporary until you unload it) and click OK.

Next, we will open the section into which we loaded the bush, and here it is - in front of us, available for editing. In my example this is the registry file software, which I temporarily renamed to soft_win_10.

After making the edits, go back to the editor menu “ File" and click " Unload bush».
Return to previous build

When reverting to a previously installed build, the user's personal files will remain intact, but everything done since the update will be undone.
Restoring a system image
Restoring an image from a backup helps restore the system to functionality in case of any problems, but the problem is that almost no one creates these images.If you are an exception to the rule and the happy owner of a relatively recent backup copy, select the item marked in the screenshot from the list of parameters,
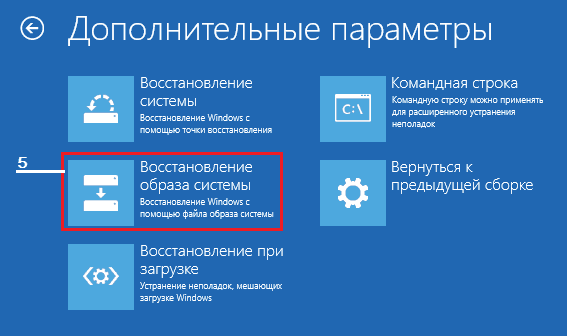
Tell the recovery program where to store the image and follow its instructions.

All data from the inoperative OS will be replaced with working copies from the archive. If it contains user files, this will also affect them.
Happy recovery!
Also on the site:
Windows 10 won't boot: why this happens and how to restore startup updated: April 23, 2017 by: Johnny Mnemonic
If you are interested in restoring Windows 10, then you have come to the right place.
Let's figure out how to get Windows 10 back up and running without using third-party programs.
System Restore
This option will help correct errors that appeared after installing software, Windows updates, changes in the registry, and similar actions.
The Resume feature allows you to return registry settings and protected system files to a previously saved state - to one of the checkpoints that Windows creates automatically.
The user's documents are not affected.
Regeneration points in the “tens” are created before installing programs, drivers, system updates, or simply once every 7 days. In addition, the user can create them manually.
Procedure
- Go to the Control Panel, open the “Recovery” applet and select “Run System Restore” from the list of commands.
- Select the checkpoint created before the failure and click Finish.

- While the task is running, the computer will restart. After 5-7 minutes, Windows 10 will return to the state that preceded the problem.
Resuming the system is also available when Windows 10 does not start. If the download fails, you will see the following instead of the welcome window:

By clicking the “Additional recovery options” button, you will be offered a choice of action. Here you need to click on “Diagnostics”.


After this, a familiar window will open asking you to select a control point. Follow the instructions and wait for the wizard to finish.
Restoring your computer to its original state
This option can help you deal with errors that System Resume does not resolve, or when appropriate checkpoints are missing or not created.
Restoring Windows 10 to its original state can be done:
- With saving user files and a number of pre-installed programs. In this case, all system settings, drivers and software installed by the user will be reset.
- Without saving personal data, programs and settings. This option returns the system to the state it was after a clean installation. No user information will remain in it.
Important! On computers and laptops where Windows 10 was installed by the manufacturer, a third option may be available - restore to factory settings. This deletes not only user data and settings, but also the contents of non-system hard drive partitions.
Returning to the factory state without saving personal information is used as a last resort - an alternative to reinstalling the system in case of intractable failures, as well as before selling the computer or transferring it to another user.
How to reset Windows 10 to its original state
- Open the Start menu and click the Settings button.

- Select Update & Security from the list of options.

- Next, select "Recovery".

- In the "Reset your computer" section, click the "Get Started" button.

- After that, select the option you need: “Keep my files” or “Delete everything”.

In about 40-60 minutes, Windows 10 will be up and running again.
Rollback to a previous version of the system (Windows 7 or 8)
This method is available only to those who installed the “ten” in the order of updating the previous OS - “seven” or “eight”. And it is possible only within a month after the update.
In this case, the user’s files in personal folders, drivers, software and settings of the previous system will be saved, and everything that was in Windows 10 will be deleted.
To roll back to the originally installed OS, launch the Settings application from the Start menu, open Update and Security, then Recovery and select Return to Windows 8.1 (7).

If this item is not in the list of parameters, then the function is not available. It will also be unavailable if the user has deleted the Windows.old folder from the system partition of the hard drive.
Reinstalling Windows 10 from a recovery disc
This option will be useful for those who have created a regeneration disk in advance. It stores a backup copy of the system with working parameters.
To create a recovery disk, you must do the following:
- prepare a blank DVD or flash drive (the minimum storage capacity is determined individually) and connect to the computer;
- open the “Recovery” section in the control panel, select “Create a recovery disk” and follow the instructions.

The finished Windows backup media should be stored in a safe place and not used for anything else.
How to restore Windows 10 from a backup
If the system boots, open the Settings app -> Update & Security -> Recovery and Reset your PC.
After rebooting into the recovery environment, select the “Diagnostics” and “System image recovery” sections.

Advice! If the system does not boot, you need to start the computer from the distribution disk, but instead of installing (Install now), select “Repair your computer”.

- Select the system image for the required number.
- If necessary, specify additional options, such as disk formatting.
- Confirm your consent to the rollback and wait for it to complete.
Windows will be automatically restored, saving user files, software and settings. The system state will be the same as when the backup was created.
Windows 10 boot repair
Resuming the Windows 10 boot loader is also performed by starting the PC from the Tens installation disc.
The procedure is as follows:
- Connect the drive with the Windows 10 distribution to your computer.
- Instead of installing, select "Repair your computer."
- In the Select Action window, click Diagnostics.
- Next, in the list of additional options, select “Startup Repair.”

In some cases, automatic startup recovery does not produce results. Then manually overwriting the bootloader files and boot partition of the hard drive can help. How to do it:
- Open Command Prompt in the Advanced Options window.

- Follow the instructions bcdboot.exe X:\Windows, Where X:- letter of the system partition on the hard drive.
In the Recovery environment, partition letters often do not match those assigned in Windows. To determine them, you can use the console utility Diskpart from the system distribution.
Type in the command line one by one:
Diskpart
List disk
Sel disk 0(or 1, 2, 3 - depends on where the bootloader is located, if there are several physical drives on the PC)
Detail disk

In our example, the boot partition is assigned the letter C, which means the recovery command is written like this: bcdboot.exe C:\Windows.
To fix boot failure on hard drives with MBR partitioning, you need to run 2 more commands in the console: bootrec/fixmbr And bootrec/fixboot. The boot partition code will be overwritten.
How to restore Windows 10 system files
To restore protected system files in Windows 10, use the application SFC.exe, launched on the command line with the parameter /scannow.
Scanning and fixing takes about 20-40 minutes.

When SFC completes, a report (CBS.log) will be generated and saved in the C:\Windows\Logs folder. From it you can find out which files were damaged and restored.
Windows 10 Recovery
Despite the fact that Windows 10 is highly efficient and stable, it may need to be restored
Windows 10, like previous versions of this operating system, is not completely protected from failures, the effects of computer viruses, hardware failure and other problems. Therefore, if you have problems operating or loading the OS, you can use the built-in tools to return the operating system to a working state.
There are several ways to restore Windows 10.
If the computer boots:
- Using a restore point.
- File history.
If your computer won't boot:
- Using a recovery disk.
- Using the installation disc.
Now let's look at these recovery options in more detail.
Method 1 – Using a System Restore Point
Windows periodically stores information about programs, system settings, drivers, the registry, and drivers in system restore points. This occurs before significant changes to the OS, such as installing programs, drivers, or system updates. You can also create a restore point manually. You can read how to do this in.
It is worth noting that after recovery, your data will remain intact, and drivers, programs and updates installed after creating the restore point will be deleted.
1. Launch the system properties window (keyboard shortcut Windows + Pause) and open the item "".
2. Click the button Restore", and then "Next". In the list of available recovery points, select the desired item and click “Next” again.

3. Check the selected parameters again, click the " Ready" and then "Yes" in the warning window. The recovery process will begin and the computer will restart.
Method 2 - Reset to factory settings
Windows 10 has the ability to return system settings to their original state. In this case, you can do a complete reset or save user files. The advantage of this method is that if you want to reinstall the system, you do not need to install Windows from scratch, just perform a reset.
To use this function, you need to go to the following section: “ Computer Settings -> Update and Security -> Recovery -> Restore your computer to its original state" and click the "Start" button.

We discussed the factory reset process in more detail in this article:
Method 3 – File History
This method is not directly related to system recovery, but in combination with other methods it can also be useful.
File History allows you to back up your files automatically and manually. You just need to activate this function and specify which folders you want to save. The system will automatically backup your documents at a frequency that can be configured. If necessary, you can easily restore files to the version you need.

You can read how to enable, configure and use this tool in this article:
Method 4 – Using a recovery disk
If Windows 10 won't boot, you can try resuscitating the system using a recovery disc, which will allow you to access additional startup options.
If you don't have a recovery disk yet, use these instructions:
After booting from the USB recovery drive, go to the " Diagnostics -> Advanced options».

Here you can use several options for resuscitating your computer:
- Restoring Windows using a restore point. We have already discussed this option above. Its meaning is the same, only it is launched in a different way.
- Restoring the system image. This method has been known since Windows 7. If you previously created a system image in Windows, you can easily restore it using a recovery disk. How to create a system image in Windows 10 can be read here:
- Using the following point, you can try to automatically fix boot errors.
- For more advanced users, it is possible to launch the command line for system recovery or other purposes.
- Well, the last option is to return Windows to the previous build.
It should also be noted that if, when creating a system repair disk, you burned system files to the disk, then you will have the opportunity to reinstall Windows from this disk. But if you bought a computer with Window 8 (8.1) pre-installed with a hidden recovery partition, then the version of the system that originally came with the computer will be restored.
Method 5 – Using the installation disk
If Windows won't boot and you don't have a recovery disk, you can use the installation disk to resuscitate your computer.
You can burn the installation disc to a USB drive or DVD using the media creation tool that you can download.
After booting from the installation media, you will see a window in which you need to select language options and click the “Next” button.

- Restore the computer to its original state. A factory reset will be performed with or without saving user files. We have already discussed this tool above (method 2).
- Extra options. Just like on the system repair disk, a list of tools will open that can help you restore Windows functionality using restore points, a system image, etc.

We looked at the main methods of restoring Windows 10. Usually they are quite enough to return the system to a working state. It was also possible to add a clean installation of Windows here, but this is already an extreme measure and is indirectly related to system recovery.
Mid-summer 2015 was marked by the release of the much-anticipated Windows 10 operating system. Consumers were able to get it by downloading a free update. Which is offered by every computer with Windows 7 and 8.1 installed. The new version has designated itself as the most reliable. But like any mechanism, it can sooner or later fail. Older versions offered different ways to fix errors. Windows 10 was no exception. How to return it to working condition or correct errors is described in this article.
The operating system itself offers users a wide choice of recovery methods. First, you will need to diagnose the suspected problem with Windows 10. For example, if the computer does not boot or freezes a lot, then you should use the troubleshooting tools that are present on the installation disks. If the operating system still loads, but does not work well or often freezes, then you can use the system itself to return to working condition.
There are three main methods for restoring system functionality, each of which is suitable in different situations based on the diagnosis of the problem itself. All of them are known and are similar to the methods that were in older versions of Windows:
- return to original parameters;
- restore point;
- return to working condition using an OS image;
- Windows 10 boot disk;
Correction using the "Restore Point" method
The most common method that does not require much knowledge in information technology is to use restore points. To use this method, the user needs to click on the notification tab, then select the following items: “All settings” - “Update and security” - “Recovery”.
You can also get to this menu even without completely loading the OS. To do this, after the welcome screen appears, where the computer prompts you to enter a password, you need to click on the power icon and hold down the Shift key. After a couple of seconds, a window will appear in which you need to select the “Diagnostics” item and go to the “Reset to original state” tab.
To start fixing problems in Windows 10, in the “Restore to original state” item, click on the “Start” button. After this, a dialog box will appear that will offer two options for reinstalling the OS:
Method by deleting all files and completely reinstalling the OS
This method deletes all old owner data and Windows 10 settings. After which all necessary drivers and the operating system itself are installed. All actions occur automatically - this prevents errors that may occur due to the human factor.
The disadvantage of this method is that it will not be able to resurrect the OS if there is damage on the hard drive. This will require other methods.
OS with storage of personal data
The method returns the computer to its original form, but at the same time retains all the owner’s data. During this correction, files stored in the users folder (sections such as “Documents”, “Images”, “Downloads”, etc.) are not formatted. But at the same time, all programs that were previously installed will be deleted. 
Restore point
This method has been used for many years by Windows. The system points for fixing a non-working OS are known to many, but few know how to check or enable them. They help the computer owner get things working in case of unsuccessful installation of a driver or other programs that lead to Windows 10 failure.
To make sure that the program creates such points on a schedule, the user needs to go to the “System Setup and Recovery” menu. To do this, right-click on the “Start” button and select the following items one by one: “Control Panel” – “Recovery” – “System recovery settings”. 
Typically, point creation occurs automatically on a schedule, and this feature is enabled by default. But the owner can always change most of the parameters independently by clicking on the “Customize” button.
All recovery points are created automatically when any important software settings and parameters are changed, as well as various services, program installations, etc. In case of experiments or other dangerous situations, the owner can create a record of the system state himself.
If Windows 10 does not work well after installing a program or driver, then by going to the appropriate item, you can return it to its original state. To do this, select the “Start system recovery” section, where the user can select the date the point was created. Having agreed to the changes, you should click the “Continue” button, after which the OS will return to the state that was saved earlier.
Creating a full Windows 10 recovery image
The developers have left a function for creating a complete OS recovery image on a hard drive (built-in or external) or on several optical DVDs.
The difference from the previously used option is that the process creates a complete reflection of the operating system, including all installed programs, necessary drivers, and individual settings that are relevant when loading the image. In the previous version, the user could only receive the OS installation file and save personal data.
It is best to create such a file immediately after the complete installation of the OS, all drivers and necessary programs, when the computer is fully configured and not cluttered with unnecessary files and applications.
To record this image, go to the “Control Panel” menu, here open the “File History” item. In the lower left part of the window, select the line “Backup system image”, then “Create a system image”. An alternative way: go to the “All Settings” menu, select “Update and Security”, then the “Backup Service” line, in the window that opens, click “Activation and Recovery (Windows 7)”, then “Create a system image”.
In the menu that appears, the user can independently indicate the path where the created file should be saved: options will be offered: to a hard drive, to a DVD drive or to a network folder, select the one you need, and you can also mark the items and partitions on the disks that need to be included in the backup copy , and which ones to remove from it. Most often, this is the section occupied by the OS itself and the software parts of the disk. 
Subsequently, the resulting file can be used to quickly return the computer to the desired state. You can launch this function from the image itself from the disk on which it is saved, or select the “Recovery” menu in the program. To do this, you need to go to the “Diagnostics” window, select the “Advanced options” line, and then “System image recovery”.
Windows 10 boot disk
Resuscitation work can be carried out either from a bootable CD/DVD disk or from a flash drive.
In older versions of Windows, a specialized disk with a set of repair utilities was used. In a modern OS, this is a full-fledged disk with Windows 10 and various recovery programs.
For security, the user can create such a disk himself using the built-in tools of Windows 10. To do this, go to the “Create a recovery disk” menu.
This feature is also useful for quickly installing the system. To do this, you need to select the item that makes a backup copy with a complete copy of all program files.
To launch such media, you need to restart the computer and first, before loading the OS, go to bootmenu and select the desired disk. Or this function can be configured in the BIOS, indicating from which media the boot will take place.
After saving the settings, the installation welcome window should appear. Here, you need to select System Restore, then the “Diagnostics” section. This will allow the user to fix the system in several ways: 
- Command line – here, you can correct errors by manually entering commands and launching various utilities. This method is suitable for advanced users.
- Restoring the OS from an image - boots from a previously saved image.
- Restore point – loaded from a previously saved system state.
- Startup Repair – Fixes any important program files that may have become corrupted.
- You can also go into the BIOS to fix or make changes to system settings.

Having such a device, the user can protect himself in many matters. An advantage can be considered the quick installation of Windows 10, with existing drivers on board.
As can already be seen from the above, Windows 10 offers a very large selection in correcting system errors. Even an inexperienced user can master them. They have the simplest and most convenient mechanism for interacting with a person.
Many may argue that there are now a large number of products on the software market aimed at fixing the OS. They also have a convenient and intuitive interface. The flexible data saving algorithm is more advanced than in the operating system itself. All this gives the green light to third-party programs. But, as a rule, they cost a lot of money. Therefore, it would be good practice for the owner to know how to revive Windows 10 using the system itself.
In contact with