
How to reduce the expansion of a scanned document. How to reduce the size of a pdf, detailed instructions. Using Adobe Reader
PDF files with lots of graphic elements look nice, but sending them by email is a complete pain due to the large size of such documents. There is no need to wait long for the file to be attached to the letter, because you can reduce its size with virtually no loss of quality. Fortunately, there are plenty of ways to do this - choose whichever you want.
It is worth noting, however, that half of the methods listed below are only possible using Acrobat DC from Adobe installed on your PC. This is a paid product, but the 30-day trial version is completely free. It is available on the official Adobe Systems website.
Using CutePDF or another PDF converter
You can reduce the size of a PDF file using one of the converters, for example, CutePDF. It allows you to convert files from any printable format to PDF, as well as change the document size, increasing or decreasing the quality of images and text. When you install this product, a virtual printer is created on the system, which, instead of printing documents, converts them to PDF format.
1. Download CutePDF from the official website (free) and install. Don’t forget to install the converter along with it, otherwise nothing will happen after clicking the “Print” button.
2. Open the file in a program that supports its format and has the ability to print documents. If it's a PDF file, you can open it in Adobe Reader; and if the file is in doc or docx format, Microsoft Word will do. Click on the “File” menu item and select “Print”.

3. When the printing settings window opens, select CutePDF Writer from the list of printers.

4. Click on the “Printer Properties” button, in the window that opens, click on the “Advanced” button and select the content display quality. To compress the file to the desired size, select a quality lower than the original quality.

5. Click the “Print” button and save the file to the desired location. Only PDF is available for saving, regardless of what format the document was originally in.
Using online tools
If you don’t want to download and install anything, then you can compress the PDF file online. Compressing and converting documents online is fast and convenient.
1. Find a suitable tool on the Internet, such as Smallpdf. Unlike other similar online tools, here the user is not limited in the size and number of documents he can upload.
2. After visiting the website, upload the required document. This can be done by clicking on the label and selecting the file using Explorer, or by dragging the file with the left mouse button and dropping it in the desired area. You can also add a document from Dropbox or Google Drive.

3. When the process is complete, click on the “You can save the file” button and select a location on your PC for it. To upload a compressed document to Google Drive or Dropbox, click the corresponding icon on the right side of the button.

In addition to Smallpdf, there are many other online compressors on the Internet: Compress PDF, Online2pdf, PDFzipper and others. Some allow you to upload files up to 50 MB in size, others - up to 100 MB, others have no restrictions at all, but they perform their work at approximately the same level.
In Adobe Acrobat
You can compress a PDF file in Adobe Acrobat DC, but not in the free Adobe Reader.
1. Having opened the document in Acrobat, click on the “File” menu item, then select “Save as another” and click on the line “Reduced PDF file”.

2. Click in the drop-down list on the version of the program with which your document should be compatible. By choosing the newest version, you can compress the file as much as possible, but there is a risk that it will become inaccessible in previous versions of Acrobat.

3. Click on the “Ok” button, wait for the compression process to complete and save the compressed document to the desired location.
Another PDF compression method in Adobe Acrobat DC
If you have Adobe Acrobat installed and need to compress a document located on your PC, it is much more advisable to use the previous method. The same method can be used when the desired file is uploaded, say, to Google Drive, and you need to download it, simultaneously reducing its size.
1. Log into Google Drive from your account, double-click the PDF file you want to compress, and click the printer icon to open the print screen.

2. In the window that opens, click on the drop-down list and select the Adobe PDF line.

3. By clicking on the “Properties” button, you will open another window where you need to select the “Paper and Print Quality” tab, and then click on the “Advanced” button at the bottom of the window.

4. In the drop-down list (see screenshot below), select the desired document quality, at the bottom of the window click on the “Ok” button, then in the next two windows also click on “Ok”.

5. Save the reduced file on your PC.

Using Adobe Acrobat and Microsoft Word
The essence of this method of compressing PDF documents is that you first convert the file from one format to another, and then convert it back.
1. Open the PDF document through Adobe Acrobat, go to the "File" menu and select "Save As".

2. Click on the “Select another folder” button, then select the file type “Word Document (*.docx)” and save location. Click on "Save".

3. Having opened the document in Microsoft Word, click on the “File” item and select the “Save as Adobe PDF” sub-item.

Using PDF Optimizer
This method of reducing the size of PDF files also requires the use of software from Adobe Systems.
1. Open the document you want to reduce using Adobe Acrobat. Next, go to the “File” menu, click on the “Save as Other” line and select “Optimized PDF File” to launch the PDF document optimizer.

2. In the “PDF Optimization” window that opens, click on the “Estimate space usage” button to understand which elements take up how much space in the file (in bytes and percentage).

3. Having assessed what can be reduced and what does not make sense to compress, close the window by clicking on the “Ok” button and set the necessary compression parameters. To do this, in the left part of the window, left-click on one or another item, and in the right part, change the parameters.

4. You can delete images, change them from color to black and white, compress them, change resolution, change built-in fonts, etc. Having “played enough” with the parameters, click on the “Ok” button and save the optimized file to the desired directory.
A way to compress PDF files on Mac OS X
PDF documents created by the Mac OS X operating system are noticeably larger in size than files with the same content created using Adobe Acrobat. If you are a Mac OS X user and want to reduce the size of the PDF file you create, do the following:
- Open the TextEdit application, then click on “File” in the program menu, and then select “Print”.
- In the lower left corner of the window that opens, you will see a button called PDF. Click on it, and then on the line “Compress PDF” in the drop-down list. The result is a more compact PDF file.

Archiving a file
To ensure that the document takes up less space on your computer, you can archive it using one of the archivers, for example, 7Zip or WinRAR. Both programs are quite popular, but the first is distributed free of charge, and you will have to pay to use the second beyond the limited trial period.
To compress a document using the 7Zip archiver, right-click on the file, then with the left mouse button, first click on the 7Zip line, and then on the inscription “Add to “file_name”. Then the archive will be created automatically.

If you want to set certain parameters before archiving, select the “Add to archive” line. Then a window like the one in the screenshot below will open.

By using an archiver, you can significantly reduce the size of a document, as well as create an archive consisting of several files, compressed and combined with each other. This will make it much easier to store and transmit them via email. Just before sending an archived PDF file, make sure that the recipient also has an archiver installed, otherwise he will not be able to open the archive.
Note: Adobe Acrobat and Adobe Reader are not the same thing. Reader is free, but its feature set for editing PDF files is extremely limited, so you can only reduce the size of documents in Acrobat. However, Adobe Acrobat is a paid program. And if you don’t have it and don’t want to buy it, use other options for compressing PDF documents that are not associated with it.
Very often there is a need to reduce the size of a JPG file - photos, scanned documents, other images.
Why do you need to reduce file size?
This allows you to significantly save disk space when storing archives and speed up the process of transferring image files by email. Often it is necessary to bring a photograph to the minimum volume required by some programs, above which photographs and drawings are simply not accepted. The first way to reduce the memory footprint of an image is to convert it to JPG format, which itself is already a compressed image. But this is not enough. Let's figure out how to reduce the size of a JPG file.
Reducing File Size in Paint.NET
The Paint.NET software product (not to be confused with the standard Paint graphic editor of Windows operating systems) is freely distributed on the Internet. It “weighs” a hundred times less than the widely used Photoshop, downloads quickly and takes up almost no disk space. The presence of a clear interface in Russian, the ability to quickly change the size, format and resolution of graphic files gives it the right to take its rightful place among your constantly used tools.

How to reduce JPG file size using this program? It’s very simple - launch the program, drag the file you are editing onto its workspace with the mouse. In the main menu of the application, select "Image" - "Resize". In the window that appears, adjust the resolution according to your preferences. Make sure that the “Maintain proportions” option is checked. Click "OK".
To change the format and quality level of the picture, select “File” - “Save As” in the main menu, set a new name, select and click “OK”. Please indicate the picture quality level. When the level changes in the range of 95 - 100%, the visual perception of the image remains almost unchanged. This can be seen in the preview window to the right of the menu, where the final file size is also displayed. After selecting the required image quality (and volume) value, click “Save”. Job is done.

How to reduce the size of a JPG file in Photoshop
Adobe Photoshop application of different versions allows you to reduce the size of images without losing their quality. This is especially important when saving photos for publication online. After loading the photo file into the program, make corrections to its color rendering, contrast and saturation, if you consider it necessary. Then proceed to resizing: select the menu item Image -> Image Size. The current image dimensions will appear in the window. To change them, enter new values in the Width and Height fields, you can only in one of them - the second value will change proportionally. Then select the "Save for Web" option from the File menu.
In this case, the application will independently optimize the photo for publication on the network, reducing its disk space at the dimensions you specify.
When saving a photo, select JPEG High. If you are satisfied with the resulting volume, save; if not, change the image quality settings with the slider at your discretion. After all the manipulations, save the photo under a different name - it is ready for publication.

Working with the PicPick editor
You can change or reduce the size of a JPG file with PicPick image capture. It is also freely available on the Internet. The capabilities of this application are wide. It allows you to capture the entire screen or part of it, add inscriptions and drawings to the image, combine different fragments of images, convert the image format and many other functions.
Resizing images is achieved as follows: upload a picture, for example, by selecting the Open menu item. In the Image menu, select Resize and in the drop-down menu, select Image Resize/Zoom. There are two options here: change the size by percentage (both larger and smaller) or change the number of pixels along the width or length of the image.

In the latter case, if the “Keep aspect ratio” item is checked, it is enough to change only one of the sizes, the other will change automatically. It is also possible to resize the image to one of the most common sizes by selecting the required one in the lower form window. Click OK. Save the result in the desired location, in the required format and under the name you need.
We hope that after reading this article, the question of how to reduce the size of a JPG file will forever be resolved and you will be confident that you will be able to perform this simple task with respect to your graphic files at any time.
There is often a need reduce the size of a PDF document, which has already been created. For these purposes, the easiest way is to use Adobe Acrobat (Standard or Professional versions). For example, Adobe Acrobat 7.0 is now available for free download on the Adobe website (registration may be required). Please note that a regular PDF viewer (i.e. Acrobar Reader) is not suitable for these purposes! What you need is a PDF document editor.
For information. A PDF file cannot be reduced if it is made of vector objects, i.e. for example from text applications Microsoft Office (Word, Excel) or AutoCAD - because Vector graphics always take up minimal space compared to raster graphics. Therefore, this solution will most likely help you a lot only when compressing SCAN documents into PDF, i.e. created from bitmaps.
So, open the PDF file that needs to be compressed, go to the menu "File" - "Save as another" and select the item "Reduced PDF file size":
Next, you need to select the version with which the resulting compressed, reduced PDF file will be compatible. The newer the version selected, the smaller the file size will be. But keep in mind that if you select, for example, version "Acrobat 10.0 and higher", the file may not open in version 7, 8, or 9, i.e. previous ones. But now most users use Acrobat Reader version 10 and above, so there should be no problems. And if not, then a newer version of the PDF viewer can be freely downloaded and installed.

By the way, you can use this opportunity if necessary Reduce the PDF size of several files at once! It’s very convenient when there are a lot of them, so as not to open each one separately:

After clicking the "OK" button, select a location to save the finished reduced PDF file, and give it a name. Due to some loss of quality, the document will take up less space than usual.
The question of reducing the file size in pdf format is often raised by active computer users. This is due to the large weight of the scanned images. Because of this, the document takes up hundreds of megabytes on disk. Let's look at the problem in more detail.
Using Adobe Reader
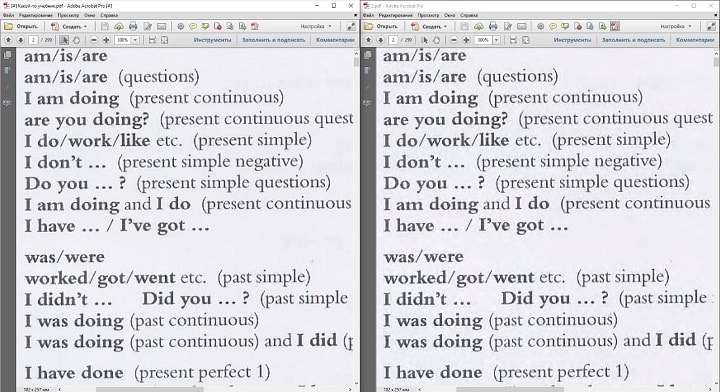
You can reduce the size of your document using the free version of Adobe Acrobat Reader. The compression feature is only available with a paid subscription. The utility is installed without any problems, so let’s get straight to work.From the initial menu, go to the “File” tab. Click on “Open” and select the document. In this example, we will use a textbook weighing 69.9 MB. It consists entirely of scanned pages of the printed publication. You can also open a document by clicking on it in the file manager. Go to the menu shown in the screenshot.

Leave the default values in the called window. Select a location to save the compressed pdf. The example file now weighs 33.3 MB. The compression took about two minutes. The quality of the images has deteriorated. This may not be noticeable on a website or computer. However, after printing, the illustrations will be fuzzy or completely blurry. The disadvantage of this method is that there is no flexible setting for an advanced user.
If you need to set additional parameters, the optimizer will help. Open the document we need. Click on the button shown in the illustration below.

There are few settings, but they look difficult to master. Let's define the main ones. They are located in the left menu “Images”. Downsampling determines the resolution of images. To the right of the parameter you can set ppi (pixels per inch). Highly not recommended for printing. It is recommended when placing illustrations on the site. Below you can set the compression type. ZIP is used for simple images with a predominance of one color. JPEG - for any images. Its improved version is JPEG2000.

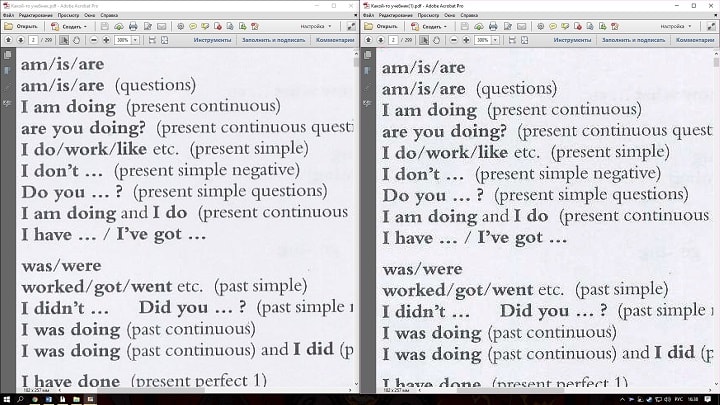
After setting, select a location to save the file. Let's compare the quality of the optimized document and the original. On the left is the original file, on the right is the compressed file.
Changes in quality are invisible even when the image is enlarged three times.
Using third party software
PDF Compressor is suitable as a free analogue.
The intuitive interface and light weight of the program will appeal to any user. In the upper left part of the window, you must click the “Add Files” button to open the document. You can also drag the file directly into the program's work area.
To optimize, click “Start Compression”. The button is located at the top center. First you need to set the compression parameters by clicking the “Compression Settings” button.

After opening the settings menu, you will be notified about purchasing a license. It is needed to fine-tune the compression. Click “Continue” and check the boxes in the “Compression” and “Optimization” tabs. Close the window and click “Start Compression”.
During the compression process, the weight of the example textbook decreased from 69.9 MB to 56.9 MB. Let's compare the quality. On the left is the document before optimization, on the right is after.
The result is worse than Adobe Acrobat Reader. There is now noticeable distortion in the compressed file. The advantage of the program is that you can compress the file absolutely free. As a result - worse quality and larger size. The utility logo is also added to the first page.
Using WinRAR
WinRAR is a free program with the option to purchase a license. Designed to place files in an archive and then compress them. The quality does not change. The original can be retrieved from the archive at any time.The utility work area displays your computer's file system. Select the folder to create the archive. Click on “Add”. The button is in the upper left corner. Here is the archive settings menu.

We are interested in the “Compression method” drop-down list in the “General” tab.

Their names speak for themselves. High-speed, less time-consuming, also has a low compression ratio. Maximum has the opposite characteristics.
Documents are added from the “Files” tab.

The file from the example was compressed in a few seconds. The file weight has changed from 69.9 MB to 68.3 MB. Conclusion: WinRAR does not work well with pdf files. The advantage of the program is that the original is preserved unchanged.
Using the online service ILovePdf
A convenient solution is web services for working with pdf files. ILovePdf can not only edit the contents of a file, but also reduce its size.
We start by clicking the big red “Select PDF files” button. An explorer will open where we specify the path to the pdf document.

After selecting it below, the compression settings will appear. They don't need any comments. Let's leave the recommended parameters. At the very bottom there is a “Compress PDF” button. Let's click on it.
After the compression process, we get to a new page and click on the big red button again.

In the screenshot above we were also informed about changes in document weight. Instead of 69.9 MB, the textbook now weighs 55.9 MB. The result is similar to that of the PDF Compressor application. The difference is that you don’t need to download or install anything. Let's compare the quality. On the left is the optimized document, on the right is the original.

A slight loss of quality is noticeable; it does not affect the perception of information.
Using the SmallPdf online service
This service allows you to download files from Google Drive or DropBox. From a computer, documents are sent through Explorer or by dragging a file into a browser window.
Click on the big red button. To reduce the file size in pdf format, you don't need to click anything. It happens immediately after loading. Then download the document by clicking on the “Download file” button.

From the service, the document can be sent to Google Drive or DropBox (adjacent buttons). The illustration shows the volume of the compressed document. The file size has changed from 69.9 MB to 59.2 MB. Slightly more than the previous service. Let's check the quality. On the left is the compressed pdf, on the right is the original.

SmallPdf was able to compress the file with virtually no loss of quality. The downside of the service is the lack of compression settings.
To conclude, archivers do not work well with PDF documents, and the best compression method is online services and the standard Adobe tool.
Reading time: 6 minutes. Views 16.2k. Published 12/29/2016
If you are faced with the task of how to reduce the size of a JPG file, then let's try to figure out this situation together. Very often, the image size needs to be reduced so that photographs or pictures do not take up much disk space. Many users often send a large number of photos by email, but as a rule, all mail servers have a limit on the amount of information in one letter.
Because of this, many people are unable to send images in an email, thereby falling into a stupor and not knowing how to get out of the situation. Also, if you upload image files to a cloud service or transfer them over the network, this will happen faster if the image has a small weight. Therefore, files must be reduced in size while trying not to spoil the image quality.
What is a JPG file?
JPEG(pronounced "japeg", English: Joint Photographic Experts Group)– the most popular raster image format. Files that contain images have the JPG extension
If you pay attention, the names of many graphic images on your computer look like (“photo title”.jpg or “photo title”.jpeg). The .jpg extension is the most popular.
JPG files are perfectly compressed, both with and without loss of quality. Accordingly, it all depends on what the user wants to get as a final result. There are a huge number of programs and online services for compressing images. Therefore, let's look at how to reduce the size of a JPG file using different methods and programs. In order to determine the initial weight of the image, you need to right-click on it and select “Properties”.
How to reduce the size of an image using standard Windows tools?
If you do not have to resize an image often, then the standard Paint program is suitable for such purposes. Its functionality will be sufficient for our purposes. So Paint allows you to perform the following functions:
- Ability to add various text to the image;
- Filling individual elements;
- Ability to trim unnecessary fragments;
- Inserting another image and more.
If you edit an image and add new elements, its size will change.
In order to reduce the size of a jpg file using the Paint graphic editor, follow the instructions below.
Advice! If the image is very large, then you can set the size to 1024x768. Also choose the correct ratio of length and width, otherwise the image will not look entirely correct.
How to reduce JPG file size using Microsoft Office programs.
Since the MS Office software package is installed on most user computers. Then we will use this tool to edit the size of the JPG file.
Note! Your Microsoft Office package should include MS Picture Manager.

In order to figure out how to reduce the size of a JPG file using MS Picture Manager, do the following:

Advice! The more the image is compressed, the worse its quality will be. Therefore, choose the golden mean.
We reduce the size of a JPG file using online services.
If the methods described above do not suit you or you need to compress a very large number of images, then you can use online image compression services. One of these services is https://tinypng.com
With its help, you can reduce the image size to the maximum possible, while the program itself performs all the actions for you. You will only need to add the image to the online service. 
Note! After compression, you will be visually presented by how many percent the weight of the image has decreased after processing.
After adding a picture or photograph, the program will automatically analyze the file and, if possible, compress it. In this case, the image size, length and width, remains unchanged. The tinypng.com service works with different graphic image formats, so it is suitable for many users.
Another online service that allows you to change the size of an image file is irfanview.com. The service supports working with various image formats. Unlike tinypng.com, the user chooses the settings for the created image. 
You can set the image size manually or choose from the suggested options.
For better compression, the program has various filters. In the saving parameters, you can also set values that will reduce the size of the output file.
Reduce the image size using the Snagit editor.
Not long ago, I wrote an article, in this article I discussed the Snagit program, which can not only take screenshots of the screen, but also edit the resulting images. This program is perfect for our purposes, now I will show you and tell you how to reduce the size of a JPG file using the Snagit editor.
I suggest doing everything point by point.

Note! To resize the image proportionally, leave the “Maintain proportions” checkbox ticked.
- Then save the image using the “File” - “Save As” menu.
After resizing the image, the file will have a smaller weight. In order to reduce it further, I recommend using the online services described above.
Conclusion.
Today we looked at how to reduce the size of a JPG file. Now, you can easily change the image size and its weight. This will help you save space on your computer hard drive, flash drive or phone memory card. Also, compressed files will be transferred over the network faster. As you can see, in most cases, you can change the file size without losing quality.