
Combine logical drives into one. Correctly merging hard disk partitions
If you need to combine several hard drive partitions into one volume, then the first thing you need to do is save important data on another medium. Most likely, they will be irretrievably destroyed. If the logical drive you are removing contains an operating system paging file, move it to the primary partition in advance.
Merging partitions can be done correctly not only by OS tools, but also by external programs.
During the procedure for merging hard disk partitions, all programs must be closed. A program or process accessing the hard drive may block access to the system, and the procedure will not be able to start. Do not turn off or restart your computer during the disk change procedure.
- The operating system deletes the logical volume you specified.
- The partition on which the logical volume was functioning is deleted.
- The system partition is expanded to fill the free disk space.
Merging partitions using external programs
You can merge hard disk partitions, for example, using the Acronis Disk Director Suit package with the Acronis Partition Expert utility or the AOMEI Partition Assistant program. There are other programs, but these have proven to be the best.
The Acronis package is convenient, has an intuitive interface, and is capable of merging disks without losing data, just like the free AOMEI Partition Assistant.
Merging partitions using AOMEI Partition Assistant
In the main screen of the program, right-click (RMB) on drive C and select “Merge partitions” in the context menu

You mark the disks for merging, confirm Ok and the program places the order you created in the delayed start queue.
 To start the procedure, click the “Apply” button.

The program will ask you to confirm the operation several more times, then check the disks for errors and merge the volumes into one.
All folders of the former D drive will be placed in the D-drive folder on the C drive.
Merging partitions under Windows XP
To solve the problem of combining hard disk partitions running XP, there are several options.
1) Through the OS control panel.
“Start” - “Control Panel” - “Administrative Tools” - “Computer Management” - “Disk Management”
- Having entered the “Disk Management” menu, right-click (RMB) and click on the name of the volume that you want to delete. In the context menu, select "Remove logical drive"
- After removing the logical drive, delete the empty partition. Right-click on it and select “Delete partition”
- Right-click on the name of the remaining volume and select “Extend Volume”. The extension wizard will launch, follow its instructions.

2) Using the DISKPART utility located C:\WINDOWS\system32\diskpart.exe.
To launch the DISKPART utility, select “Run” from the Start menu or press the key combination “Win + R” and manually enter the name of the utility: diskpart.
To work with this utility, you need to remember the principles of managing the operating system from the command line.

Merging partitions running Windows 7
The diskmgmt.msc utility allows you to merge hard disk partitions. The utility can be launched in two ways:
- Through the control panel. “Start” - “Control Panel” - “Security and System” - “Administrative Tools” - “Computer Management” - “Disk Management”.
- Through the “Start” menu - “Run” or the key combination “Win + R”, then enter the name of the utility diskmgmt
Step-by-step algorithm for merging sections:
In the “Disk Management” window that appears with a list of disks, right-click (RMB) on the name of the volume you want to delete. Select "Delete Volume" from the context menu
 After deleting a volume, an unnamed partition will appear in its place. Right-click on it and select “Delete partition”
Select the volume to be expanded, and right-click on it, select “Extend volume” and then “Next”

Specify how much you want to expand the disk and click “Finish”.
Immediately after the process is completed, restart your computer.
Merging partitions running Windows 10
The algorithm for merging partitions running Windows 7, Windows 10 and Windows 8.1 is identical. The difference is in the method of entering the control section.
To enter Disk Utility under Windows 10, right-click on the “Start” button and select “Disk Management” from the context menu.
The window that appears is exactly the same as the window described above for the Windows 7 system.
Conclusion
Any changes made to the hard drive structure are critical and important. Incorrect actions can lead to inoperability of the hard drive, loss of data and the need to reinstall the operating system. The process of merging disk partitions is quite lengthy, and if the computer turns off during operation or an unexpected failure occurs, data may be lost. Therefore, before starting work, be sure to make backup copies of your data, make sure that you can restore the operating system if necessary, and only then start.
In this article we will look at the question, how to connect drives in Windows 10. Strictly speaking, it will not be disks that will be combined into one volume (as they are not quite correctly called in the operating system), but partitions of one physical hard drive. The times when it was believed that a HDD must necessarily be divided into several volumes are becoming a thing of the past. Today, most experts agree that one hard drive should have one main partition, not counting small system ones. It is acceptable to leave additional volumes if they contain files for restoring or reinstalling the Windows 10 operating system. However, if Windows 10 is completely installed on your computer, we recommend leaving only one volume on the hard drive. If you want to speed up the system, it is best not to create additional HDD partitions, but to purchase another hard drive or solid-state drive (SSD). The latter provides speeds many times greater than a traditional disk. Ideal option: use an SSD for the system and programs, and an HDD for storing personal files.
So, let's begin to consider the question of whether how to connect partitions (in other words, volumes) of a hard drive into one in Windows 10. First of all, let's say that this can be done during a clean installation of the operating system. You just need to delete all existing partitions and place the “top ten” in the freed up unallocated space.
If you don’t plan to completely reinstall the operating system, but you still want to merge the volumes into one, then we can use the built-in utility “ Disk management" To launch it, you need to RIGHT-click on the Start menu (1) and select the appropriate item (2).
Volume F, which we will attach to C, will first need to be removed and converted into free space. Only then can we add it to drive C. Therefore, before we start merging two hard drive partitions in Windows 10, we need to transfer all the necessary information from the attached volume to the main partition (flash drive, external hard drive). Data on the deleted partition is not saved!
After there is nothing left on the additional hard disk partition that you need, you need to:
- And select the item “ Delete volume...»

Instead of partition F, we now have free space labeled “Unallocated.” To add it to drive C, you need to:
- Click on it with the RIGHT mouse button.
- And select the item “ Extend Volume».

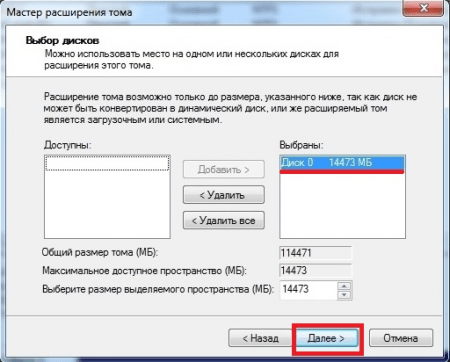
After this it will start " Volume Expansion Wizard" In it, click “Next” twice, and then “Finish”. As a result, we get one hard drive partition with a capacity of 297.60 GB instead of the two that existed at the beginning (197.60 and 100.00 GB).

Sometimes there are problems merging computer hard drive partitions problems that cannot be resolved using the built-in Disk Management utility in Windows 10. In this case, it makes sense to use third-party tools. There are a great variety of programs that work with HDD partitions, but among them it is very difficult to find one that is truly effective and safe. We recommend using the free version of the tool AOMEI Partition Assistant(Be careful! You need to download a file called AOMEI Partition Assistant Standard Freeware). We give reasons why we offer this particular program. Firstly, its extended version is paid - this fact alone inspires some confidence in it. Secondly, there is a separate and quite detailed article about this product from the technology company AOMEI in the English-language Wikipedia. This is also a kind of sign of software quality. Well, and finally, thirdly, we check the installation file of this free program on the VirusTotal.com website (we recommend checking all files downloaded from the Internet there) showed the absence of any viruses or other threats. So, the AOMEI Partition Assistant program definitely deserves attention. Moreover, its free version Standard Freeware it is quite enough to solve the vast majority of problems that arise when dividing or merging hard disk partitions.
An example of such a task, which the Disk Management utility built into the operating system cannot solve, but is successfully solved by the third-party program mentioned above, is shown in the image below. Here we have two hard disk volumes (C and F), as well as 50 gigabytes of space already freed for joining partition C. We see that when we try to expand volume C by the size of this unallocated space, the system does not allow us to do this - the “Expand volume...” item remains inactive (all because the space we need is located through another volume - between C and the unallocated space there is also volume F).

But the AOMEI program will easily solve this issue. For this:
- On the expanded volume C, click the RIGHT mouse button.
- Select the item “ Merging partitions».
- In the window that appears again, check the boxes next to those volumes or unallocated space that you want to connect.
- Click OK. After this, in the program window, the free space will be added to volume C, but do not delude yourself with this.

- In order for changes to be made in practice, it is necessary in the upper left part of the program window Click on the green check mark “Apply”».
- Then, in the newly opened window, confirm the action by clicking on the “ Go", wait for the operation to complete and press OK.

Let us add that in some cases, when working with hard disk partitions, the program warns that it can only complete the tasks assigned to it in the PreOS. This means that it will merge or split volumes after the computer is rebooted, before Windows 10 starts. PreOS means “before the OS,” that is, it works before the operating system loads. Merging or splitting hard drive partitions in this preboot mode may take some time and should not be feared.
If you have additional questions on this topic, ask them in the comments below.
When working with a computer, situations may often arise when you need to resize hard drive partitions, or even merge them into one. For example, you need to install a new operating system, which is larger in volume than the previous one. Also, if the system has 2 or more logical volumes (not counting the partition with the operating system installed), it makes more sense to combine them into one. To do this, you can use both standard Windows tools and third-party software. Let's consider both options.
Method 1: merging disk partitions using standard Windows utilities.
Before starting the procedure in this way, you need to copy all the data from the partition that needs to be attached to another, since the volume is deleted before the operation and, accordingly, all information from it is erased. In Windows OS, there is a disk management console to perform such operations. To open it, right-click on the “Computer” icon and select “Manage”. The computer management console will open, where you need to select “Disk Management” in the left menu.The console displays all available drives. Now you need to select a section that is combined with some other. After that, right-click on it and select “Delete volume”. We confirm the operation, after which the unallocated space will appear in the menu. Then open the context menu of the volume to which you want to attach the unallocated space, and select the “Extend partition” item.

Next, the Volume Expansion Wizard opens, in which you will be asked to select a disk through which you want to increase space on the local partition. In our case, this is just one volume, which was previously a hard disk partition.
Method 2: merging disk partitions in Acronis Disk Director.
This method is more reliable, since it is not necessary to transfer data from one disk to another in Windows: the program will independently merge the partitions. Acronis Disk Director has an intuitive interface that makes it easy for any user to understand.Note: There are 2 versions of this program: for Windows OS and a boot version. It is recommended to use the second version to avoid errors that may occur during the procedure. If this is not possible, then first make sure that your operating system is running without errors or failures.
The main window of the program will display information about all partitions of the hard drive. To merge, select the section you want to merge and click “Merge Sections” in the side menu.

A wizard will open in which you need to select the disks to merge, and also indicate which of them will be the main one, that is, which disk will be connected to which.

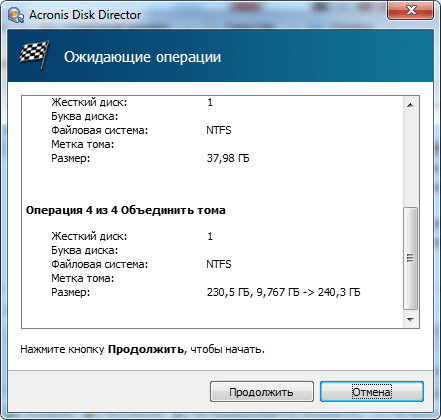
Having completed the necessary manipulations, you need to fix them by clicking the “OK” button. Now a new section will appear in the main window with the same volume as the previous 2. However, this does not mean that it has already been created. Acronis Disk Director uses transaction confirmation to avoid incorrect user actions. After completing the necessary manipulations, a checkbox with the number of operations that need to be performed will appear in the upper corner.

When you click on it, a window with a list of operations will appear. Here the user can once again check the correctness of his actions. If everything is correct, then clicking the “Continue” button will start step-by-step disk partitioning according to the instructions specified by the user.
This process is irreversible. If the program is running under Windows OS, the computer will be rebooted to complete the operation.
You can also use Partition Magic and Paragon Partition Manager to combine hard disk partitions. They are similar in functionality to Acronis Disk Director, so you can use either of them. All of these disk merging programs work well for any version of Windows.
Friends, hello everyone! Now I want to show you with a live example how merge disks on a hard drive without data loss. Perhaps this interpretation may seem like a tautology to some (disks on a disk), but nevertheless the topic is very relevant and people are actively interested in this issue in search results.
Moreover, I had just such a need on my work computer. It is necessary to collect small scattered partitions into one in order to allocate a large space for data backup.
And our old friend, called AOMEI Partition Assistant Standard, will help us in this rather simple question. Once upon a time, we used it to increase the size of .
I have tested the program more than once in combat conditions, so I can confidently recommend it. And, of course, we remember that it is legally free. This means that no changes were made to the source code by unknown people.
In general, let's probably get to the heart of the matter. In this publication, we will not focus on where you can download this application and how to install it. These aspects have been covered in great detail in the link above. It is only worth noting that AOMEI is supported by the entire line of Windows operating systems (XP, 7, 8, 10).
So we immediately begin to merge local sections on the hard drive, onwhich important data and software are stored, the functionality of which cannot be disrupted in any way. Aren't you scared yet? Personally, yes to me already. ; — )
So, pay attention to the screen. We have the following initial data. The computer's hard drive is divided into four parts (disks). Of these we need to combine « D « And « E « . That is, to merge them:

No sooner said than done. To do this, feel free to launch the program and in the main window right-click on the disk « E « . Next, in the context menu that opens, select the item “Merge partitions”:

In the next step, mark the disk with a daw « D « and carefully read the explanation at the bottom of the window. It seems like just what the doctor ordered:

To complete the operation, click the “Apply” button in the upper left corner. In principle, in the main window you can already admire the created structure of the logical partitions of the hard drive:

But this is only the beginning, since at the next stage the united disks will be locked and you will need to agree to a mandatory reboot. Well, what can we do, we agree, of course:

After this, AOMEI Partition Assistant Standard will begin to do its “dark deeds”, as a result of which Windows will start with the partition structure we already need:

That's all, friends, now you know how to combine disks on your hard drive.
After all, if at such a moment the tension suddenly disappears, who knows what the consequences might be. But let's not talk about sad things, but rather watch another educational video.
When installing operating systems, many computer technicians divide one physical disk into several partitions or volumes. As a rule, this is done to increase convenience when reinstalling the Windows OS, as well as to ensure the security of stored information. One volume is used for the system itself and installed programs, and the second is used to store various personal information: music, photos, films, documents, computer games. This article describes how you can combine different hard drive partitions into one, as well as how to delete an extra volume.
If you are working on a computer running Windows 7 or higher, you can use the built-in utility to disconnect, delete or merge local volumes of your disks. Windows XP does not provide this feature, so you need to download special software. The following article describes each option in detail.
General information and comparison of methods
Starting from Windows 7, all Windows distributions have a special built-in utility for working with hard drives. With its help, users can split a physical disk into local ones and attach them back.
The advantage of this program is that it is already installed on any OS, and you do not need to search for it on the Internet and install it. The negative aspects include the rather limited functionality - before merging hard drive partitions, users will need to transfer all important data from the non-primary volume to another location.
The fact is that the utility does not support regular volume merging; you will first need to completely delete one partition, and only then connect it to the system disk.
If you install additional software, it will help you combine several volumes into one without deleting all the information.
Standard Windows Tools
In order to get started with logical drives in Windows 7, users will need to do the following:
AOMEI Partition Assistant
If you use Windows XP or do not want to temporarily transfer all your important information, you can use the AOMEI Partition Assistant application. With its help, you can combine several logical HDDs into one without losing data:

All files will be saved and moved to the “*disc_name*-drive” directory. 
windowsTune.ru
Merge Windows 7 hard drive
Quite often a situation arises when you need to combine a Windows 7 hard drive. To be more precise, we are talking about several partitions of one hard drive. There are several ways to solve this problem. We will do this using the operating system itself, without using third-party programs.
One big and significant nuance is that it will not be possible to combine a hard drive without losing information from one of the partitions (depending on which partition you will join). Therefore, it is recommended to make a backup copy of important files in advance onto a flash drive, portable hard drive or CD... Before merging, it is advisable to check the disks for errors so that there are no problems with the files and the system as a whole.
Merging hard drive partitions in Windows 7:
1.Right-click on the “My Computer” icon and select “Manage”.

2.In the program window that opens, we are interested in the “Disk Management” tab.

We will see a list of all the partitions that exist on your hard drive. In my example, I will combine drive C and E. On partition C I have windows 7, and on partition E I simply store important files (movies, music...).
3.Right-click on drive E and select “Delete Volume”; in the English version there will be the phrase “Delete Volume”

A warning will pop up stating that all files on it will be lost, agree and click on “Yes”. After this, the disk will be painted in a different color and marked as “Unallocated Area”.
4. Now you need to right-click on drive C and select “Extend disk”, in the English version “Extend volume”.

A new window will open where you need to click on “Next” or “Next” a couple of times

If you don’t go into details, I’ll explain briefly: the unallocated area that we created before this step is attached. We wait a couple of seconds and the system will show us that our disk has increased by the size of the unallocated area, and in fact we have merged Windows 7 disks!

lameram.ru
Methods for merging partitions on a hard drive
To make two local disks into one or increase the disk space of one of the volumes, you need to merge partitions. For this purpose, one of the additional partitions into which the drive was previously divided is used. This procedure can be carried out both with saving information and with its deletion.
Merging hard disk partitions
You can merge logical drives in one of two ways: using special programs for working with drive partitions or using the built-in Windows tool. The first method has priority, since such utilities usually transfer information from disk to disk when merging, but the standard Windows program deletes everything. However, if the files are unimportant or missing, then you can do without using third-party software.
Method 1: AOMEI Partition Assistant Standard
This free disk partition manager software helps you merge partitions without losing data. All information will be transferred to a separate folder on one of the drives (usually the system drive). The convenience of the program lies in the simplicity of the actions performed and the intuitive interface in Russian.
Download AOMEI Partition Assistant Standard

After the merger is complete, you will find all the data from the disk that was joined to the main one in the root folder. It will be called X-drive, where X is the letter of the drive that was attached.
Method 2: MiniTool Partition Wizard
The MiniTool Partition Wizard program is also free, but it has a set of all the necessary functions. The principle of working with it is slightly different from the previous program, and the main differences are the interface and language - MiniTool Partition Wizard does not have Russification. However, basic knowledge of English is sufficient to work with it. All files will be transferred during the merge process.

Look for the transferred files in the root folder of the disk with which the merger occurred.
Method 3: Acronis Disk Director
Acronis Disk Director is another program that can merge partitions, even if they have different file systems. By the way, the free analogues mentioned above cannot boast of this opportunity. User data will also be transferred to the main volume, but provided that there are no encrypted files among them - in this case, merging will be impossible.
Acronis Disk Director is a paid, but convenient and multifunctional program, so if you have it in your arsenal, you can connect volumes through it.

After reboot, look for files in the root folder of the disk that you designated as the primary
Method 4: Windows built-in utility
Windows has a built-in tool called Disk Management. It can perform basic operations with hard drives, in particular, this way you can merge volumes.
The main disadvantage of this method is that all information will be deleted. Therefore, it makes sense to use it only when the data on the disk that you are going to attach to the main one is missing or not needed. In rare cases, it is not possible to carry out this operation through Disk Management, and then you have to use other programs, but such a nuisance is rather an exception to the rule.

Merging partitions in Windows is a completely simple procedure that allows you to effectively manage disk space. Despite the fact that the use of programs promises to combine disks into one without losing files, do not forget to make a backup copy of important data - this precaution is never superfluous.
We are glad that we were able to help you solve the problem.
Poll: did this article help you?
Not reallylumpics.ru
How to merge hard drive partitions in Windows 7 and Windows 10?
Computers and laptops are often sold with several partitions on the HDD; this is a fairly standard situation. This was done because most users find it convenient to reinstall Windows in a special partition without losing data on other disks. For others, the difficulty arises in how to combine hard drive partitions so as not to be scattered across several volumes, but to store everything in one place.

Why merge sections?
Merging partitions on a Windows 7 hard drive was indeed somewhat difficult, because further operation carried the risk of losing all data when replacing the system. With the release of Windows 10 and its factory reset feature, this complexity was eliminated. Today you can easily roll back your system without losing data, even if the disk is not partitioned.
Manufacturers divide the disk into 2 or more sections for ease of use, as if dividing them by purpose. It is much easier not to divide into volumes, but simply create characteristic folders within the section.

The most common reason for connection is the lack of free space on the system disk. Then you should think about expanding its contents with another disk. There is only one problem - when transferring space, data is lost from the disk you want to attach. This rule only applies to connections using regular windows tools; there is an alternative option. Perhaps the user shared the disk for no reason or the need for it simply disappeared.
It is important to know that consolidation implies the presence of one HDD. If you want to combine two different hard drives, then this procedure will not work. Another action is required, which is performed at level zero, creating a pool of hard drives, performing using storage spaces and other options. We will not consider it in detail because this procedure does not provide significant benefits, but it often cuts off half of the space, blocks autoloading and has other similar side effects.
Read also: Why doesn’t my computer see my hard drive? What to do?
How to merge hard drive partitions in Windows?
Merging Windows 10 or Windows 7 hard drive partitions is quite easy. All versions of the system have a Disk Management tool, which is great for various manipulations with the HDD. To combine, one disk with the system and another with data are mainly used.
Error 0xc0000142 launching an application in Windows
It is important that when merging volumes, information from one of the partitions will be lost, namely the one that will be moved. Therefore, you first need to remove data from the partition, transferring it to a second disk, if there is space. Otherwise, you can move the information to the cloud or flash drive.
- Click Start and “Control Panel”;
- Next, select the “Administration” tile;

- Go to “Computer Management”;

- In the menu on the left, select “Disk Management”;
- Determine the letter of the volume that we will delete and RMB on it, click “Delete volume”. Everything that was in the partition was moved to unallocated space, now you just need to add it;

- RMB on the target disk to expand and select “Expand volume”;

- Specify the amount of persistent memory to be attached to the partition.
This procedure will allow you to combine 2 or more logical drives. To make one partition out of 3 parts, you will have to delete all other volumes, the freed memory will be transferred to unused memory.
Hard drive partition management software AOMEI Partition Assistant
The program for high-quality, fast and complete memory transfer eliminates the possibility of data loss. There is not always a need to combine disks; mainly the question arises of expanding a partition, usually a system one, at the expense of another. It is not at all necessary to delete the volume for this.
Read also: How to connect a hard drive to a laptop?
AOMEI Partition Assistant allows you to separate the required amounts of memory and transfer them to another location. The application does not require payment. Before using the program, it is better to create a backup, although the application is generally safe, user error is possible.
- Download the utility http://www.aomeitech.com/download.html;
- Install and then launch the application;
- In the window, select the disk from which you want to separate the part, RMB on it and “Resize partition”;
- A window will appear with a draggable slider; you need to move it to the required amount of memory. Important! To further transfer, you need to move the strip on the left so that the empty space appears in front of the occupied one;

- RMB on the disk that you need to expand and go to its settings;
- Stretch the slider to the size that was just released;

- After all the steps, click on “Apply”.
The program has a deferred system for executing actions, so before clicking on “Apply” no changes occur and you can perform many manipulations. If necessary, it’s really easy to delete a partition and attach the space to another.
Read also: Why does the hard drive click and what to do?
There are other disk managers that allow you to combine partitions on disks, but they are functionally similar to the options already discussed.
Thanks to simple steps, you can create one from any number of partitions, provided they are located within the same media. Particular care should be taken not to delete the desired disk, since the user often gets confused about the partition letters.
If you still have questions on the topic “How to merge hard drive partitions?”, you can ask them in the comments
Was the material useful to you? Leave your review or share on social media. networks:
(1 ratings, average: 5.00 out of 5) Loading...
tvoykomputer.ru
How to merge hard drive partitions. All ways (2017)
Let's take a closer look at how to combine hard drive partitions. If your hard drive is divided into several partitions, you can easily merge them using standard Windows tools or third-party programs.
In earlier versions of Windows, dividing the hard drive into partitions made it possible to structure the amount of information that users stored on their computers. And also, some system administrators create separation so that system files and other data are stored in different places.
This reduces the risk of damage from virus software or careless user actions.
 Content:
In modern OS models, as a rule, only two divisions are used - the main disk and space for backup. Thus, if a serious failure occurs in Windows and everything stops working, your data will not be damaged, because you will always be able to make a recovery using the second disk partition.
If you have too many unused partitions on your PC and you want to remove them, use the following instructions from the article.
Before you merge multiple volumes, there are steps you can take to help preserve your files. Any editing of a partition in Windows results in permanent deletion of files and folders in this volume.
We recommend that you create a backup copy of all files and move it to a removable USB drive. If the amount of information is too large, create a separate profile for it in cloud storage. In most of them you can use up to 20 GB of space for free (Yandex.Disk, DropBox, OneDrive and others).

Fig. 1 - schematic example of dividing a hard drive