
Fixing windows 7. Fixing errors in Windows
This section should be the first place you visit if any problems occur. You can find it at “Control Panel” → “Troubleshooting”.
Here you will find several step-by-step wizards that will help you solve problems with connecting a printer, playing sound, accessing the Internet, and so on.
It may well be that your problem is not anything complicated, and therefore is quite within the capabilities of this built-in repairman.
Disk optimization
Modern hard drives generally don't require as much maintenance as in past decades. In addition, new versions have learned to perform disk optimization on a schedule and during idle minutes. Nevertheless, if you begin to notice your computer slowing down or strange sounds coming from the drive, it would be a good idea to run the disk maintenance utility.

The easiest way to do this is to search by title. Using the utility, you can analyze the status of drives, optimize them, or change the automatic maintenance schedule.
Rolling back the system to a previous state
A great feature that many users forget about for some reason. It may come in handy if you experience any errors or crashes after installing new programs or updating drivers. Using System Restore, you can return your computer to the time when everything worked.

Sometimes recovery leads to partial loss of user data that appeared recently. Therefore, before starting treatment, it is better to make backup copies. Still, rolling back to a previous checkpoint is a simple and quick way to solve many problems.
System Stability Monitor
To fix something, you need to understand what is broken. The System Stability Monitor utility will help you answer this question. Finding it is not so easy, since it is hidden in the depths of the Control Panel. Therefore, the easiest way is to use the search, where you should enter the phrase “reliability log”.

Here you will find a detailed report on the operation of the operating system and installed software, as well as any failures that occur. Sometimes one glance at the log is enough to determine the cause of the problem and eliminate it.
System Restore
If the methods listed above do not work, you can try a more radical remedy. To do this, you need to use the reset function available in the latest versions of Windows. It has several options: the most gentle one even allows you to save everything, while the other will return the computer to the time of purchase.
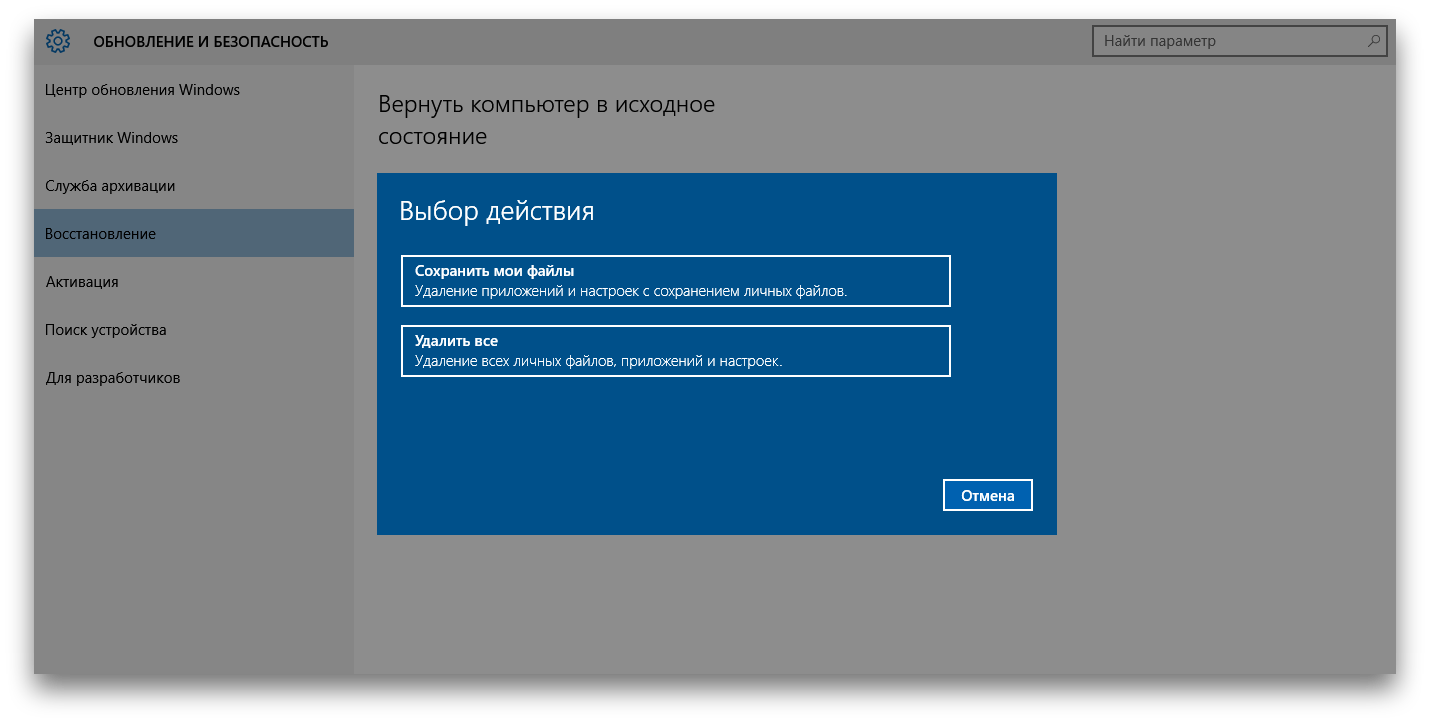
To access this feature, open PC Settings and then go to Update & Security. Here, find the “Recovery” tab in the left panel. Depending on what system was originally installed and what updates were applied, the composition of the items may differ slightly.
RAM diagnostics
Quite often problems are associated with RAM errors. The special insidiousness of this case is that bugs begin to arise without any system. Therefore, if you are tormented by sudden reboots, blue screens and programs that won’t start, be sure to check the status of your RAM.

A search using the words “memory diagnostics” will help you find this useful utility. After launch, select the test mode that suits you and wait for the test results.
Resource Monitor
Another great tool that allows you to find out what's going on under the hood of Windows is called Resource Monitor. It will be useful to you, for example, if a process begins to behave inappropriately, overloading the processor or constantly writing something to disk. Of course, this will slow down the computer, so the intruder must be quickly found and neutralized.

"Resource Monitor" is the older brother of the familiar "Task Manager". It provides the most complete information about each process, service, driver, network connections and their use of processor, memory, and hard drive.
Well, have you tried everything, but Windows still hasn’t been cured? Then it’s really worth picking up the phone and calling a computer geek you know.
Can you suggest any other options for saving the system? In this case, welcome to the comments!
Critical errors when starting Windows 7 occur for many reasons: due to hardware failure, due to problems with the system itself, or due to software failures. In some cases, a direct relationship between cause and effect can be traced if a failure occurred after installing an application, driver, connecting a new device, etc. In other cases, the source of the error is difficult to determine.
Hardware problems
Problems that arise before Windows 7 starts loading are related to the hardware, so just a few words about them. The culprit of the failure can be any of the devices, but most often they are RAM and hard drive. The message that appears on the screen in case of a critical error will help you understand in more detail.
Every user has ever seen a blue screen of death (BSOD). We will leave most of what is written there behind the scenes, since to make a diagnosis, only the following is important to us:
- error type – a line at the top of the screen, written in capital letters separated by an underscore (item 1 in the picture);
- error code – a numeric identifier in hexadecimal form and its additional parameters (point 2 in the picture);
- the driver or application that caused the BSOD, as well as the address where the failure occurred (point 3 in the picture). In case of problems with the equipment that arise before the initialization of drivers and in a number of other cases, this parameter is not available.

The following data may indicate problems with the hard drive or its controller:
- 0x00000077 – KERNEL_STACK_INPAGE_ERROR
- 0x0000007A – KERNEL_DATA_INPAGE_ERROR
- 0x0000007B – INACCESSIBLE_BOOT_DEVICE
- 0x00000024 – NTFS_FILE_SYSTEM
- 0x0000008E – KERNEL_MODE_EXCEPTION_NOT_HANDLED
Memory errors often make themselves known with messages like this:
- 0x0000002E – DATA_BUS_ERROR
- 0x00000050 – PAGE_FAULT_IN_NONPAGED_AREA
- 0x00000077 – KERNEL_STACK_INPAGE_ERROR
- 0x0000007A – KERNEL_DATA_INPAGE_ERROR
- 0x0000012B – FAULTY_HARDWARE_CORRUPTED_PAGE
- 0x0000007F – UNEXPECTED_KERNEL_MODE_TRAP
- 0x0000004E – PFN_LIST_CORRUPT etc.
Often, RAM malfunction is manifested by a variety of errors that can happen at any time when starting up and operating the computer.
Restoring the BIOS Setup to default settings or, as they say, resetting to default often helps to resolve a simple hardware failure. This can be done in several ways: using your own BIOS option, by switching a special jumper to the mat. board or temporary loss of power to the CMOS chip (BIOS storage location).
To return BIOS Setup to default settings using its own option, you need to:
- go to the menu by pressing the designated key immediately after turning on the machine (F2, F4, F12, Delete or others - this is written at the bottom of the motherboard splash screen);
- open the Exit tab (usually), place the cursor on the LOAD BIOS DEFAULT option (in some versions it is called LOAD SETUP DEFAULTS or LOAD FAIL-SAFE DEFAULTS) and press Enter;
- press F10 and Yes (or Y) to exit and save the settings.

Other methods are to switch the special jumper for resetting the BIOS to the CLR CMOS position (variants of the name are CCMOS, Clear CMOS, Clear CMOS, Clear RTC, etc.) or temporarily remove the battery on the board. On some, mat. boards have a special button for this.

If the method does not help, the failure is probably more serious and is associated with a breakdown of one of the devices. At home, you can try to find the problem unit by disconnecting it or replacing it with a similar working one. If this is not possible, you need to contact specialists.
Using Windows 7 Safe Mode
In some cases, startup failure occurs only in normal mode, and in safe mode the system boots without problems. If this is your case, use this opportunity.
To get into safe mode, press the F8 key several times before starting Windows. When you see such a list on the screen, select the desired item from it:

After loading the desktop, you need to open Start, go to the “All Programs” menu, open the “Accessories” folder, then “System Tools” and select “System Restore” from there.

This Windows 7 tool will help you fix startup errors caused by system registry corruption, deletion or corruption of important files, installation of faulty drivers, virus attacks and other system and software related issues.
- After starting “Recovery”, you need to select a checkpoint that was created no later than the date when the failure occurred, and then click “Next”.

- After confirming the point selection, click “Done” and wait for “Restore” to complete its work. This will return Windows 7 to the state it was before the boot errors occurred. Registry, files, drivers, updates, programs installed or changed after this date will be deleted or returned to normal. Files in user folders will not be affected.
Additionally, you can use the system to automatically search for problems and their solutions. For this:
- boot into safe mode with network driver support;

- Open the Control Panel, select the “System and Security” section from “Settings” and then “Check your computer’s health.”

- Expand the “Maintenance” tab and in the “Search for solutions for problems indicated in reports” section, click “Search for solutions.”

In some cases, the system generates error reports that are sent to Microsoft Support Center. If there is a ready-made solution for your problem, you can use it.
Recovery environment
If the system does not boot into safe mode, if the recovery tool does not find any checkpoints or does not work, there is one more option - Windows RE. Windows RE is an addition to Windows 7, a recovery environment that works regardless of whether the main system boots or doesn't boot. Built-in tools in Windows RE allow you to:
- fix problems that prevent the PC from starting normally;
- undo recent changes by rolling back to a checkpoint;
- check RAM using Windows 7;
- restore the system from an archived image, if it was previously created;
- run the sfc system file checker and repair tool, scan your hard drive, run antivirus utilities, registry editor, etc.
To get into the Windows RE environment, you need to select “Troubleshoot computer problems” from the F8 menu.

Once you reach the “Recovery Options” window, you will be able to select the tool you need.
Startup recovery
To identify and fix problems that cause Windows 7 to not boot, select the first option from the list of options: “Startup Repair.” This tool will automatically check and fix the MBR (master boot record), the status of bootable registry keys and system files. Most often, startup errors with Windows 7 can be successfully resolved with its help.

If restoring startup did not help solve the problem, you can use the same already familiar tool to undo the latest changes - “System Restore”. It happens that in safe mode Windows does not see a single checkpoint, but in the Windows RE environment it does.
To launch this tool in “Recovery Options”, use the second item from the top.

If you have a backup image created when Windows and programs were stable, you can restore from it right here. To do this, connect the drive with the image to the computer, select the third item from the list of recovery options - “Restore system image” and follow the instructions of the wizard.

The Windows Memory Diagnostics option will help identify problems with RAM if you suspect it is faulty. Above we have listed which errors when starting your computer may be a sign of problems with RAM. It is possible that it is because of them that your system does not boot.
In addition to memory failures, startup problems can also be caused by the hard drive, or more precisely, by file system errors and “bad” sectors. The recovery environment also allows you to troubleshoot and resolve these issues. To do this, via the command line, you need to run the chkdsk system utility with the /f and /r parameters, which means searching for and correcting errors, as well as restoring the contents of bad sectors, and wait for the results. No user intervention is required in this procedure - it is completely automatic.
And finally, if you suspect that the system does not boot due to a virus infection, the recovery environment allows you to run anti-virus tools.
To do this, launch the command line and open Explorer through it.
- Enter the command into the command line notepad and press Enter to open Notepad.
- Using the “File – Open” menu, launch Explorer - note that in the recovery environment, the drive letters sometimes do not match the letters when Windows boots in normal mode.

- To see all the contents of directories, in the “Files of type” field, check “All files”.

- Go to the folder where the antivirus program is located, for example, the CureIt.exe utility, and run it.
After this, restart your computer. It can be said with a high degree of probability that the next Windows release will be successful.
All owners of desktop computers or laptops, sooner or later have to reinstall the OS, be it Windows 7 or any other modification. There are many reasons for damage to the operating system (malware infection, incorrect installation of drivers, accidental deletion of system data, etc.). However, if information that is important to you is saved in the system partition of the PC (for example, on the desktop), after the demolition of the operating system it will also be deleted. To prevent this, you can restore Windows instead of reinstalling.
Ways to restore Windows 7 without reinstalling
The developers of this operating system took care of its reliability, equipping the product with many protective functions, among which the most useful is the recovery procedure. This software tool allows you to restore the functionality of the OS without completely reinstalling it.
There are several ways to initiate the Windows reanimation process:
- using last known known configuration;
- using the program;
- via a restore point;
- via BISO.
To complete the task, you do not have to look for any software or use additional devices.
The only thing you need to prepare is a DVD with Windows 7 OS of the exact build that was installed on your computer. The ideal option is to use the same disk.
Restoring the last good configuration
Every time you exit the system, all the important data necessary for the launch and operation of the operating system is entered into the registry. It is this information that the recovery procedure uses.
To activate it you need:
If after completing the above steps the system boots, it is recommended that all important information saved in the system partition (“My Documents”, drive C, desktop) be copied to another drive. After this, check your PC for malware and, if possible, perform a full system diagnostic.
Using this recovery procedure, you will not be able to recover lost personal data (music, videos, etc.), since it only works with system files. To restore such information, you need to use additional programs.
Restoring Windows using the Chkdsk application
Chkdsk (from the English “check disk”) is a program built into the operating system that searches for damaged system files on the hard drive and restores them.
Another useful property of this tool is diagnosing storage media for mechanical damage to sectors and blocking access to them, thereby speeding up the operation of the system.
There are two ways to initialize Chkdsk:
- via graphical interface;
- from the command line.
In the first case it is necessary:

To run Chkdsk from the command line:

After this, the Windows system will restart and be diagnosed for damage.
Applying a restore point
A restore point is an OS element that stores a copy of system files, drivers and installed programs recorded at a certain time. In Windows, such points are created automatically at regular intervals, as well as after installing and updating programs.
To use a restore point, you need to:

Restoring a Windows system via BIOS
If it is impossible to start the OS, restoring using the methods described above will not work. In this case, you can use the BIOS to resuscitate Windows without reinstalling it.
The procedure will be as follows:

Unfortunately, Windows 7 does not always work stably, and regularly appear, the system may spontaneously reboot and even force shutdown to prevent damage. In this article we will talk about eliminating system errors on Windows 7.
Description of the problem
As a rule, system errors do not occur without reason. In practice, it looks like a computer or laptop running Windows 7 spontaneously stops working, reboots, or displays a blue screen of death. In any case, it is impossible to work normally in this mode, so the problems must be eliminated. If you recognize your situation from the description, then this article will help you solve the problem. All system problems can be divided into two large categories:
- The OS no longer starts;
- Windows 7 can start after reboot;
Neither the first nor the second situation are good symptoms, but the solution to the problem, if the OS does start, is a little simpler.
The computer has rebooted but still starts
If a system error manifests itself as a computer reboot, then congratulations, you are in a better position than people who are faced with the situation that Windows 7 does not start. In this case, the problem may lie in the following:
- Outdated drivers;
- Lack of the latest OS update;
- Errors on the hard drive;
- Problems with hardware;
After the next system reboot, run the registry cleaner. It could be, or any other analogue. Fix any registry errors and clear up free space on your hard drive. You can help your HDD and OS performance a little more - defragment it or use special software to check the disk for possible problems.
Go to the update center and check if the latest OS updates are installed. If you have a pirated version of the OS, you still need to take care of OS updates. You may need to worry about activating your system to get the latest updates.
Problems with hardware - video card, processor, etc., can also cause a reboot. These problems are not truly systemic, since the system here acts as a fuse. For example, if your video card overheats, the system reboots to ensure the safety of the card. Here it is necessary to carry out diagnostics, measure the temperature on the main components. And if the system gives you a blue screen, then look at the error code. If you have problems starting the OS, then watch the following video:
Windows 7 keeps crashing
The term “Windows 7 crashes” means that the system constantly reboots itself. The frequency can be anything - from 1-2 times a day, and up to 1 time in 5 minutes. In any case, it is impossible to work and the problem needs to be solved. This behavior of the device clearly indicates that you have a system error or some kind of hardware problem. If you put potential overheating problems aside, you can concentrate on system errors.
In a situation where Windows 7 constantly reboots, try checking the registry for errors first. To do this, use CCleaner. Then defragment the disks, and at the same time check all disks for viruses. If the problem persists, you can restore to a date when the problem did not exist. System Restore helps in most cases. But sometimes drivers or fresh OS updates solve the problem.
Please note that Windows 7 must be kept up to date. If you have not updated the OS for a long time, then the reason why Windows constantly reboots may be due to an outdated version of the system itself.
Windows 7 won't start
The situation when the OS stops starting seems hopeless to some users. How to solve problems if the OS does not start? There are several possible solutions.
After numerous reboots if the OS starts unsuccessfully, the system itself will prompt you to start in safe mode or load the OS with the latest working settings. Try the latest working configuration first.
If the last working configuration did not help you, then try starting in safe mode. If the OS boots in this mode, then all is not lost. Go to the system utility section and restore to the last restore point. Then restart your computer. Alternatively, you can start in safe mode with support for network drivers and perform a remote system scan.
System Restore
You can restore the system without booting it. To do this, when starting the OS, press F8 on the keyboard. A dialog box will open in which you need to select “Repair your computer.”
In the window that opens, select the appropriate recovery options and then follow the onscreen instructions. Depending on the problem, recovery may take up to 1 hour. If you have an installation disk or USB flash drive, you can use them to restore the OS. In any case, follow the system instructions and even a beginner can cope with the recovery.
If the restore does not help, you can return to the “Repair your computer” window and undo all changes. To do this, select the corresponding menu item of the same name.
Reinstalling the OS
The most radical method, but it saves in 100 cases out of 100, if your hardware is not broken, is reinstalling the OS. You can install the OS from a special installation disk, which you should have made in advance. If there is no such disk, then you can download a clean image of the system and separately drivers from your manufacturer on the Internet. We will discuss the issue with the license, how to transfer and save it, in one of the following articles.
We hope that your Windows 7 computers and laptops will run smoothly and you will never encounter system errors. And if you do, now you know how to fix OS errors.
The Windows Troubleshooting Wizard is a built-in utility that is responsible for fixing problems with the operating system. Using this program, you can “fix” Windows Update, software errors in USB inputs, Wi-Fi adapter failures, and much more.
Diagnosing problems in Windows 7
The utility, which is responsible for finding and fixing errors in various components of the Windows system, is built into the OS and is launched manually by the user when any bugs are found. There are several ways to access the troubleshooting wizard:
The main window of the Troubleshooting Wizard is a list of categories that, when clicked, launches a debug tool for a specific system element. Collected here:
- tools for diagnosing and configuring programs adapted for another version of Windows OS;
- utilities for setting up and using devices and printers;
- a wizard for troubleshooting sound recording and playback problems;
- Tools for finding and troubleshooting Internet problems;
- design settings;
- utilities for troubleshooting Windows Update problems;
- programs for optimizing energy consumption;
- Tools to troubleshoot performance problems.
The “Computer Troubleshooting” utility is not just some small program for fixing bugs, but a comprehensive system that includes the ability to fix each individual element.
 The main Troubleshooting window includes categories for which you can run debugging
 If you are interested in setting up or debugging a specific element, then especially for such cases, a “View all categories” button has been added to the left side of the main window. It changes the design of the main window of the utility so that its components are not grouped by categories, but are displayed in a list in order.
 This is more convenient if you know exactly what you want: there is no need to wander through categories, wondering where exactly the required debugger is located.
 The View All Category feature displays all items in the troubleshooting wizard as a list from which you can select the item you want
 Double-clicking an element launches it and opens a program that scans the selected element and notifies the user of any errors found. Before starting diagnostics, in the window that opens, you can check or uncheck the “Automatically apply fixes” checkbox - its presence means that if the program detects problems, it will fix them automatically.
 If the checkbox is not checked, the utility will ask the user for permission to fix it or will not touch the errors at all.
 Before running diagnostics and treatment, you can allow the program to automatically apply fixes
 After troubleshooting is completed, the utility will provide the user with a report on its work, which will indicate which errors were detected and which were eliminated.
When the utility analyzes and repairs the element, it will give the user a report on its work
Examples of using the program
“Troubleshooting Center” is recommended to be used first when problems are detected with a particular system component. The program is not perfect, but it allows you to fix errors in two clicks, which can be difficult to “treat” manually.
Windows Update problems
To open the troubleshooting wizard to fix Windows Update errors, you need to call the “Troubleshooting problems using Windows Update” option from the wizard’s main menu (how to access it is described above). Now you need to click “Next” and monitor the errors that the program detects.
 To troubleshoot Windows Update, select the appropriate utility from the list in the wizard's main menu
 It also happens that the Windows Update problem is resolved, but the unsuccessful update remains. In this case, you need to roll it back, and this is done in Windows 7 like this:

Video: How to remove Windows 7 update
Sound problems
Incorrect sound or complete absence of sound is a problem that can also be solved with the help of a wizard.
It should be remembered that if the problem is in the hardware itself, then the program will not help in any way. The utility is not always able to solve the problems found, but successful diagnostics in any case gives a hint on how to fix the error.
The utility that you need to call from the wizard is called “Troubleshoot Audio Recording” if you have problems recording audio, or “Troubleshoot Audio Playback” if playback does not work.
 Troubleshoot audio problems and Troubleshoot audio problems can help you solve audio problems.
 USB Troubleshooting
There is no standard pre-installed tool for solving USB problems in Windows. Despite this, Microsoft has released a set of utilities called Fix It (aka Easy Fix), which is something like an advanced version of the standard troubleshooting wizard. Its features include a USB troubleshooting utility.
You can download the USB Troubleshooter from the Microsoft website. The utility is downloaded in .msi or .diagcab format: both are executable files and can be launched by double-clicking with the left mouse button.
- After running the file, allow it to install data on your computer. In some cases, an administrator login and password may be required.
 For Easy Fix to run, you need to give it permission as an administrator
 - In the window that opens, click “Next”. If you want to pre-configure the utility so that it applies fixes independently or, on the contrary, asks permission for certain actions, the already familiar “Automatically apply fixes” checkbox is located under the “Advanced” button.
 Here you can set up automatic application of changes and run a utility to find and fix problems
 - Wait a while while the utility looks for and fixes problems.
 Finding and fixing problems will take some time
 - Check out the report that Easy Fix will provide you with after the job. All errors and problems that the program has fixed will be listed there.
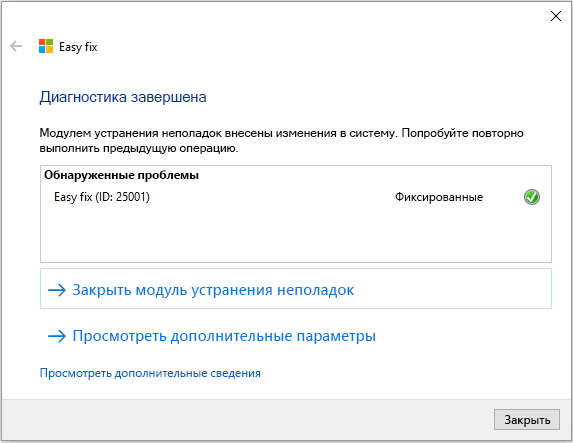 After finishing the work, the utility will provide a report indicating exactly what errors it found and what corrections it made.
Error code 43
Error 43 indicates that Device Manager has stopped the operation of a device due to a problem found in it. Initially, this error indicates a problem with the computer's hardware configuration. In other words, if the mouse gives error 43, it is probably the mouse that is broken, not Windows.
However, in addition to hardware problems, the cause of error 43 can be software failures: most often in drivers. It’s not a fact that Easy Fix will help with them. Most likely, you will have to do it yourself.
- First of all, try restarting your computer. Perhaps this is a single glitch, and after a reboot everything will work.
- If rebooting doesn't help, open Device Manager. To do this, press the Win + X key combination and select “Device Manager” from the menu that appears.
 To enter Device Manager, you need to select the appropriate option in the menu
 - If a device connected via USB generates an error, you should update the USB port drivers. In Device Manager, select the USB Controllers tab and right-click on one of the devices listed there. Select the option "Update hardware configuration" or "Update drivers".
 To update a device driver, right-click on it and select “Update Drivers”
 - When the system asks whether you want to search for drivers on the Internet or specify an existing one, choose based on whether you have a driver file on your system. If there is one, indicate the one you already have and select it, and if not, start a search on the Internet. In some cases, it does not work perfectly, so the best option is, if possible, to find drivers on the Internet yourself.
 To update the driver, you need to either tell the system the path to it, or give it the ability to search for it on its own
 - Repeat the driver update one by one with all USB devices except virtual ones.
- If the above steps do not help, look for a driver for a non-working device on the Internet by its name. The system will not be able to find this driver because it does not recognize the device. The only way out is to search on your own using the information provided on the device or on its packaging.
- When the driver is found, install it (just run it).
- If this does not help, it is recommended to check the system for viruses and also clean the registry using one of the special programs (for example, CCleaner). To do this, go to the “Registry” tab in the main program window and click “Search for problems.”
 CCleaner has a Registry Cleaner tab that allows you to fix erroneous entries in the system registry
If none of the above methods help, most likely the problem is related to the hardware and cannot be fixed using software methods.
Video: how to fix error 43
Troubleshoot startup problems
It is not the wizard that deals with problems when starting the computer, but another utility, but let’s look at that too. If your Windows 7 refuses to boot, this program is an indispensable assistant. However, her help will only work if the problems are software. If the problem is not in Windows, but in the hardware, then the download will not even get to the launch of this utility.

Video: how to fix Windows 7 startup errors
If the troubleshooter doesn't work
The Troubleshooter is a system program, and if it doesn't work, something serious has happened. The failure may be due to update errors, unsuccessful changes to the system (this can be done, for example, by third-party programs), as well as hardware damage to the disk.
- And if nothing can be done about the latter, except replacing the hard drive, then the rest can be eliminated.
- First, try uninstalling the latest updates. How to do this is described in detail above.
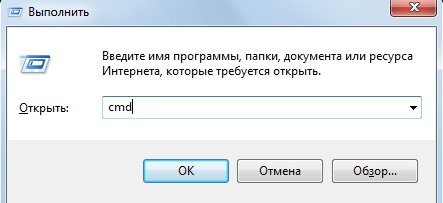 If uninstalling updates does not help, use Command Prompt. To do this, press Win + R and type cmd in the Run window.
 - To open Command Prompt, press Win + R and in the Run window type cmd

- In the Command Prompt, type the following commands:
- Restart your computer. If the troubleshooter still doesn't turn on, the problem is more serious. If you have backups (system backups that can be used to roll back the OS), now is the time to use them.
 To do this, go to “Start” - “Control Panel” - “Recovery” and select the “Run System Restore” option.
 - The program itself will offer you the optimal backup copy for recovery. If you do not agree with it, select another backup from the list.
 From this list you can select any backup copy and roll back your Windows to it
 - If you want to see exactly what will change in the system after the backup, click “Search for affected programs.” A window will open where you will see a list of changes.
 The program will show which programs and files will be changed after rolling back to the backup copy
 - In the last window, click “Finish” and wait for the system to be rolled back to the state at the time of the backup. It will take some time.
 To start a system rollback to a backup, click “Finish” and wait a moment
 - If you accidentally select the wrong restore point, the backup can be canceled in the same “Run System Restore” utility. To do this, open it and select the “Cancel system restore” option, and Windows will return to the state it was in before the backup.
 To cancel an unsuccessful system rollback, run the program again and select “Cancel system restore”
Troubleshooting programs
The built-in wizard is, of course, useful, but not ideal. It does not fully cope with cleaning the registry or fixing most bugs. Fortunately for the user, there are many third-party programs that can be used to fix bugs and keep your computer in working order.
FixWin 10
Despite its name, this free program is intended not only for Windows 10, but also for earlier versions of the OS, including Windows 7. The main window of the program has several tabs, and all errors specific to Windows 10 are placed in a separate one. the rest apply to all versions of Windows.
 The main window of FixWin 10 contains information about your system; You can also launch troubleshooting utilities from here
 To start automatic error correction, you need to go to the tab of interest and find the error for which you want to find a fix. Here you can see how to solve this problem manually.
 The FixWin10 tabs look like this: a description of the error and a “Fix” button, as well as help on solving the problem manually
 The main disadvantage of this program is the lack of Russian localization. So it is suitable for those users who more or less confidently know English.
You can download FixWin 10 from the official website of The Windows Club developers.
Video: how to work with FixWin 10
Anvisoft PC Plus
This program is similar to the previous one: it is free, easy to use and distributed in English. The interface is convenient and pleasing to the eye. The main window presents the most common problems, and clicking on the desired error opens a menu with a “Fix” button. The utility downloads files for repair from the network, so an Internet connection is required for its operation.
 In the main window of the Anvisoft PC Plus program, you can select the error of interest, and a window will open where you can fix it
 You can download the program from the Anvisoft website.
Video: Anvisoft PC Plus program
Kaspersky Cleaner
The utility from the creators of the famous antivirus is aimed at cleaning the computer. But it also has tools to “cure” some problems. The program is in Russian, free and very easy to use: you start searching for errors, and then the utility does everything itself.
 In Kaspersky Cleaner, just run a search for errors, and the utility itself will find and fix everything
 This utility can be downloaded completely free of charge on the Kaspersky website.
Video: review of the Kaspersky Cleaner utility
NetAdapter Repair All in One
Of all the programs presented, this is the most complex, but also the most advanced. It is designed primarily for “fixing” network errors: clearing Hosts, SSL, DNS cache, managing adapters and network cards. There are many functions here, but it is recommended only for experienced users who know what they are doing. The downside of the program is the English-language interface.
 The main menu of NetAdapter Repair All in One lists a significant part of its functions, not including advanced
 The standard Windows 7 troubleshooter isn't perfect, but it can be a big help if you find errors. And if it doesn’t cope, you can always use third-party programs.