
Installing windows 7 from iso flash drive. Installing Windows from a flash drive via BIOS. Installation does not occur
Do you have a laptop, personal computer or tablet - in a word, a device on which you want to install Windows via a USB flash drive? Do you have to frequently reinstall the OS and don't want to use fragile and bulky disks?
If yes, then this guide is for you. Read the instructions below carefully and you will definitely succeed!
We can also say that a disk image is the same CD/DVD disk that does not have its own material shell.
Step 1. If you own an official copy of Windows, you can create a bootable USB drive from the Windows installer that comes on the DVD, or you can use the official ISO file that you can download from the company's website. You can also purchase an ISO distribution from other sources (download from any torrent tracker). In the last two cases, skip the following paragraphs in this section.
Step 2.. There are many free solutions available on the Internet, one of which is ImgBurn, one of the most popular utilities.

Step 3. Insert the operating system disc into the DVD drive. Open the program and click on the “Copy to Image” or “Create Image” tab (the inscription may differ in different versions of the program). When prompted, select the DVD drive as the source.

Step 4. Save the ISO file. Choose an easy-to-remember file name and location. Make sure you have enough free space to save the file. An ISO file is essentially an exact copy of the boot DVD.

Part 2: Creating a bootable USB flash drive
Step 1. Insert your flash drive into the appropriate slot on your computer. To successfully copy a disk image (ISO) file, the media size must be at least 4 GB.
Note! When created, all original data will be erased - create a backup copy if you have important information.

Step 2. Download Windows 7 USB/DVD Download Tool from the official Windows website. Despite the name, the utility also works with other versions of the OS.

Step 3. Specify the path to the ISO file - the location where you saved it at the last stage of creation.

Step 4. Click on the "USB Device" button. The program can also create a boot disk; to do this, click on the “Disc” button.

Step 5. Wait until the download completes. The program will prepare the drive, then download the ISO file to it. Depending on the speed of your device, the copying process takes up to 15 minutes.

Part 3. Preparing the system
- Insert the USB drive into your computer. Press the power button or restart your computer. During the reboot, click on the so-called “Setup key” - a key combination that is shown on the first system boot screens. Typically, this combination is located on the same screen on which the manufacturer’s logo is displayed. The key varies from computer to computer, but in any case it will be on the screen. Once clicked, you will be taken to the BIOS menu.

Table of dependence of hot keys on the PC model at the time of booting

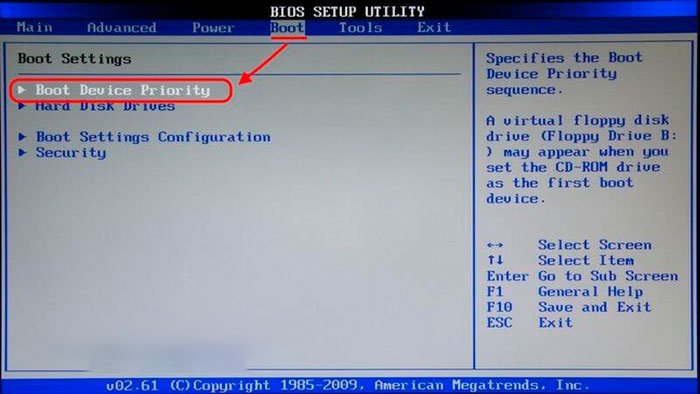
- Click on the "Boot Menu" tab. Each BIOS is different, but they all have this tab. You will see the order in which the computer searches for a bootable operating system. Typically, computers do this from the hard drive first, so the OS boots automatically.

- Once you go to the "Boot Menu", you will need to switch the order so that your USB drive is at the very top of the list. Again, exactly what this list looks like will vary depending on the make and model of the device. You may see the name of your drive, or perhaps it will just say “Removable Device” or “USB”. To change the order, use the “+” and “-” keys - up and down, respectively.

- Afterwards, save the changes and exit the BIOS. The key to this action is usually the F10 key. The computer will reboot from the USB drive.

Part 4: Installing Windows
Step 1. To begin initializing the installer, press any key. If you do nothing, the computer will automatically start loading the already installed operating system and you will have to reboot the system again.

Step 2. After pressing the key, the system will begin downloading data to install the operating system. On slow devices, this process may take up to several minutes.

Step 3. Follow the installer's instructions. Once the installation is complete, the system will reboot.

Congratulations! You have installed Windows! Now you have a flash drive with which you can . Most new computers support installation from flash drives, use the special BIOS boot option as shown above.
Video - How to reinstall Windows from a flash drive via BIOS
Good health, my dear readers and computer lovers!
Yesterday I was dealing with the laptop of a friend who asked me to take down the tenth Windows and return the seventh to him. I didn’t have a free disk, and I decided to resort to such a step as installing Windows 7 from a flash drive. Well, according to tradition, I installed it myself and shared it with friends! Today I will tell you all the secrets of installing this operating system from a USB drive.
When should you reinstall the OS?
Imagine, you have installed the operating system, you are working, installing various programs, month, two, three. And eventually you realize that the visual shell begins to slow down a lot, especially in demanding toys or software like Photoshop. It is virtually impossible to automatically fix the problem. Constantly cleaning the registry will not save the situation indefinitely either.
Professional system administrators advise reinstalling the OS once a year. They claim that even with proper Microsoft shell maintenance methods, it will still end up cluttered with errors, reports, and other nonsense.
And all this will greatly reduce productivity. Believe me, even the updates that the graphics platform downloads from official sites can also fill the general registry with bugs, for example, due to a crooked installation or a broken package of files.
What do you need to prepare before you start?
First, you need to take care of the files you need. You don't want to lose them, do you? Therefore, I offer you several options. If your hard drive is divided into logical drives, then transfer everything you need to a hard drive that does not have a system. Typically, such disks are designated by the letters “ D" And " H" Just copy all the archives, photos and music with movies on them. Of course, if there is enough space.
If it’s not enough, or the hard drive is not divided, don’t worry, help will come to the rescue storage from Yandex. Come here, register and either click here and download the information.
Or download the client.


After installation you will have a shortcut like this.

You open it and work just like with a laptop and a network drive. Please note that the software has become a part of your computer.

And if you like Google more, then that way.

Everything is very simple, just like above, you either download the client or upload it through the drop form on the site itself.

Well, if you are not satisfied with this option, well, then you can rewrite everything on a blank.
By the way, on the HP laptop I was working on, I actually used both virtual storages. There was an enormous amount of files in there.
Now take the flash drive and insert it into the port. Now it needs to be formatted. It's done like this. Open my computer and right-click on your flash drive.

And click the word “ format».

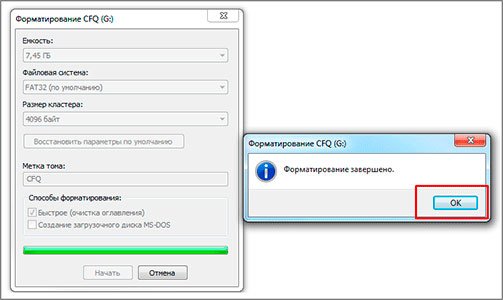
And now you will see a window like this.

You need to change the file system to NTFS and to start the process click on the button of the same name.

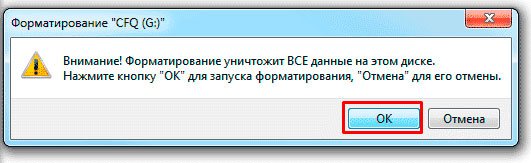
In this sign, click " Yes».
As soon as everything is over, a sign like this will automatically pop up.
That's it, now you can leave the device without attention and move on to the software.
This is where we download torrent program. A from here system distribution. Then take it here Ultraiso program - and install it.
Now we move on to the preparatory work for recording the system.
Burning an operating system onto a flash drive
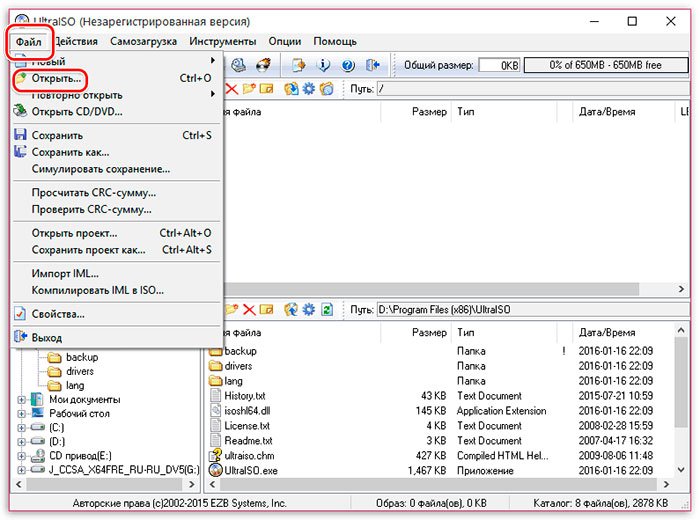
So, it's time for the most important aspect. Open the Ultra ISO program. Then open the system image.

A new window will pop up. I advise you to format the flash drive again.

Now write it down.

BIOS setup
Another important aspect. BIOS is a set of microprograms that are responsible for the hardware in your laptop. If you do something wrong, you will cause problems, or even burn your laptop. Read the article carefully and do as I show.
We need to boot from the hard drive and from our flash drive. It's not difficult, you have to be careful not to do it. BIOS can have different configurations. Let's look at the different versions and configuration principles.
Award BIOS
The simplest and quite old. Features a bright blue screen background. To get into it, you need to press DEL or F2 on the keyboard immediately after restarting the computer. You will see an image like this.

Now goes to the First Boot Device tab. And in this line, put the USB HDD indicator in first place in the column. That is, the computer will initially load external devices, and only then the hard drive, which is what we need.
AMI BIOS
Now the same thing, but in a different BIOS edition. Let's go here first.
Then select the third line and move it to the very top. Like this

All. Now we press F10 and we go out. We have configured everything we need through the BIOS.
System installation
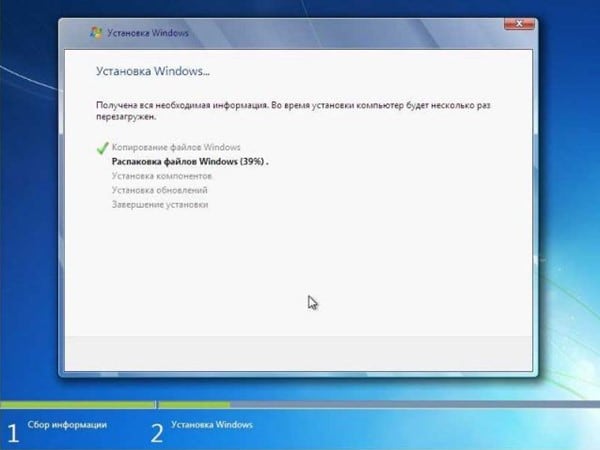
Well, now it's time to start the installation itself. As soon as the laptop turns on, you will see this image.

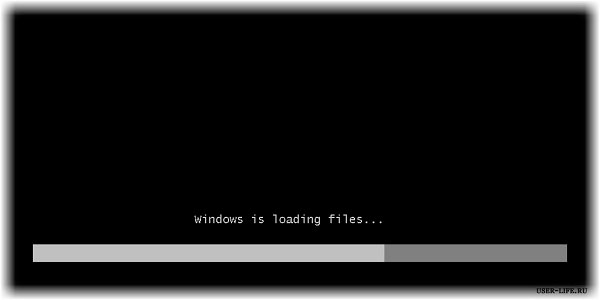
As soon as the scale reaches the end, the interface itself will open.

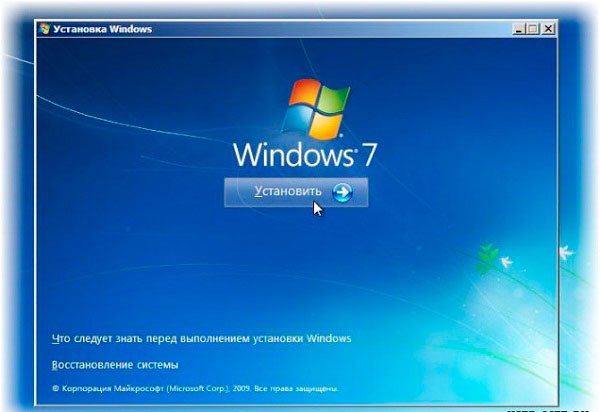
You need to select Russian everywhere (if you are not a foreigner) and click next.
And now " install" There is only one button, so you can't go wrong.
If you have the assembly that I suggested to you. Then you will be asked to select the edition of the operating system. Choose the one that suits you. If you have a computer with two or more cores, then the bit depth is 64 bits, if not, then 32.

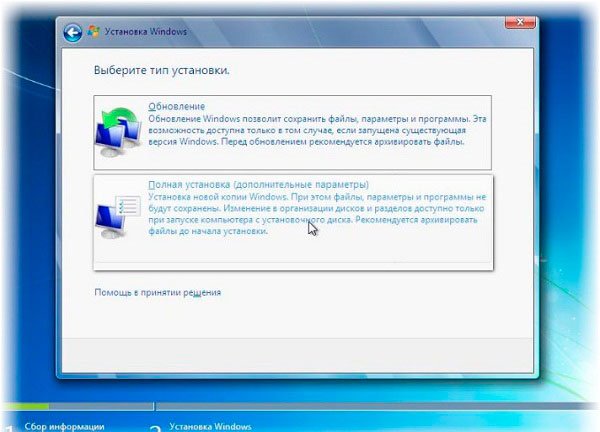
Now you need to select the bottom line. The top one is an update. It will automatically simply restore the system, but we want to install it from scratch, right? This means we need a complete installation.
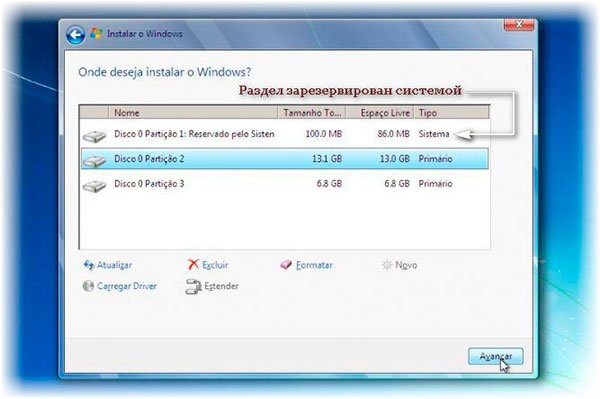
Now the interface for working with hard drives will open. If you don't have it divided, just format it. If there are several of them, completely erase the one where the system was. In general, you can divide it later, for example, the Acronis program will help with this. But more on that later. Once everything is ready, select a new clean partition and click Further.


Now the installation process will begin. First the files will be copied, then unpacked. Next is installation. You will have time to have a hearty lunch or at least drink tea, as this takes quite a long time. Wait for the first reboot.

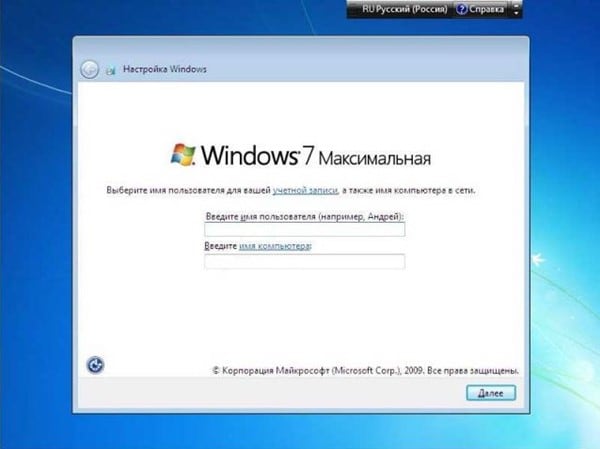
As soon as the computer has rebooted, immediately remove the flash drive. It will boot from the hard drive and you will see this interface.
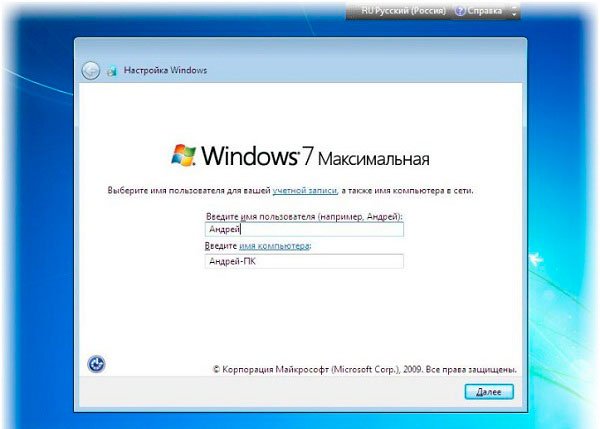
Fill out the lines and move on to the next step.
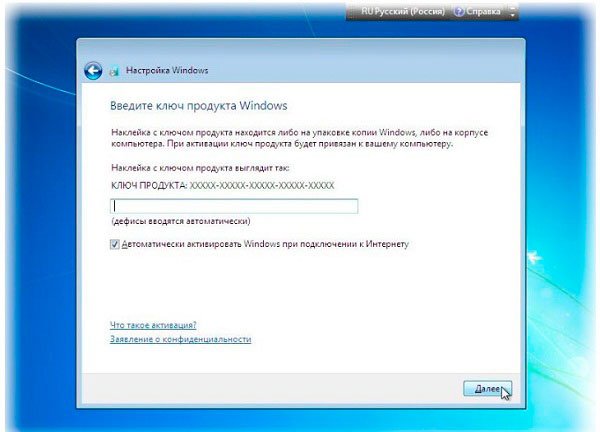
You can skip everything here while we install the OS without activation. Click Further.
Now the security settings. If you are not a secret agent and your computer is personal, then choose the first line.

Set your time zone.

Select your home network.

That's it, you just installed Windows yourself. Congratulations, but that's not all.
Final measures
So, we already have Windows, we have the Internet. But we can’t do without drivers. Let's climb here— and download the driver booster.

Install and press the scan button.

Once everything is found, click “ update everything" Next, with the software, everything will be done automatically.
Now restart your computer. Everything should become better, faster, brighter, juicier.
Since you will most likely have to deal with ISO images, you will need the Alcohol 120% program. Take her you can here.
Hard drive division
I already said above that it is always better to divide your hard drive into several parts. This is just so you don’t lose files, and it’s more convenient to work. The partition for Windows remains specifically for it, so there will be no garbage on it (well, except for system errors). We will need a program Acronis Disk Director. The software is very useful and really cool. It’s not free, but there is a trial period, so you need to do everything quickly and immediately.
Launch the software.

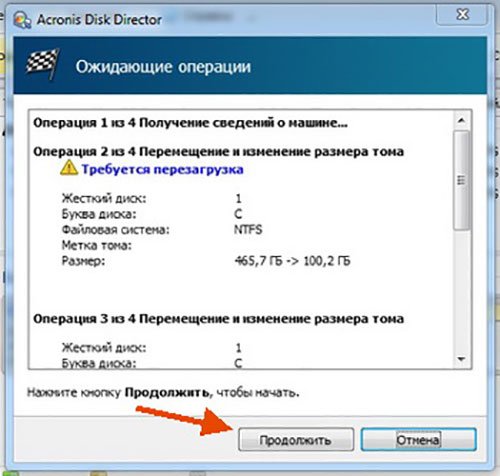
Now select your hard drive and click on resize volume.

Either drag the slider and specify how much space should be on each hard drive or specify how much should be on the local HDD that you are creating.

I advise you to leave the operating system for a hundred gigs. This is not little, but not much either. Quite enough for normal work.

Now click on the section that just appeared and click on the tab “ create volume».

Now select " base" and move on.


Now set the file system, volume letters and name and click on the “ complete.

Go to the top part of the interface and click here.

Click continue.
And now it's OK.

That's it, the computer will reboot, and then you will have your new hard drive. By the way, here is a video that will help you.
Conclusion
That's all, my dear readers! Now you can do all this yourself, and even teach your friends. By the way, share this article with them on social networks and messengers, it will be useful to everyone.
I would like to remind you that all programs must be run as administrator. You can install anti-virus programs, they will help you avoid infecting your machine. With this I say goodbye to you! Subscribe to my blog to stay updated on new useful materials that I write especially for you. All the best to you and see you in touch!
If you need to install Windows 7 from a flash drive via BIOS, then our article will be a great help for you.
Installing a new operating system on a computer is a fairly common problem that can arise due to the slightest malfunction of the system or the actions of an inept PC user.
This issue also became relevant in connection with the statement by official representatives of Windows about the suspension of technical support for the XP operating system.
Today, almost all users have completely switched to the so-called seven.
Our step-by-step instructions will help you quickly and easily bring your computer back to life.
Preparing the computer to reinstall Windows
Before you start working on new software, you need to properly prepare your PC. First you need to remember what important information is stored on your computer and save it to a portable storage device.
Particular attention should be paid to the local drive C, as this is where the largest amount of information is saved. Almost all users store their media files (photos, videos) in the “My Documents” folder or directly on the desktop.
These files are often located on the disk along with the already installed OS. You can also use the free space of another local drive to save information.
It is very important before reinstalling Windows to check whether there are drivers for the network card on the PC.
If you install a new system via USB, and then it turns out that the distribution does not contain drivers for the network card, then you will not be able to configure the drivers and Internet connection.
For your own confidence, it is better to once again make sure that the drivers are available. Also, be sure to check if you have drivers for your sound card, audio card, video card, etc.
Preparing a flash card for software installation
To install an operating system from a flash drive, we recommend following these rules:
- The minimum size of the flash drive must be 4 GB. This is the amount of space required to save all important components and files;
- Mandatory preparation of a Windows 7 distribution kit for recording and saving its image (*iso format);
- Selecting a program to create a disk image.
Advice! UltralSO is considered one of the best utilities for creating a disk image. The latest version is on the developer's website
We install and run the utility on the PC, and then select a pre-selected disk image from it. Step-by-step instructions for using the program will help you quickly understand all the intricacies.
- Launch
2. Now the main working window opens in front of you
3. Let's move on to recording the hard disk image
4. Now you need to connect the flash memory and enable formatting. When the flash drive formatting process is completed, you can start recording.
5. After recording is complete, the space on your flash drive will contain Windows, with which you will perform the reinstallation.
Comment! To create a flash drive for installing the system via BIOS, you can use the toolsWindows.
Setting up Bios to work with a bootable USB flash drive
Just connecting the installation flash drive to the PC to install new software is not enough; preliminary configuration of the computer is required so that it starts booting from it when turned on.
All settings are made in Bios. Any laptop or computer has a BIOS, which stores important settings, including the order in which devices should boot. It is this setting that we now need for further fruitful work.
To start the Bios, you need to hold or press a certain key on the keyboard when you turn on the computer.
You can find out which key we need from the information on the monitor. Typically these keys are Esc, Delete, F2. If you have entered Bios, one of the following screens will appear in front of you:
If your login attempt fails, restart your computer again and try starting the BIOS again. To make things easier for you, we have placed a table with the main options for enabling Bios.
Keyboard combinations for logging inBIOS depending on manufacturerBIOS
Basic key combinations for launchingBIOS depending on laptop and computer manufacturers
After you get into the Bios, you need to find the option that is responsible for loading devices. Usually it is in the menu and its name contains the word BOOT. Other options are not excluded; you may even have to look.
Here are some examples:
As a rule, selecting the main device to boot is done by pressing the arrows on the keyboard, although sometimes there are other control methods. If you can’t figure it out yourself, then refer to the help that appears in the BIOS.
In our case, the first boot device is a USB-HDD (there may be another name). After selecting it, you need to exit the Bios and save all settings using the Save and Exit Setup item.
After this step, the computer should reboot and we will move on to the main stage for which we are here.
Installing Windows 7 using a bootable USB flash drive
If everything was correctly written to the flash drive space, and the correct settings were made in the BIOS, then you will see the following message on the monitor screen, which says that you should press any key to activate the boot.
If there is no such inscription, then you will have to check your actions. To do this, go to Bios and make sure that the boot from flash drive setting is saved. If there are no errors in the Bios, then most likely you were unable to create a bootable USB flash drive and you need to repeat the whole process again.
If there is an inscription, then congratulations, your installation of the new Windows version via BIOS has begun. Some installation images, in addition to the operating system itself, also contain various additional programs, then you will have to select the required item from the menu.
It is also worth saying that some disks perform most of the settings described below by default. There is no need to worry about this, since all settings can be changed after the software installation process is completed.
A welcome screen appears in front of you, on which you select the necessary data. After the setup has been completed, click on the “Next” button, and then “Install”.
In a new window, the terms of the license agreement appear in front of us, which you, of course, read very carefully, and then agree by checking the special box and clicking the “Next” button.
The final stage of installation
In a new window you will have to select what type of installation we require. We need the full type. Next, you will have to do a little work with the disk on which the new version of the software will be written.
To do this, select the required disk partition in the menu and click on the “Disk Setup” button, after which we start formatting.
We have already described how this is done above. Here you just need to change from USB-HDD to the name of your disk. This is a very easy action that should not cause you any difficulties.
Once the reboot is complete, Windows installation will continue.
- Enter names for the computer, laptop and users.
- Set a password, if necessary.
- Enter the name of the license key, if you have one (you can skip this step).
- Selecting security settings (“Recommended settings”).
- We set the date and time.
- We configure the network.
Thanks to these simple steps, you can install Windows 7 through the BIOS using a flash drive.
The Windows installation process can hardly be called something complicated. However, there are many myths circulating among PC users about this incredibly difficult process. While installing an operating system from a disk may seem like something traditional, performing exactly the same actions from a flash drive terrifies many. Mainly due to the banal ignorance that the USB input can be used as a full replacement for a CD\DVD drive. There can be a huge number of reasons for this:
- Initial lack of a disk drive (netbook, ultrabook).
- Drive failure.
- Disk failure.
- Infection with a virus that prevents the device from reading disks, etc.
Having and installing Windows from a so-called bootable USB flash drive can be a full-fledged replacement for a boot disk.
- Preparing the computer for installing the operating system.
- Preparing a USB drive.
- Changing BIOS settings.
- Installation of the operating system itself.
Each stage has its own nuances and features. Therefore, we strongly recommend that you read the article carefully to the end, or better yet, print it out or download it to your mobile device.
Windows installation can be complete or partial. It depends on what goals you plan to achieve by reinstalling it. Full formats both of your disks (the one on which the OS is located and other additional ones) if you have them, of course. Partial allows you to reinstall only system files. It helps if you accidentally deleted system files or folders (for example, win 32 or *.dll files), but you simply do not have the time or opportunity to transfer all the information from your computer.
If you plan to perform a partial installation of Windows (and you have 2 disks, “C” and “D”), you can move all the important information to a disk that is not a system one. This is quite easy to do.
How to find out which drive the OS is installed on
To understand which of your system drives the operating system is installed on, just open the Start menu and launch “My Computer”. Or go to your computer settings from the shortcut on your desktop. After you start the “computer”, you will see all the hard drives that you have, as well as connected flash drives. Where Windows is installed, a small win icon will be drawn.

If for some reason this method does not work, then there is another way to find out the location of the OS on the computer. For this:

To avoid this need in the future, try to install the operating system on the “C” drive, and also create an additional directory for storing files.
Copying files
Once you have determined which of your drives is the system drive, you can, if necessary, copy all your information to an additional drive (in my case, drive “D”). It is advisable to carry out this procedure in advance before installing Windows. Especially if you have a habit of not organizing your files. Therefore, immediately check the main directories related to the system drive C; by default, this includes:
- Desktop.
- Library (images, documents).
If you are going to carry out a partial reinstallation of the OS, then create a new folder on an additional disk and copy all important files there (do not try to copy installed programs, they will not work anyway!). If the OS installation from a flash drive is complete, then copy your data to other USB drives, external hard drives and cloud services.
The main thing a computer is used for is storing information. Therefore, the most important thing here may be saved passwords, details, and so on. Don’t forget to write down all important logins and passwords (as well as files for WebMoney Keeper) from your browsers, because after reinstallation this information cannot be returned. Of course, if your computer is completely new and you just want to install a different version of Windows, then there will obviously not be important information on it.
Driver preparation
As a rule, some of the drivers are included in the operating system distribution itself and are installed along with Windows. Sometimes it happens that they are installed incorrectly or are completely absent from the installation package itself (it is assumed that the user has a disk with all the necessary drivers).
The main thing that needs to be provided is the presence of a fresh network driver. It is necessary for the correct operation of the Internet and Wi-Fi adapter. Therefore, it is not necessary to download absolutely all drivers to an additional disk or flash drive. If you have a network driver, you can easily download the rest from the Internet.
Preparing USB media and BIOS
Therefore, this article assumes that you have already created a bootable USB flash drive and are ready to install Windows itself. However, to start this process, it is not enough to simply insert a flash drive into a USB port.
By default, the BIOS settings are set in such a way that if there is a disk in the disk drive, the computer will boot from it. If, when Windows boots, there is a flash card in the USB input, then this fact is ignored by the system, and loading occurs as usual.
How to enter BIOS
To change the boot priority of devices, just go into the BIOS and set the necessary parameters. For this:
- Insert your bootable USB flash drive into the USB port.
- Restart your computer.
- Immediately after the screen turns on, press the button to enter the BIOS settings (most often this is delete).
If you did everything correctly, you will see the BIOS main menu. It looks something like this:


If you pressed the delete button several times, but the BIOS did not appear, then perhaps your laptop or computer model uses a different default key to call up this menu. To find out exactly how to enter the BIOS from your computer, use the search or random dialing method (try the F2, F12, Escape, etc. buttons).
Changing BIOS settings
After you manage to get into the BIOS, you need to change the boot order of the devices. Control in this menu is carried out using the “arrows”, the “confirm” key - “enter”, back - backspace or escape. Once you open the BIOS, the control buttons will be marked on the screen.
The next thing you might notice when you get into the BIOS is that it is not Russified. Therefore, to change the boot priority of devices, you will need to know the simplest terms in English that will help you find and correctly change the necessary parameters. So follow these steps:

After you correct the necessary parameters, you can exit the BIOS menu. However, do not forget to save all changes made. Therefore, when exiting, be sure to select Save and Exit.
Installation does not occur
Insert the bootable USB flash drive into the USB port and reboot the device. An inscription should appear on the screen prompting you to press any button to boot the system from a flash drive or disk. If such a boot screen does not appear and the computer starts up as usual, then you may have configured the BIOS incorrectly, or you forgot to save the changes you made. Therefore, open the BIOS again, and then make the necessary changes again. If you are sure that you have configured the BIOS correctly, then the problem may lie in the image itself, the flash drive, or even a faulty USB port. In this case, you may need another USB drive or wine distribution.
Installing Windows 7
After the required loading screen appears, follow the system’s recommendations and press any button to continue the installation.
It should be immediately noted here that depending on the version and build of your win operating system distribution, the settings of various parameters may differ slightly. There may be additional settings or the absence of those that will be mentioned in the article. In any case, don't worry about it. If you encounter such a situation, just carefully read the information that win offers you to choose and mark the parameters you need. As a rule, for such cases, the Win 7 system explains that in the future all the parameters you select can be changed or offers a choice of “default” settings (if you don’t know what to choose).
The first thing you will be asked to select is the operating system interface language, date and time settings, and keyboard layout. After selecting the settings you need, click the “next” button.

An information screen will appear on which you can familiarize yourself with the reinstallation procedure in detail, after which you can click “install”.
 The Windows 7 installation wizard will prompt you to select one of the operating system versions. It all depends on which image distribution you copied to the flash drive. If you initially downloaded win 7 Home Edition or Professional from the Internet, then this window will not appear. If you have downloaded a collection of various packages, then from the list select the one for which you have a license key (it can be found in the laptop box or on the back cover). If you cannot find it or are in doubt, you can enter this information later, within 30 days. Therefore, select the required version and click “next”.

Read the license agreement in detail, accept its terms and continue installation by clicking “next”.

Win 7 will prompt you to select an installation type:
- Partial (updating system files, saving information on an additional drive “D”).
- Complete (all user information will be permanently erased).
Depending on the purpose of installation, select the desired item. If you are in doubt about making a decision, you can find more detailed information in the “decision help” menu. In principle, further actions will not be much different. The article assumes a complete installation of Win 7, then we will consider the parameters that are equivalent for the selected “full installation” item.

Then you will be asked to select the disk on which the Windows 7 operating system will be installed. Select the desired one with the right mouse button and click on the “disk settings” line.

Select the partition in which Windows 7 will be installed and click “Disk Setup”. If you have never installed an operating system, then this is where you may have difficulties.
Hard drive setup
Usually, in addition to the main disk partitions that are visible to the user (the so-called drives C, D, etc.), there are so-called hidden partitions. This is especially common with new laptop models. Usually the so-called recovery system is located here, which allows you to return the operating system settings to factory settings. There may also be a special section created by win 7. It is necessary for setting up the encryption of system settings data. Therefore, it is better not to change this parameter during OS installation. And if the need arises, then change it using third-party utilities.
In the same “disk setup” menu, format each partition.

This procedure will remove all custom settings. But since you have previously saved all the important information, this procedure is absolutely not scary. The data formatting procedure must be carried out without fail. Therefore, we confirm the removal of all data from the computer.

After the system completes the removal, you can exit the disk settings menu and click “next”. Automatic unpacking will begin.
Configuring operating system settings
After the system finishes installation, you will be prompted to enter your computer name and username.
Here you can also configure other administration settings (password, additional accounts).

Then you will be asked to enter the license key (depending on the distribution build, this item may be missing altogether).

Now select windows security settings. Check the top line to automatically check and install updates.

The next item is setting the date and time (time zone). Here you can enable or disable the automatic transition of the system to summer or winter time. Plus, you can always change your time zone settings at any time.

If the win 7 distribution had built-in network drivers, the computer will automatically detect the network connection and prompt you to select security settings. Otherwise, this window simply will not appear.


In contact with
Make a bootable USB flash drive with Windows 7
Where to download the Windows 7 image - watch the video below
Very often, when reinstalling Windows, you need a bootable USB flash drive with Windows 7. How to do it? The process itself is not complicated, but let's try to figure it out.
Here we will describe 2 very different methods in order to create a bootable USB flash drive from an iso image.
We will analyze everything from beginning to end, we will try to clarify all the details of creating a bootable installation flash drive with Windows 7
We also recommend reading the article on how to properly install Windows from a flash drive; sooner or later it may come in handy. All programs used here work perfectly under Windows 7, 8, 10.
The 2nd method is also very noteworthy; with it we will make a bootable Windows 7 flash drive without any programs, using the Windows command line, although it is noticeably more complicated.
It is important to keep in mind that the USB ports must be in order (or at least one of them is what we need). The fact is that if we use a faulty USB, then there may simply be a loss of contact and nothing may work out. Plus, of course, the flash drive should also be in order, in general, keep this in mind.

Original Windows 7 images for flash drive here: http://nnm-club.me/forum/viewforum.php?f=504
Let us clarify the following points when creating a bootable USB flash drive with Windows 7:
- First we need to find a windows iso image(to do this, in any search engine we write - download Windows 7 torrent, download one of the proposed options using the free torrent program. However, do not forget that you have a good antivirus, plus you can download only from trusted sites, ask your friends and acquaintances about such ). We will assume that we have found
- Let's move on to the flash drive, we will completely clear it, so copy all important data from it in advance
- Also, don’t forget about the size of the flash drive.. You need at least four GB, although more correctly it is no less than the size of the iso image
How to make a bootable USB flash drive for Windows 7-10? Step-by-step instruction
Now let's prepare the flash drive, for this we need to format it. We do it like this:
- We go to “My Computer”, find the flash drive we need there
- Right-click on it
- Select "Format"
- In the window that appears, you can also check the box for “Quick, clearing only the table of contents” - this will be quite enough in most cases
- That’s it, click “Start”, an additional warning may appear, we agree
- We wait for the process to complete (usually no more than a minute)
- At the end, the flash drive is ready for further actions, it is completely empty

If you have any questions with formatting or would like to learn more about this important and useful process for information storage devices, we recommend that you view the corresponding section. In which, by the way, you can select a program for formatting a flash drive, if it does not want to succumb to this process in the standard way (as described above), plus with the help of additional programs for formatting a flash drive, you can improve its technical condition.
Now we are almost close to the process of creating a bootable USB flash drive with Windows 7, for this we will consider a very interesting and simple program .
Download the original ISO image of Windows 7
The simplest, most convenient and free program to solve our problem is Windows 7 USB/DVD Download Tool
Very convenient, bootable fleshka is done in just 4 clicks, and it can also be made into a boot disk.
Or you can do it from the official website using this direct link http://wudt.codeplex.com/ (copy, paste into the address bar of the browser and press enter).
The Microsoft .NET Framework_Online_Setup is also required in the system (completely free, online loader, which means the Internet must be turned on), usually this utility is already installed in different windows assemblies. In general, this is an official application from Microsoft, it is also important for the operation of other programs and games.
And so, you downloaded Windows 7 USB/DVD Download Tool. Now install it.
Open the program. We see this window.

Click on “Browse” and look for the Windows iso image we need on the computer.

Now if you specified an iso image, click “Next”. Now click on “USB device”.

Here we click on “Begin copying”.

And so began the process of recording an ISO image of Windows 7 onto a USB flash drive. We are waiting for the end.
The Windows 7 bootable USB flash drive is ready.
We recommend that you read the article on how to properly install Windows 7 on a netbook. So you will know what to do if the question arises of reinstalling Winows 7 on a netbook, laptop or computer without disk drive.
The second method is not simple. It is interesting for those who do not want to install any additional programs on their computer
This method uses the Windows command line, through which, by the way, you can do many more interesting things.
And so, let's go. We connect the flash drive to the USB port. Please note that a 4 GB flash drive will be used here. Open the command line like this, “Start” - “Run”:

Enter the command “cmd” and press “Enter”:

This is what should appear:

The first command we enter is “diskpart”, a special editor that gives us the ability to manage disks, press “Enter”:

Now we write “list disk” and press “Enter”, thereby getting a list of devices:

Now you need to determine without errors where your flash drive is located, in our case it is “Disk 3”. It most likely will not match yours, just make sure that you have found your flash drive correctly. If, for example, you have a flash drive “Disk 1”, then write it in the line and press “Enter”.
Attention! If you do not correctly identify the flash drive, you can format one of your hard drives and lose all the information on it.
- So, enter “select disk 3″, press “enter”
- The program detects our flash drive
- Now enter “clean”, which will delete files on the flash drive, press “enter”
- Next, enter “create partition primary”, press “enter”
- With this command we created a section
- Now enter “select partition 1”, press “enter”
- Now enter “active”, again “enter”
- Now we need to make the file system format for the flash drive NTFS by formatting it using “format fs=NTFS” or for quick formatting we write “format fs=NTFS QUICK”, press “enter”
- We are waiting for the completion of the formatting process
- All is ready
- We write “assign” and the flash drive will automatically receive a letter, for us it is J
- Upon completion, a window with the flash drive will automatically open
- Now we need to exit using the “Exit” command
- That's it, the bootable USB flash drive has been created, now you need to copy all the files from the installation operating system to it
It is only important to understand that it is not the iso image that should be copied in one file, but all the folders that are included in this iso image. To do this, you just need to mount it with some program, for example DAEMON Tools.
That's all, we have looked at the question of how to create a bootable USB flash drive with the Windows 7 operating system.