
A program for backing up VMware virtual machines. Free backup of virtual machines based on VMware ESXi Configuring backup parameters for virtual machines
Let's look at and compare two methods for backing up VMware virtual machines.
Initial data
The test bench consists of two ESXi hypervisors on a Fujitsu Primergy BX2560 M2 server connected via SAN (two 8 Gbit/s ports) and LAN (two 10 Gbit/s ports). ESXi and VSCA version 6.5. For ESXi, the disks were presented by the Fujitsu ETERNUS DX8700 S2 storage system. As a backup storage system we use an EMC Data Domain 6300 connected via SAN (four 8 Gbit/s ports). To perform a backup, in order to save time, we will use the ready-made Backup Exec tool. The system management server is installed on a physical HP ProLiant BL460c Gen8 server and also has a network connection via SAN and LAN with two ports.
Three virtual machines were created for testing: VM1 (146Gb), VM2 (157GB) and VM3 (284Gb). The testing procedure will look like this: we will perform FULL Backup of each system three times, after which we will calculate the average backup speed (Gb/min) for each method.
The Backup Exec system has four ways to access virtual machine data, for a physical server these are SAN, LAN (NBD), NBDSSL and the fourth, if the Backup Exec server is installed on a virtual machine, HotAdd. Let's test the option when Backup Exec is installed on a separate physical server and compare the pros and cons of performing backups over SAN and LAN.
Setting up Backup Exec is quite simple and consists of the following steps:
- Select an existing or create a new task to perform a backup of virtual machines
- Open properties for this task
- Go to tab Virtual Machines > VMware subsection
- Mark the connection method we need (it is permissible to activate all four methods at once and set their order of use)

METHOD ONE: BACKUP VIRTUAL MACHINES OVER SAN

In order for Backup Server to backup ESXi virtual machines over a SAN, it must first present the same LUN(s) that were presented to ESXi. In this case, Backup Server, using the vStorage API, requests information from vCenter in which LUN the VMDK of the virtual machine is located, takes a snapshot of the disk and picks it up over the SAN.
The result of this experiment is average.
METHOD TWO: BACKUP OF VIRTUAL MACHINES OVER LAN (NBD)

In this mode, Backup Server requests from vCenter information about which ESXi the virtual machine we need is located on, takes a snapshot and transfers it over the local network from the ESXi server to the Backup Server.
The result of the second experiment is average.
CONCLUSIONS, PROS AND CONS
If you build a modern infrastructure from scratch using network equipment with a bandwidth of 10 Gbit/s, then using backup in the mode of connecting to data via a local network (NBD) will most likely be more cost- and time-effective. In the case when the network between ESXi and Backup Host is 1 Gbit/s, and the necessary equipment for connecting via SAN is already available, then the first method will be more efficient and faster.
The main advantage of performing a backup over a SAN is that data transfer does not load the local network and is performed at a fairly high speed, but in the case of a 10 Gbit/s network this is no longer such a clear advantage, since even with relatively large volumes of information the backup window does not take much time.
The main advantage of performing backup over LAN is the ability to use cheaper equipment as a data storage system. And as the test showed, building a modern network on 10 Gbit/s equipment will provide faster backup than an 8 Gbit/s SAN.
Restoring virtual machines with thick disks via SAN is performed quite quickly, but it is better to refuse recovery with thin disks because this often ends with an error or crash.
From general practice, we can say that to restore virtual machines it is better to always use a local network and not overwrite the old virtual machine, but try to restore it to a new location.
The information used in the article is taken from official sources.
To organize an automatic backup system for virtual machines running on a VMWare ESXi server, we will use a free utility MKSBackup, which you can download (at the time of writing, the latest available version is MKSBackup 1.0.4 dated January 24, 2013). This utility is a kind of front-end that integrates with various backup scripts, including GhettoVCB(VM backup script written in perl and maintained by enthusiasts). GhettoVCB allows you to create online backups of running virtual machines. A VM backup is created by creating a snapshot of it.
Important. GhettoVCB does not work with virtual machines that have their own snapshots. To perform a backup of a virtual machine, all snapshots must be deleted (for example, through Snapshot Manager).
MKSBackup is one of the few backup tools that allows you to perform online backup of virtual machines. MKSBackup can be used to backup virtual machines running on both commercial editions of VMware ESXi and free VMware Hypervisor. The utility is developed in Python and is cross-platform. The MKSBackup utility does not have a graphical interface, works via the command line, and is configured through configuration files.
Naturally, the convenience and manageability of the solution for organizing backup of VMWare virtual machines based on MKSBackup is lower than that of commercial products, but is largely compensated by its free nature, ease of configuration and speed of deployment.
Installing the MKSBackup backup script
Configuring virtual machine backup settings
The next step is to configure the backup settings for virtual machines running on the ESXi server. Configuration is carried out by editing the mksbackup.ini configuration file (located in the C:\Magik folder by default).
Open the mksbackup.ini file in any text editor. The structure of the file consists of several sections, the name of each section is enclosed in square brackets.
Section:
In this section you can set email notification parameters. We are not interested in this, so we will leave it
Next section. This section represents the backup task and describes the various parameters that ensure the launch of a backup of virtual machines in the Windows environment. In our example, the task looks like this:
Program=ghettovcb host=10.10.1.89 port=22 login=root password=LI&f3ccc23 local=C:\magik\vmware global_conf=ghettoVCB.conf vm_list=vm1_https winXPtest destination=C:\magik\$(vm) scp_bin="D: \Install\Putty\pscp.exe" -scp -r

Let's take a closer look at the task parameters:
program– backup program, leave ghettovcb
host– name/ip of the ESXi host on which the virtual machines are running
port– port for access (default port 22 – SSH protocol)
login– username with access rights to the ESXi server (by default this is root, but for security purposes it is better to create a separate user on the ESXi server)
password– user password
local– local directory in which the backup script and its configuration are stored
global_conf– file with ghettoVCB script settings
vm_list– a list of virtual machines for which you need to create a backup copy. If you need to back up all virtual machines, this parameter should be left empty. If you need to exclude some virtual machines, use the vm_exclude parameter.
destination– the parameter allows you to specify the type of operation to be performed. It could be
- backup – perform a simple backup (no need to specify a destination)
- copy – perform a backup and copy the resulting files to the specified directory
- move - perform a backup and move the resulting files to the specified directory
Let's focus on the move option, as it is more optimal. In this case, local backups of virtual machines will be created on the ESXi host, which will then be transferred to the computer running the script.
mon-sun – it is assumed that the script can be executed daily (we will leave it this way, since we will set the frequency of running the backup through the Windows scheduler).
In addition, we will indicate the directory into which VM backups will be moved (C:\magik). The $(vm) parameter indicates that a separate directory with its name will be created for each virtual machine, where the virtual machine files will be stored.
Note. A detailed description of the script's configuration settings and its syntax is provided on the developer's website.
scp_bin– path to the scp utility
Important. Make sure the SSH daemon is enabled on the ESXi server.
VM_BACKUP_VOLUME=/vmfs/volumes/msa2000/backup VM_BACKUP_ROTATION_COUNT=3
VM_BACKUP_VOLUME– a directory on the ESXi server in which copies of virtual machines will be saved (naturally, there should be enough free space on the VMFS partition)
VM_BACKUP_ROTATION_COUNT– the number of local copies to be stored (in our example, the last 3 backup copies will be stored)
All that remains is to use the plink utility (also included with Putty) to save the host key in the local ssh cache. For example, like this:
PLINK.EXE [email protected] ls /

Running a backup of virtual machines on a VMWare ESXi host
Let's test the backup script. To do this, open a command prompt with administrator rights and run the command:
C:\Magik\MKSBackup\mksbackup.exe -v -c C:\Magik\mksbackup.ini backup VMWARE_FROM_WINDOWS
Where is the key –v indicates that detailed information should be displayed, -c path to the settings file mksbackup.ini, backup– means that you need to start a backup, at the end the name of the task from the file is indicated mksbackup.ini(in our example, the task is VMWARE_FROM_WINDOWS).

If everything is configured correctly, the utility will begin to display detailed information about the backup process to the console (the backup process is quite lengthy, so you shouldn’t expect it to finish quickly).
The backup process can be tracked by the appearance of snapshot creation/deletion events in the VMware vSphere console.
During script execution, folders containing virtual machine files will appear in the destination directory.
After performing a test copy, you can move on to automating the backup process. To do this, let's create a new Windows scheduler task.
Let's create a task named “Backup ESXi”, which runs on Fridays and runs the command: C:\Magik\MKSBackup\mksbackup.exe -v -c C:\Magik\mksbackup.ini backup VMWARE_FROM_WINDOWS
In the task settings, do not forget to specify that it needs to be run with administrator rights (the “Run with highest privileges” option).

Note. If the task will be run under a different account (not the one under which testing was performed), you must remember that the cache of the new account will not contain the required key. To solve the problem, you need to run the above plink command from a new account.
Disadvantages of this given method of backing up virtual machines:
- rather low backup speed
- a large amount of free space required to store VM backups
These disadvantages are compensated by its free nature, but for large solutions it is preferable to use commercial backup products, such as Veeam or HP DataProtector.
The task arose of organizing backups of Hyper-V virtual machines from individual virtualization hosts (without a cluster) on several remote sites. Due to the fact that one of the inputs of this task is the presence of very modest and unstable communication channels, the idea of using a single backup server on a central site disappeared on its own. Because it’s one thing when you can consolidate backup copies into one central location, taking into account block changes, while reducing the load on the network, for example, with the same System Center DPM, and quite another thing if, in a short time, you need to perform a complete recovery of a VM at a certain point in time through these same weak channels. Thus, it was necessary to think about how to organize backup of virtual machines directly on a remote site, provided there was no increase in the ongoing costs of licensed software and existing equipment.
It so happened that at these remote sites, in addition to the virtualization host, there is an old server that was previously decommissioned, but quite working IBM System x3200, which can be used as a file server to store backup copies of virtual machines. The idea arose to install additional disks on this server and deploy it as a base OS Linux with package QUADStor, with the help of which, in turn, create a virtual disk with support for block deduplication and using the protocol iSCSI present this disk to the virtualization host Hyper-V, and already on the virtualization host, using the product, configure “hot” backup of virtual machines to this same iSCSI disk. The end result should be “cheap and cheerful”. In this note I will describe the procedure for setting up such a design.
Preparing a file server based on Debian Linux with QUADStor
The disk basket of our future IBM System x3200 file server in the existing configuration supports no more than 4 SAS/SATA 3.5" drives. Considering that the controller in this server model is also very modest (LSI Logic SAS1064ET) and, to put it simply, can only “strip” or “mirror”, we will create two mirrored pairs of disks - the first on two existing low-capacity SATA disks for the Linux operating system, and the second on two additionally installed low-cost 1TB SATA disks for storing VM backups (for the QUADStor virtual disk).
So, without any special frills, we install the OS on the first pair of mirrored disks Debian GNU/Linux 8.6 (Jessie). We leave the second mirrored pair of large disks unallocated.
Let's move on to installation and configuration.
Installation procedure QUADStor for different Linux distributions is described in the documentInstallation/Upgrading on RHEL/CentOS 5.x, 6.x, SLES 11 and Debian 6.x, 7.x . Based on the fact that in our case we are using Debian, we install the pre-required packages:
# apt-get install uuid-runtime build-essential sg3-utils iotop sysstat lsscsi apache2 psmisc firmware-qlogic linux-headers-`uname -r`Enable support CGI for web server Apache:
# a2enmod cgiAdding a rule iptables, allowing incoming connections to the web server and saving the current rules:
# iptables-A INPUT -i eth0 -p tcp -m tcp --dport 80 -j ACCEPT # iptables-save> /etc/iptables.confReboot the server and make sure that the web server service starts successfully when the system starts:
# systemctl status apache2.serviceNow download and install the main package QUADStor Storage Virtualization(take the link to the current version of the package here:
Storage virtualization downloads ): # mkdir~/QUADStor-files # wget http://www.quadstor.com/virtentdub3z/quadstor-virt-3.2.11-debian7-x86_64.deb-P~/QUADStor-files # dpkg-i ~/QUADStor-files/quadstor-virt-3.2.11-debian7-x86_64.deb ... Performing post install. Please wait... Synchronizing state for quadstor.service with sysvinit using update-rc.d... Executing /usr/sbin/update-rc.d quadstor defaults Executing /usr/sbin/update-rc.d quadstor enable Building required kernel modules Running /quadstor/bin/builditf. This may take a few minutes. Processing triggers for systemd (215-17+deb8u5) ...The package installation should complete without errors.
After installation the service quadstor will not start, but during the installation process this service should be automatically registered in startup when the system starts. We reboot the server and make sure that after the system boots, the service starts automatically and successfully:
# systemctl status quadstor.serviceWe check access to the web interface by following the link http://(server). The web server will have to redirect us to the link http://(server)/cgi-bin/system.cgi
After the installation of QUADStor is completed, we perform the initial setup, which is not fundamentally different from
, namely:- Setting up access restrictions to the web server Apache, and also, if necessary, we set up support HTTPS;
- Go to the web management interface QUADStor and create there Storage Pool;
- Add a disk ( Physical Storage) V Storage Pool(in this case, as the added disk we use the second mirrored pair of disks of large disks on our server, which are presented in the system as one disk device);
- Create a virtual disk VDisk.
After the QUADStor virtual disk has been created, we will configure access to it using the protocol iSCSI. In general, information on how it is possible to access QUADStor virtual disks can be found in the documentAccessing Virtual Disks (VDisks) .
Functional iSCSI Target implemented in QUADStor using the service ietd, which opens in the system TCP-listener on port 3260 , so we need iptables create the appropriate allowing rule:
# iptables-A INPUT -i eth0 -p tcp -m tcp --dport 3260 -j ACCEPT # iptables-save> /etc/iptables.confTo set iSCSI configuration settings regarding the virtual disk we created, let's go to the properties of this disk in the QUADStor web console ( Virtual Disks > Modify > iSCSI Configuration):

Here in the field IQN we will see the automatically generated iSCSI disk identifier and to restrict access to this disk we will set the field values Incoming User And Incoming Password. In these fields we will enter an arbitrary username and password that our file server will request from the iSCSI client (Initiator) when connecting to this QUADStor virtual disk.
Connecting a QUADStor disk to a virtualization host on Windows Server
By going to our Hyper-V based virtualization host Windows Server 2012 R2, let's open Control Panel and find the applet in it iSCSI Initiator. The first time you access this applet, the system will inform you of the need to start a system service necessary for correct operation of the iSCSI protocol. We agree to start this service and transfer it to the automatic start state at system startup:

After starting the service, the iSCSI management applet will open, where on the tab Discovery let's press the button Discover Portal to add information about our Linux based file server

In the window that opens, enter FQDN name or IP address Linux servers (leave the default port - 3260 ) and press OK

After that, in the tabular part of the field Discovered targets the previously mentioned one should appear IQN of our QUADStor virtual disk with the status Inactive. That is, the disk was successfully detected on the remote Linux server and now, in order to connect this disk, we will use the button Connect.

Add this connection to the list of Favorite Targets In order for the disk to be added to the list of disks that are automatically connected when the system starts, click the button for advanced disk connection settings - Advanced

In the window that opens, enable the option Enable CHAP log on and specify the username and password for accessing the QUADStor disk that we set earlier.

Save the settings made by closing the windows with the button OK

If everything is done correctly, the disk status should change to Connected.

Let's go to the bookmark Favorite Targets and make sure that the disk is in the list for automatic connection when the operating system starts.

At this point, connecting the QUADStor virtual disk via the iSCSI protocol can be considered complete. Now you need to initialize this disk in the system and create a partition with a file system on it NTFS. To do this, let's go to the equipment Disk Management(diskmgmt.msc), select the connected disk and put it in the state Online

Then we will initialize the disk - Initialize Disk

You will be asked to select the disk partition type. Since we are using a QUADStor virtual disk, it is likely that over time we will want to increase the size of the disk, and it will be larger than it is now. Let me remind you that the QUADStor virtual disk can be increased at any time to 64TB, despite the fact that the actual size of the physical disks on which this virtual disk is located will be small and/or will remain the same. And given the fact that in MBR there is a limit on the size of logical drives in 2TB, then in our case it makes sense to choose the type of markup GPT:

After the disk has been initialized and a partition table has been created on it, we will create a partition with a file system on this disk NTFS

Let's assign a separate letter to this disk, for example E:\, and wait for the formatting process to complete, which, depending on the size of the disk, may take some time.
At the end of the formatting process, we will make sure that the disk is available to us in the system, and we can create, modify and delete folders and files on it. After these checks, we will reboot our virtualization host and make sure that during the system boot process the disk is automatically connected and fully accessible.
Installing Veeam Backup Free Edition 9.5
To backup Hyper-V virtual machines we will use the program Veeam Backup Free Edition 9.5, which will allow us to create a full backup VM without shutting it down.
You can learn about the main features of this product from the document Product Overview.
System requirements can be found by downloading the document Release notes.
EULA is available hereVeeam End User Software License Agreement .
Latest version 9.5.0.711 , currently available, can be downloaded from the Veeam website.
Image file VeeamBackup&Replication_9.5.0.711.iso 1.5GB in size after downloading, we copy it to our virtualization host based on Windows Server and mount it into the system. For example, using PowerShell you can do it like this:
Mount-DiskImage -ImagePath " C:\Temp\VeeamBackup&Replication_9.5.0.711.iso"On the mounted disk, run the installation program Setup.exe, read and accept the license agreement, click Next
 At the step of entering the license key, we leave everything unchanged. Without a key, the program will work in mode Free Edition with limited functionality, which will be sufficient for our task.
It is worth noting that in fact a full-fledged copy is installed on the system Veeam Backup & Replication, and if a license key was not specified during the initial installation, you can add it to the application later and upgrade its operating mode to editions Standard, Enterprise or Enterprise Plus. You can learn more about the differences between the free and paid versions from the document Veeam Backup: Free vs Paid
In the next step, without changing the set of components to be installed, click again Next


The components are additionally installed from the distribution, so you don’t have to download anything separately. After the necessary components are deployed, we start the check again using the button Re-run and move on to the next installation stage - Next.

Here we will see a summary screen of the current settings with which the application will be installed. If you enable the option Let me specify different settings, then all of the specified settings can be changed before starting the actual installation process. For example, instead of the default named instance SQL Server 2012 Express, you can specify installation into an existing instance of SQL Server, change the database name, service account, directory location or port numbers. In most cases, you can leave the proposed settings in the default configuration and click Install.

During the installation process, a named instance will be deployed on our virtualization host Microsoft SQL Server 2012 SP3 editorial staff Express(VEEAMSQL2012) and the VeeamBackup database will be created in it. Let's wait for the installation process to complete.

Registering a virtualization host with Veeam Backup
At the end of the installation process, launch the shortcut from the desktop or start menu Veeam Backup & Replication Console. We use as a connection server localhost and default port 9392 . Let's enable the option to use the current user's credentials Use Windows session authentication and click Connect

First of all, let's register our virtualization host in the program so that it becomes possible to backup virtual machines located on this host. To do this, on the tab VIRTUAL MACHINES in the infrastructure tree we select Microsoft Hyper-V and in the context menu or top ribbon of buttons select Add server.

In the Add Server Wizard that opens, enter the FQDN name of our server...

On the move Type select the Hyper-V server type. In our case, this is a separately operating host - Standalone

On the move Credentials You will need to specify an administrative account through which Veeam Backup will connect to the virtualization host and access the virtual machines for backup operations. In my opinion, for this purpose it would be more correct to create a separate service account. In this case, you can use either a local account created on the virtualization host or a domain account. In our example, we selected a domain account that was granted administrative rights on the virtualization host.


Click Next and wait for the completion of the Veeam Backup configuration and the connected virtualization host
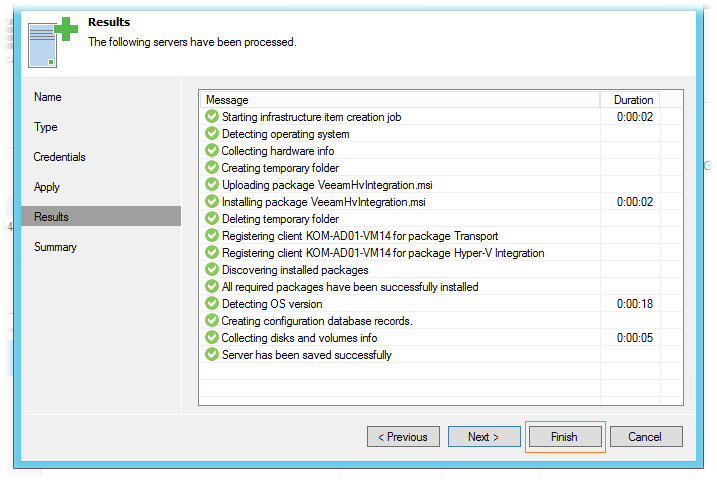
After closing the Add Host Wizard, the Veeam Backup console should display a list of virtual machines located on the added host.

Now you can move on to checking the backup functionality of virtual machines using Veeam Backup.
Verifying VM backup in Veeam Backup
On the disk we connected earlier via the iSCSI protocol, we will create a directory in which full backup copies of virtual machines made from Veeam Backup will be placed. In our case, this will be the E:\VMBackups directory.
Then in the Veeam Backup console, select some virtual machine and call the menu item for it VeeamZIP

In the window that opens, specify the path to the newly created directory for storing backups, if necessary, define the parameters for deleting old backups and disable compression. Compression of Veeam Backup backups is undoubtedly an interesting thing, but in our case, enabling compression will lead to low deduplication rates on the QUADStor disk (tested in practical experiments). Having configured all the parameters of the current backup session, click OK

Launching a backup task will be accompanied by an information window with status indicators of the task being performed.

During the backup we will also be able to see what is in the console Hyper-V Manager the virtual machine assumes the appropriate status.

As a result of executing the backup task, a full backup copy of the VM will be created in the directory we specified in the form of a file with the extension VBK. This type of file is associated in the system with Veeam Backup and by double-clicking it, the Veeam Backup console will automatically launch and a form will be opened in it, from which you can, if necessary, perform the operation of restoring both the entire virtual machine and individual files inside the VM ( Instant File-Level Recovery).

Thus, we believe that backup, as such, works for us, but now we need to solve another important problem. The fact is that the free edition of Veeam Backup has limitations that do not allow us to set up scheduled backups directly from the program interface. However, Veeam Backup includes a set of cmdlets PowerShell, which you can use to invoke a backup task in Veeam Backup. And if you combine this possibility with Windows Task Scheduler (Task Scheduler), then as a result we can get a completely workable solution to the problem of automating the launch of backups on a schedule.
Automation of running VM backups
You can get online help for Veeam Backup PS cmdlets hereVeeam Backup & Replication 9.5 - PowerShell Reference . And a ready-made PowerShell script that exploits the Veeam Backup cmdlets, in particular Start-VBRZip , we can find in the articleVeeam Backup Free Edition: Now with PowerShell! . I modified this script a little to add the ability to notify by email only if some error occurred during the backup process.
# ############################ User Defined Variables #################### ######### Names of VMs to backup separated by comma (Mandatory). For instance, $VMNames = “VM1”,”VM2”$VMNames = " KOM-AD01-WS305 " , " KOM-AD01-DEV03 "# Name of Hyper-V host VMs to backup reside on (Mandatory)$HostName = "KOM-AD01-VM14"# Directory that VM backups should go to (Mandatory; for instance, C:\Backup)$Directory = "E:\VMBackups"# Desired compression level (Optional; Possible values: 0 - None, 4 - Dedupe-friendly, 5 - Optimal, 6 - High, 9 - Extreme)$CompressionLevel = 0# Quiesce VM when taking snapshot (Optional; VMware Tools are required; Possible values: $True/$False)$EnableQuiescence = $True# Protect resulting backup with encryption key (Optional; $True/$False)$EnableEncryption = $False# Encryption Key (Optional; path to a secure string)$EncryptionKey = ""# Retention settings (Optional; By default, VeeamZIP files are not removed and kept in the specified location for an indefinite period of time. # Possible values: Never , Tonight, TomorrowNight, In3days, In1Week, In2Weeks, In1Month)$Retention = "In1Week"# ############################ Notification Settings ###################### ######## Enable notification (Optional) # Possible values: 0 - None, 1 - Only Warnings&Errors, 2 - All notifications$EnableNotification = " 1 "$SMTPServer = "KOM-SMTP.holding.com"$EmailFrom = " [email protected] " $EmailTo = " [email protected] " $EmailSubject = "VEEAM Backup Notification"# ############################ Email formatting ###################### #######$style = " " # ############################ End User Defined Variables ###################### ##########Asnp VeeamPSSnapin$Server = Get-VBRServer -name $HostName$MesssagyBody =@() foreach ($VMName in $VMNames) ( $VM = Find-VBRHvEntity -Name $VMName -Server $ServerIf ($EnableEncryption) ( $EncryptionKey = Add-VBREncryptionKey -Password ( cat $EncryptionKey | ConvertTo-SecureString) $ZIPSession = Start-VBRZip -Entity $VM -Folder $Directory -Compression $CompressionLevel -DisableQuiesce:(! $EnableQuiescence ) -AutoDelete $Retention -EncryptionKey $EncryptionKey } Else( $ZIPSession = Start-VBRZip -Entity $VM -Folder $Directory -Compression $CompressionLevel -DisableQuiesce:(! $EnableQuiescence ) -AutoDelete $Retention } If ($EnableNotification -in " 1 " , " 2 ") ( $TaskSessions = $ZIPSession.GetTaskSessions().logger.getlog().updatedrecords$FailedSessions = $TaskSessions | where ( $_ .status -eq "EWarning" -or $_ .Status -eq "EFailed") If ($FailedSessions -ne $Null) ( $MesssagyBody = $MesssagyBody + ($ZIPSession | Select-Object @(n = " Name " ;e = (($_ .name).Substring(0 , $_ .name.LastIndexOf(" (" ))) ) ,@(n = " Start Time " ;e = ( $_ .CreationTime)),@(n = " End Time " ;e = ( $_ .EndTime)),Result,@(n = " Details " ; e = ( $FailedSessions.Title))) ) Else { $MesssagyBody = $MesssagyBody + ($ZIPSession | Select-Object @(n = " Name " ;e = (($_ .name).Substring(0 , $_ .name.LastIndexOf(" (" )))) , @(n = " Start Time " ;e = ( $_ .CreationTime)),@(n = " End Time " ;e = ( $_ .EndTime)),Result,@(n = " Details " ;e = (($TaskSessions | sort creationtime -Descending | select -first 1).Title))) ) ) ) If ($EnableNotification -in " 1 " , " 2 ") ( If (($EnableNotification -eq " 1 " ) -And ($FailedSessions -eq $Null)) ( exit ) Else( $Message = New-Object System.Net.Mail.MailMessage $EmailFrom, $EmailTo$Message .Subject = $EmailSubject$Message .IsBodyHTML = $True$message .Body = $MesssagyBody | ConvertTo-Html -head $style | Out-String$SMTP = New-Object Net.Mail.SmtpClient ($SMTPServer) $SMTP .Send($Message) } }Open the console with administrator rights Windows PowerShell and run a test run of the script by running the command:
& "C:\Tools\VeeamZip.ps1"The running script will display the status of the task of creating a backup copy of virtual machines:

After we are convinced that the script runs successfully when launched manually, we will set up periodic launch of the script using Task Scheduler Windows. As a command executed in the Scheduler task, we will specify the launch powershell.exe with parameters:
powershell.exe-NoProfile -command "C:\Tools\VeeamZip.ps1"
The backup setup can be considered complete.
Checking the result
So, in our example, the PS script performs a scheduled backup (at night, once a day) of two virtual machines with automatic deletion of backup copies older than seven days. After seven days, we will check the result on our virtualization host.
 As you can see, we actually have 7 full backups for each of the two virtual machines that we specified in the script. The total size used by these backups is approx. 700GB. At the same time, if we look into the QUADStor web console and look at the properties of the disk pool on the basis of which the virtual disk was created, we will see that, taking into account deduplication, the actual physical disk capacity is used no more than 100GB.

In my opinion, the result looks quite good. And in this situation, if necessary, we can increase the storage period of backup copies to two weeks, or even up to a month. Just remember that for this we will need to increase the size of the QUADStor virtual disk and then increase the logical disk through the snap-in Disk Management on the virtualization host.
Free backup of virtual machines based on VMware ESXi
For VMware ESXi question virtual machine backup is particularly acute. Additional free software is inconvenient to use due to limited functionality. Therefore our backup will be based on a free script - ghettoVCB. This is the best version of existing scripts, although it has such a funny name and the whole project as a whole - www.virtuallyghetto.com, author William Lam. Its algorithm is to create a snapshot and clone a VM.
To set up a full-fledged backup scheme, we need:
- NFS server for storing files;
- connection via SSH to ESXi;
- script ghettoVCB.sh added to the ESXi server (to the root or folder of the future backup). This is done through SFTP in any way convenient for you, for example, FileZilla;
- we give rights to execute the copied script;
Now let's look at each point in more detail. To increase the performance and fault tolerance of a file server/backup server, it is better to use RAID10. In this case, Linux OS (Debian, Ubuntu, “convenient for you”) and file system are preferred XFS, because in this configuration, the write speed (the main priority for fast backup) will be higher.
We already have it, but you can also do everything in vSphere client: Configuration > Software > Security Profile > Properties… > Remote Tech Support (SSH) > Options… > Start or Stop.
Let's move on to the script configuration ghettoVCB.sh, the main parameters we need:
VM_BACKUP_VOLUME - path to the backup folder, in my case /vmfs/volumes/datastore1/backup
DISK_BACKUP_FORMAT - disk format, thin is best for backups
VM_BACKUP_ROTATION_COUNT - number of stored backups (for each virtual machine), I have 3
ADAPTER_FORMAT - adapter type, in my case - lsilogic
The remaining parameters are responsible for copying files over the network and e-mail notifications. More detailed configuration parameters are described on the developer's website!
If it is necessary to copy not all virtual machines, then a file is created with a list of VMs included in the backup. Create a file like this in vi:
- go to the folder with the script - cd /ghettovcb or backup
- vi vmlist
- press “a” and enter the VM names (each name on a new line)
- press “esc” and to save changes - “:wq” (without saving “:q”)
Let's run the script:
- ./ghettovcb.sh -a -l ./log.txt - start copying all machines, writing a log file in the same directory
- ./ghettovcb.sh -f ./vmlist -l ./log.txt - starts copying the machines specified in the vmlist file, logs are saved in the same directory
- ./ghettovcb.sh -f ./vmlist -g ./ghettovcb.conf -l ./log.txt - similar, only using the .conf file
The correct execution of the script will be signaled by a line with the inscription: “###### Final status: All VMs backed up OK! ######". If this is not the case, check the logs, command syntax and file paths.
In order to add a line to run on a schedule (in cron), you need to edit the file “/etc/rc.local.d/local.sh” by doing the following:
- go to the directory /etc/rc.local.d/local.sh
- chmod u+w local.sh
- open the file with an editor - vi local.sh
- enable editing of the “i” or “insert” keys
- add the following before the exit0 line:
/bin/kill $(cat /var/run/crond.pid)
/bin/echo 0 20 * * * /vmfs/volumes/datastore/script/ghettoVCB.sh -a -l /vmfs/volumes/backup/log/log.txt >> /var/spool/cron/crontabs/root
/bin/crond
- At the same time, we indicate the schedule (time is indicated in UTC, i.e. for MSK -3 hours), i.e. "00 20 * * * "
- press “esc” and save - “Shift+:” and “wq”
- at the end we execute chmod u-w local.sh
Thus, at 23:00 Moscow time, virtual machine files will be backed up. In our case, there will be 3 copies left.
Setting up backup for ESXi via ghettoVCB.sh completed.
A small test:
Local network - gigabit.
For local storage (hardware RAID 10 of 4 10K disks) - “time dd if=/dev/zero of=/vmfs/volumes/datastore/temp bs=1M count=1K” 8 seconds.
On “linux” storage (software RAID 0 of 3 7.5K disks) - “time dd if=/dev/zero of=/vmfs/volumes/linbackup/temp bs=1M count=1K” 12 seconds.
On Windows storage (hardware RAID 5 of 10 10K disks) - “time dd if=/dev/zero of=/vmfs/volumes/winbackup/temp bs=1M count=1K” 1 minute 44 seconds (I’m shocked) .
The results speak for themselves. Yes, the win storage has RAID 5, but it’s unlikely to be the only one to blame for this result.
We've sorted out the storage system, now we need to automate the backup. The best free tool is the ghettoVCB script, to use it you need to access the ESXi host via SSH. As it turns out, there is a very simple way to enable and disable access directly from the vShere Client: Configuration > Software > Security Profile > Properties… > Remote Tech Support (SSH) > Options… > Start or Stop. I think it will be clearer from these screenshots:
Download the latest version of the script. You can go “true” by doing as written on the script page in the “Setup:” section, but I did it simpler - I unpacked the archive on my computer, instead of editing the configuration file - I edited the script itself, copied it to local storage (via “Browse Datastore ").
Here are the main parameters:
VM_BACKUP_VOLUME - path to the backup folder, in my case /vmfs/volumes/linbackup
DISK_BACKUP_FORMAT - disk format, thin is best for backups
VM_BACKUP_ROTATION_COUNT - number of stored backups (for each virtual machine), I have 2
ADAPTER_FORMAT - adapter type, I have lsilogic
The remaining parameters do not need to be edited, but if you are interested, all parameters are described in detail on the script page, although in English, almost all parameters are written in Russian.
So, the script has been copied to local storage, connect via ssh, move the script somewhere closer to the root, for example to /ghettovcb/ghettovcb.sh, if you do not need to backup all virtual machines, you need to create a file with a list of virtual machines to be backed up:
cd /ghettovcb
vi vmlist
press “a”, enter the names of the virtual machines, each on a new line, press “esc” and to save the changes “:wq” or to exit without saving “:q”
Line breaks must be “\n”; when carrying “\r\n” the script will generate an error, so you should not create a list in Notepad and then copy it to storage if you have never used Notepad+ or EmEditor and don’t know what it is "\n" and "\r\n" - better create a list in vi.
Let's try to run the script:
./ghettovcb.sh -f ./vmlist -l ./log.txt
./ghettovcb.sh -f ./vmlist -g ./ghettovcb.conf -l ./log.txt
The script works, producing a lot of information, if at the end of the output we see “###### Final status: All VMs backed up OK! ######” then everything is fine, otherwise we read log.txt and figure out what we didn’t do So.
Now we need to create a schedule for backups.
cd /var/spool/cron/crontabs
chmod u+w root
vi root
press “a”, write a schedule, just keep in mind that the time is indicated in UTC, i.e. for Moscow this is local time minus three hours
00 20 * * * /ghettovcb/ghettovcb.sh -f /ghettovcb/vmlist -l /vmfs/volumes/linbackup/logs/`date +%F`.txt
or if you created a config file
00 20 * * * /ghettovcb/ghettovcb.sh -f /ghettovcb/vmlist -g /ghettovcb/ghettovcb.conf -l /vmfs/volumes/linbackup/logs/`date +%F`.txt
press "esc" and save ":wq"
in custody
chmod u-w root
Now every day at 20:00 UTC (23:00 Moscow time) the script will be launched, logs about its execution will be saved to storage in the logs folder, a separate log for each day.
According to the logs, it takes me about 4 hours to make a backup, I calculated the speed - about 4GB per minute, i.e. approximately 70MB per second, not bad at all. 2.7 TB of storage is enough to store two copies of each virtual machine, this is quite enough, plus there is free space left, and it is needed because... First, a third backup copy is made and only after its creation the oldest copy is deleted.
Well, one more thing against the “windows” storage - I tried to make backups with a script on it, the storage simply fell off, and the script itself ended with an error. I understand that the whole point is that the NFS recording was configured incorrectly, but the settings were default and I didn’t really want to understand the “tuning”.
The experiment was successful, you can buy a server with good disks, RAID 10 is planned for 5TB, this should be enough for future virtual machines.
Tags: vmware, vsphere, esxi, backup, backup