
How to connect via remote desktop. Creating and configuring a remote desktop. How to connect to remote desktop? — Connecting to a computer on a local network
A common task: setting up remote access to a computer that is connected to the Internet via a router.
Solution: do port forwarding on the router. Port forwarding is also called publication of the port or port forwarding. In English terminology the terms are used Port Forwarding And Port Publishing.
What is port forwarding
Port redirection is the mapping of a specific external port of a gateway (router, modem) to the desired port of a target device on the local network (server, workstation, network storage, camera, recorder, etc.)
But which port to forward depends on how you want to access the computer.
How to set up remote access via RDP (remote desktop, terminal)
RDP connections are made to port 3389 of the target computer. What should be done:
Step 1 Allow incoming RDP connections on the computer
Attention! It is possible to make INCOMING connections via Remote Desktop to the following editions of Windows OS:
Windows XP Professional;
Windows 7/8.1 Professional;
Windows 7/8.1 Ultimate;
Windows 7/8.1 Corporate.In Windows XP Starter, Home Edition, in Windows Vista/7/8/8.1 Starter, Home Basic, Home Premium there is no possibility of incoming connections.
To do this we open Properties of the system(WIN+Break), click on the link Additional system parameters:
Go to the tab Remote access, put the switch in position Allow connections to this computer, uncheck Allow connections only from computers running Remote Desktop with network level authentication (recommended) and click OK to apply the setting:

Step 2 Create an account on your computer under which the remote desktop user will connect.
Requirement No. 1. This the account must have a password. According to the default settings of the local security policy, accounts without a password are prohibited from connecting via RDP. It is not recommended to allow remote access to non-password-protected accounts in security policies. This will create a threat of unauthorized access from intruders.
Requirement No. 2. If the user is NOT an administrator on the local computer, he must be added to the group. This can be done in two ways.
How to allow a user without administrative privileges to connect to a remote desktop
Method one.
Right click on the system shortcut This computer and select Control:

In the window Computer management select Local users and groups => Users:

Find the desired user in the list and double-click to open its properties:

Go to the tab Group Membership and press the button Add:

Click the button Additionally:

Then, button Search:

Select a group from the list Remote Desktop Users and press OK:

In the windows Group selection And Properties:<пользователь> click OK:


Method two.
Open system properties (Win+Break), click Extra options:
Go to the tab Remote access and press the button Select users:

Click the button Add:

Click Additionally:

And Search:

In the list, select the user account to which you want to grant remote access rights and click OK:

Now click OK in the following two windows:


Step 3 Create a forwarding rule on the router, according to which, when a request is made on a given port, the connection will be redirected to port 3389 of the desired computer.
In D-Link routers, the required section may be called Virtual Server, as in D-Link DIR-615:

Also, it may be called Port Forwarding, as, for example, in DIR-300:

The essence is the same:
- Give an arbitrary name to the rule;
- Open a non-standard port on the router that is not occupied (field Public Port);
- We indicate the IP address of the target computer on the network where the remote user should go (field IP address);
- We indicate the port number through which the application or service runs on the computer. In our case, for the Remote Desktop Server service this is port 3389 (field Private Port).
If your ISP gives your router a dynamic address, it is convenient for you to use the Dynamic DNS service. D-Link has its own service where you can register an Internet address (i.e. domain) for free and set up access to your router and local network through it.
To configure Dynamic DNS, go to the section MAINTENANCE, select subsection DDNS Settings and click on the link Sign up... to go to the site and register a domain. Then set up synchronization of the domain with the router's IP address in the area DYNAMIC DNS SETTINGS and save the settings with the button Save Settings:

After this, you can connect not by IP address, but by an address like your-adres.dlinkddns.com:port
Checking the connection to the computer via remote desktop
Start the Remote Desktop Server client:

In field Computer Enter the address and port separated by a colon. In field User enter your username and click the button To plug:

Check the box and click the button To plug:

Now enter the user password, check the box Remember credentials, if you don't want to enter your password every time, and press OK:

After this, a message may appear:
The authenticity of the remote computer cannot be verified. Do you want to connect anyway?Here you can check the box Don't ask for connections to this computer again and press Yes:

It would be great to open files on another while sitting at one computer, listen to music on a third, chat with friends on Skype on a fourth and print documents on a fifth. Someone will say: “This is fantastic.” And I will answer: “No, reality!” To establish remote access to a computer that is located as far away from you as you like, all you need is permission from its owner and access to the Internet.
Remote connections are used very widely - for administering an enterprise's computer park, helping users, accessing files when they have to work on different machines. And it's very convenient. Today I will talk about ways to control the desktop of a remote PC using the operating system and three third-party programs.
AeroAdmin
is a very easy-to-use remote computer access program, free not only for personal but also for commercial use. It works without installation, that is, it can be launched from flash drives and other portable storage devices. Compatible with Windows, Linux and Mac OS X operating systems.

The program supports 2 methods of establishing a connection - by IP address and ID - a 9-digit personal computer identifier, as well as 3 connection modes:
- Full control of the remote machine.
- Desktop view only.
- File manager only - file transfer.
AeroAdmin has several unique features. One of them is mail chat, which starts working before the connection is established. It is intended for the exchange of email messages between a PC user and a remote operator, for example, with a request to connect and help solve a problem.
The chat window opens by clicking the button with the envelope icon (next to “ Stop»).

The second unique feature is the multiple levels of access rights that can be defined for each remote user:
- Viewing only.
- Keyboard and mouse control.
- File transfer.
- Clipboard synchronization.
- Only the PC administrator can edit rights.
The rights settings section opens through the menu “ Connection».

Unfortunately, AeroAdmin Free does not have a contact book. But it is available in the Free+ version. To get it, click the button next to “ Connect» and agree to free license activation.

The conditions for receiving it are very simple - like the program’s Facebook page and send the developers a link to your profile. After confirming the like, the address book will become available in your copy of AeroAdmin.
Windows Remote Desktop
Application " Remote Desktop"(Remote Desktop) does not require installation - it is natively present in all versions of Windows, starting with XP. To connect with it to another PC, you need:
- So that both machines have access to the Internet or are on the same local network.
- Enable permission for remote connections on the remote computer.
- Have a password-protected account on the remote machine.
Remote access permission is enabled in the application " System"(it is convenient to launch it from the Start context menu) in the section" Advanced System Settings».

In the additional parameters window, go to the “ Remote access» and mark the items highlighted in the screenshot. I show using Windows 8.1 as an example. In other versions of Windows, the window layout is slightly different, but similar options are there.

If you, like me, are setting up access on a machine running Windows 8.1, create a “white list” of those who will have the right to establish a connection with it. Click " Select users" and add the required names.

This completes the setup.
Subsequent actions are performed on the operator's machine.
- For quick start " Remote Desktop"Press the Windows + R hotkeys and enter in the field " Open» team mstsc.

- In the login parameters, enter the name of the computer you are connecting to (indicated on the system properties tab of the same name), as well as the user - your account on it. Let me remind you that the account must have a password.
- To start the session, click " To plug».

Now let's take a little look at the remaining sections of this window. If you want, set it on the “ Screen» the remote PC's desktop size and color depth (but note that high resolution and highest color quality will slow down the connection).

Adjust if necessary " Local resources» – audio broadcasting, hotkey management, shared clipboard, etc.

In chapter " Interaction» set performance parameters depending on the connection speed. Here, as a rule, nothing needs to be changed.

On the " Additionally» the optimal default security settings are found.

So, after clicking " To plug» a password entry window will open. Enter it and click OK.

The desktop of the remote computer will open in a new window. Manage it in the same way as the one you are currently sitting at.
If there is a user behind that machine, after connecting, his work session will be ended and a splash screen will be displayed on the screen. He will be able to log in again as soon as you close "Remote Desktop".
TeamViewer
- perhaps the most popular program for remote access to computers with various operating systems, designed for both experienced users and complete beginners. It is free for private, non-commercial use.
TeamViewer is released in both installation and portable versions, including options for mobile devices. In addition to remote control, you can use it to exchange files, chat and use an Internet phone, connect other participants to the session, change control sides, take screenshots and screencasts of the remote screen, and much more.
How to use
To establish a connection, you just need to know two things:
- ID – numeric identifier of the computer in the program (assigned once);
- Password (changes every time you connect).
This data should be provided to you by your partner - the user of the remote PC.
The main TeamViewer window is divided into 2 halves. On the left are your ID and password, on the right is the field for entering your partner’s ID. Enter it and click " Connect».

In the next window, enter your partner's password and click " Login».


By the way, the program is not bad as a parental control tool.
To control your own PC remotely, for example, your home PC from work, you just need to assign it a permanent password in TeamViewer. To do this, let's go to the menu " Connection" and click " Set up uncontrolled access».

Set a password and click " Continue».

We will refuse to create an account (you can create one if you wish, but it is not needed for this).

And let's complete the master's work.

Use the ID number shown in the last window and the password you just assigned to connect.
Ammyy Admin
– an even simpler means of accessing a remote desktop than TeamViewer. Does not require installation, is free for private use and is very simple to use. Connects to a partner by ID or IP address (the second option is for local networks). Works only on Windows.
The Ammyy Admin window is also divided into 2 halves: yours and your partner’s.

Instead of a password, connection consent is used here. When you press the " Connect", the partner must respond by pressing " Allow».

The Ammyy Admin remote screen, unlike TeamViewer, is not scalable, but the main functions - management, file transfer and voice chat - are present in it. The control panel is shown in the screenshot below.

Warning : AmmyyAdmin really don't like antiviruses, although there is nothing malicious in it. If your antivirus tries to block a program, add it to exceptions or pause protection for the duration of the session. updated: October 31, 2017 by: Johnny Mnemonic
Support for RDP - Remote Desktop Protocol has been present in Windows since version XP, but not everyone knows how to use (or even about the presence of) Microsoft Remote Desktop to remotely connect to a computer running Windows 10, 8 or Windows 7, including without using any third party programs.
In order to connect to a remote desktop, you do not need to install additional programs. Just start typing “remote desktop connection” into the search field (in the Start menu in Windows 7, in the taskbar in Windows 10, or on the Start screen of Windows 8 and 8.1) to launch the connection utility. Or press Win+R keys, enter mstsc and press Enter.

By default, you will only see a window in which you should enter the IP address or name of the computer you want to connect to - you can enter it, click “Connect”, enter the username and password to request account data (the username and password of the remote computer ), after which you will see the screen of the remote computer.

You can also configure image settings, save connection configuration, and sound transmission - to do this, click “Show settings” in the connection window.

If everything was done correctly, then after a short time you will see the screen of the remote computer in the remote desktop connection window.
To connect to a Windows computer on a Mac, you will need to download the Microsoft Remote Desktop application from the App Store. After launching the application, click the button with the “Plus” sign to add a remote computer - give it a name (any), enter the IP address (in the “PC Name” field), username and password to connect.
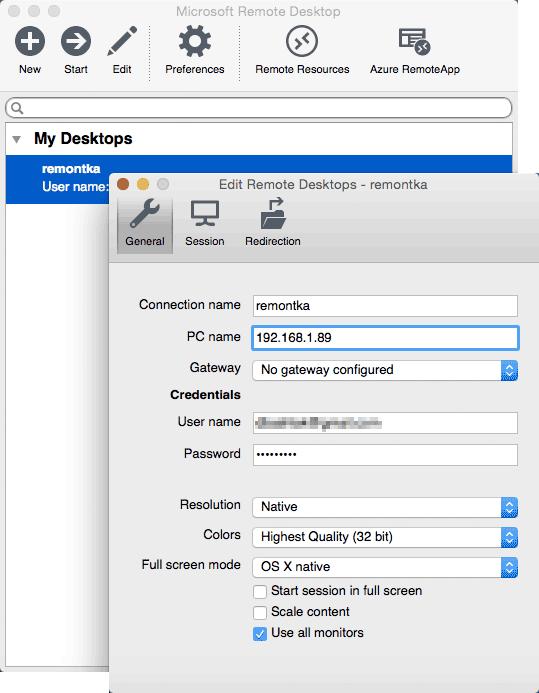
If necessary, set screen parameters and other details. After that, close the settings window and double-click the name of the remote desktop in the list to connect. If everything was done correctly, you will see the Windows desktop in a window or full screen (depending on your settings) on your Mac.

Personally, I use RDP in Apple OS X. On my MacBook Air I do not keep virtual machines with Windows and do not install it in a separate partition - in the first case the system will slow down, in the second I will significantly reduce battery life (plus the inconvenience of reboots ). So I just connect via Microsoft Remote Desktop to my fancy desktop PC if I need Windows.
Android and iOS
Microsoft Remote Desktop Connection is almost the same for Android phones and tablets, iPhones, and iPads. So, install the Microsoft Remote Desktop app for Android or Microsoft Remote Desktop for iOS and launch it.

On the main screen, click “Add” (in the iOS version, then select “Add a PC or server”) and enter the connection parameters - the same as in the previous version, this is the connection name (at your discretion, only in Android), IP address computer, login and password to log into Windows. Set other options as needed.
That's it, you can connect and remotely control your computer from your mobile device.
RDP over Internet
The official Microsoft website contains instructions on how to enable remote desktop connections over the Internet (in English only). It consists of forwarding port 3389 on the router to the IP address of your computer, and then connecting to the public address of your router indicating this port.
In my opinion, this is not the most optimal option and it is safer, and maybe easier, to create a VPN connection (using a router or Windows) and connect via VPN to your computer, and then use the remote desktop as if you were in the same local network (although port forwarding will still be required).
Remote access is an excellent tool if you need to help a person who is far away with a computer, or urgently view work files from home. Let's look at what programs you can use for this, how to configure them and use them in your work.
What is remote access
Remote access is a technology that allows a user to connect to a computer at a distance using another device and control it as if he were sitting at that computer. This could be connecting to a work machine from home, or helping a friend install programs - there are many options. The main condition is that both devices have Internet access and a special program.
There are many programs for organizing remote access, both complex and very simple, some of which we will try to highlight.
A device in a remote access network can play two roles:
- host - a computer to which access is provided (for example, a work computer on which you need to work from home);
- client - a machine that accesses other devices.
The same computer in different situations can be used both as a host and as a client - but not at the same time.
Each device is assigned its own identifier - a label with which devices “find” each other on the network. In most cases, the connection happens like this: the client is given a host identifier, it finds it on the network and connects to it, giving the user access. For security purposes, a unique one-time password may also be required, which is visible only to the host: this is done so that an untrusted person cannot connect to the computer.
Some programs use a generated unique ID number as an identifier, some prefer to use an IP address and a domain name. We will look at both.
Remote access via ID
First, let's talk about programs that operate on IDs. They are quite easy to use and suitable for the household needs of ordinary users, but they are not without their drawbacks.
AeroAdmin
One of the advantages of the AeroAdmin program is its intuitive interface.
Although all the main functions of the program are available in the free version, if necessary, you can purchase a license that gives access to additional functionality, including:
- exchanging files with a remote computer;
- contact book;
- interface customization (for example, you can add a logo and company name to the utility interface).
The AeroAdmin program can also be used for parental control and remote monitoring of a child’s or employee’s computer, conducting online seminars, presentations and meetings.
TeamViewer
TeamViewer is the most popular and widely used remote access software. It has quite a lot of functions, but is easy to use and convenient. There are paid and free versions: the free version limits the number of connections that can be made by one client.
On the main page there is an ID, password, a window for logging into your account, a window for entering the host ID and a large “Connect” button. In other words, all the data to use the program both as a host (left side of the window) and as a client (right side).
On the main page of the TeamViewer program you can find out your data as a host, or you can connect to someone as a client
To connect, you need to select a mode (remote control, file transfer, VPN), enter the ID of the required host and click on the “Connect” button, then enter the password that you need to obtain from the host (since the password is displayed only there). The password is unique for each session: when TeamViewer is restarted, it will change if the user has not specified a static password in the settings. This is done for connection security purposes.
In addition to simple remote connection, the program supports:
- audio conferences;
- screenshots and video recording of what is happening on the remote screen;
- remote printing;
- transferring files from host to client and back;
- chat between host and client;
- ability to swap host and client;
- Wake-on LAN;
- reboot followed by auto-connection.
In short, TeamViewer has great capabilities, and its main disadvantage is its limited use for home use. If the program thinks you're using it too much for a casual user and connecting to too many hosts (the free version supports up to five different devices), it will start dropping remote sessions five minutes after it's established. This is extremely inconvenient, and therefore it is not recommended to use TeamViewer for too many devices unless you want to buy an expensive paid version.
Video: Using TeamViewer
Ammyy Admin
Ammyy is another remote access program that is characterized by its simplicity and minimalism.
It has fewer functions than TeamViewer, but it is perfect for people who do not have special functionality requirements: Ammyy is simple and very convenient, and it is also free.
The program interface is similar to the previous one: there is a window, the window contains your data as a host and a form for connecting other computers. You can connect either by ID or IP.
The main Ammyy Admin window provides the opportunity to both connect your computer to the client and become a client yourself
Unlike TeamViewer, Ammyy Admin does not require a password: instead, it requires the host to confirm consent to connect. Without the consent of the host, the communication session will not begin.
Ammyy waits for the host to give permission to connect
The main disadvantage is the same as that of TeamViewer: the free version involves limitations in using the program, which can only be eliminated by purchasing the full version.
Video: working with Ammyy Admin
LiteManager
The third program that provides access by ID is LiteManager - a Russian program built on the basis of a utility from Microsoft, now closed. In the same way, dividing into a free and paid version, LiteManager provides “free” users with much more opportunities than previous programs: for example, you can connect not 5 computers to your client, but all 30. Such loyalty makes the program attractive not only for ordinary users, but also for administrators of small networks.
Unlike other considered tools, LiteManager consists of two components that are installed separately from each other: a client part (installed on the client machine) and a server part (respectively, on the host).
When installing the server part, a password is set for it, which is subsequently used by the client to connect to the host.
The client interface differs from previous programs and is more reminiscent of a virtual machine manager window. In him a list of connected devices is indicated, each of which can be launched using the mouse.
The LiteManager interface displays connected devices that can be launched with a mouse click
The capabilities of LiteManager in some ways duplicate the functionality of TeamViewer and even exceed it. You can connect via IP or ID; There's also a handy mapping feature called a network map. With its help, you can present all the computers involved in the network in the form of a map that displays the connection of the hosts to the client, as well as connected printers and other devices.
Network map in LiteManager is an opportunity to view connected devices in the form of a map
Video: how to use LiteManager
Remote access using IP address
Here everything is a little more complicated. The fact is that the IP address of an ordinary user is dynamic, that is, it changes regularly, and if you need to constantly connect via IP, it will be very inconvenient to configure the program again each time. Therefore, to take full advantage of remote access via IP, you must activate a static IP service. This is done by the provider and costs about 200 rubles per month (prices may vary depending on the provider).
After connecting to the service, you will be given a static (unchanging) IP, and you will be able to use a remote connection. However, the service should be used at your own peril and risk: for an ordinary PC user, a static address, due to its less security, can cause problems.
As an alternative, you can use the DynDNS service, which, for a fee, provides the user with a virtual server - the connection will go through it. However, such a service is more expensive than static IP.
When a static IP is received, you need to open the port necessary for the program to work.
- First, find out the internal IP address of the network. To do this, go to “Start - Control Panel - Network and Sharing Center -<ваша сеть>- Information." The line “IPv4 Address” is your internal IP address. Remember it, it will come in handy later.
In the properties of the network connection you can find the value of the internal IP address
- Enter the router menu. To do this, type 192.168.0.1 in the address bar of your browser (or, if it doesn’t work, 192.168.1.1) and enter your login and password on the page that appears. The necessary data is indicated on the router, but, as a rule, the login and password are admin/admin.
The router will require a login and password for access (usually admin/admin)
- The required menu in different models of routers is called completely differently: Virtual Server, Port Forwarding, “Network Address Translation”, “Port Forwarding”... There are so many names that you will have to act either with the help of the documentation for your router, or at random. Find the required menu and create a new rule: in the window that appears, specify the name, the interface used by your connection, the internal IP address of your network and the port. The Radmin program we will be working with uses port 4899 by default.
The desired location in the router may look like this (or maybe completely different)
Now that the settings have been applied, it's time to move on to the program itself.
Radmin
For a long time (before the advent of TeamViewer and other systems using ID) the Radmin program was the leader among remote access systems. It is very lightweight, undemanding to system restrictions (therefore it works well on older computers), and also provides high connection speed. However, this program only works via an IP address.
Radmin consists of client and server parts, and after installation it will require some configuration.
- In “Radmin Server Settings” you need to find the “Access Rights” item. First, the program will prompt you to select a security system: you must select Radmin if the connection will be made over the Internet, or Windows NT if you will use a local network. After this, you need to click on “Access Rights”.
When choosing a security system, you need to select Radmin when connecting via the Internet or Windows NT when connecting via a local network
- In the window that opens, you can add a new user with certain rights. At least one must be added, otherwise Radmin will deny access to everyone. For the user, you must specify the name, password and rights that he will have.
To have access to the program, you need to create at least one user and specify access rights for him
- In the client part, you just need to click on “Add a new entry” and enter the data of the host computer in the window that opens.
In the Radmin client you need to specify the name, IP address of the host and the port through which it will connect
Radmin is a paid program, but a free 30-day trial version can be downloaded from the official website.
Video: how to configure and use Radmin
Remote Desktop
This is not a third party program. This is a built-in tool for remote administration from Microsoft, which, as a rule, only works on a local network. To work with it, you will also need a static IP address and port settings, which are described above. However, you need to specify a different port: 3389.
For Remote Desktop to work, you need to give it permission. To do this, you need to follow the path “Start - Control Panel - System - Remote Access Settings” and check the “Allow connection ...” checkbox wherever possible.
For the built-in Windows Remote Desktop service to work, it needs to be set permissions
Remote Desktop is found by searching the Start menu as “Remote Desktop Connection”. It looks like this: a window into which the data of the host computer (IP address and user name) is entered.
To connect via the desktop Windows application, you need to enter the details of the host computer
If all is well, then this will be enough to connect.
So, we found out how to use programs for remote access and how they can help both a simple user and a network administrator. Now the main thing is to apply the acquired knowledge in time!
Since our site is designed for average users, some disagreements arose within the non-Oshibka.Ru team regarding the usefulness of this article. Typically, such material is intended for more experienced users who at least have a good knowledge of the Windows OS.
On the other hand, where should a novice user go who has only a vague idea of what RDP, TCP, UDP are? But you really want to know? Again, is this necessary for the average user? Maybe one simple program is enough for him?
A difficult situation.
Explain in one article what remote access to a computer via the Internet is, but in such a way as not to frighten off the visitor.
We decided to experiment. Talk about difficult things as clearly as possible. We will take your comments into account.
What is this article about?
This article will tell you about two types of remote connection, briefly tell you what it is ID. Will tell you about the programs Remote access And Remote Desktop. We will also try to configure your computer in order to access it remotely without using third-party programs. Complex terms in the article are highlighted in brown and provided with explanations in the form of tooltips.
Remote access concept
Remote access to a computer via the Internet refers to operating system tools or a third-party program that allows you to gain visual or file access to a computer located at a remote distance, but still connected to the Internet.
How is the required computer identified on the Internet?
Conventionally, all remote access programs can be divided into two groups according to the type of connection:
- Using ID
- Using IP addresses And domain names
Remote access programs using ID
Of great interest are programs that use ID(unique identificator). Receipt method ID something like this: when a remote access program is launched on the computer to which you plan to connect, it sends a request to its server through which the connection will occur.
Having received this data, the server generates for the computer unique identification number — ID. This number is assigned to the computer. In the screenshot below it is highlighted in red.
Knowing this identification number and password, you can connect to a computer from anywhere in the world with this ID.
It remains unchanged until the hardware is replaced or the OS is reinstalled.
So using such programs is very convenient. When you change Internet provider, city, and even country, your computer ID Will not change.
Lack of programs using ID one - they are paid or shareware. Condition - you must not use the program for commercial purposes.
Example of programs using ID— TeamViewer, Ammy Admin. But the list is not limited to these two. They are simply the most popular and always heard by users.
We will not spend a lot of time on these programs, since their interface is simple and allows you to learn the program in 5-10 minutes. We may look at each of them in the future.
You won't have any problems with these programs. Use it for your health without overusing it. If TeamViewer will connect to a large number of ID- then sooner or later, the communication session will be limited to five minutes.
Remote access programs using an IP address or domain name
With this category everything is a little more complicated. They need a static IP address or domain name. Connection via IP address, this is a classic connection type. It does not allow as much flexibility in the location of the computer and is most often used in "office space".
In order to use it, you need to do the following.
Connecting a fixed IP address or domain.
You need to activate an additional service from your provider - Fixed IP address . This service is provided by many providers, including mobile ones. This service will assign your home network an external IP address in the format 123.123.123.123
It is this address that will allow you to find your computer from outside.
An alternative to a fixed IP address can be the service DynDNS. When registering, you will be given a custom domain, for example:
neoshibka.dyn.com
Next, you simply install a program on your computer that, when turned on, will track your current IP address and send it to the server DynDNS, which in turn will match your current dynamic ip address , with address yourlogin.dyn.com
Thus, no matter where you are, no matter what provider you use, no matter how often your IP address—the address of your computer—changes, yourlogin.dyn.com
We won’t undertake to say, but getting a fixed IP address from a provider is somewhat easier and cheaper than using DynDNS. For example, at the time of writing this article, the cost of a dedicated IP address was only 20 rubles. / month
Advertising
Opening a port to a target - a remote computer.
Even now, knowing our IP address or assigned to us DynDNS domain, we can hardly connect to the computer - the firewall will not let us through. Most likely the port 3389 used by the program Remote Desktop which we will tame in this article will be closed. For everything to work as it should, we will have to open it and redirect it to the desired computer on the network.
Difficult? Not at all. Let's try to figure it out in practice.
Remote access to a computer via the Internet using Remote Desktop
So, first what we did was get a fixed ip address from our ISP. Let's remember, write it down, draw it.
Second. Let's find out intranet IP address our computer. To do this, we will follow the following path: Network and Sharing Center => Local Area Connection => Details  As you can see in the screenshot, the address of our computer within the network 192.168.1.102
Third the point will be opening the port 3389 to the above address. To do this, let's go to the router. In our case it is ADSL modem TP-LINK. We will show everything using his example. There’s nothing you can do about it, but you can’t do without instructions if you don’t know how to configure the modem yourself.
In our case we enter through Google Chrome by the address 192.168.1.1 and under the combination admin/admin. We get to the information page.
Let's go to Advanced Setup => NAT => Virtual Servers and press the button

Here you can choose ready-made services or create your own.
We will create our own and call it Udalenka, but the name can be absolutely anything. We register the local address of the computer, the one we spied earlier. In the table we enter the port everywhere 3389 and select the protocol TCP/UDP. We do all this based on a standard Windows application. Remote Desktop. For other programs, the ports may be different. A good list of applications and the ports they use is provided. (What we are learning may even be useful for games).
If, for example, you want to use Remote Desktop, and advanced RAdmin, then you will have to register a different port for it: 4899 .
Press the button

Item fourth, we will run on the computer we are going to control - Terminal Server Service. It’s worth clarifying something here.
Using the method described below is not recommended from the point of view of licensing purity if you do this in the organization where you work. Not sure about Windows 10, but in Windows XP - 7, the license was not violated if only one user connected to the computer.
We do all this for the purpose of familiarization and in order to learn the principles of remote access to a computer via the Internet.
So, to run it on your computer Terminal Server Service. In Windows XP this was done simply - Go to Administration — Services and applications — Services found it and simply turned it on. This allowed one user to connect to the computer. In this case, the user who was sitting locally was disconnected.
In Windows 10 we need to do things a little differently. We need a special patch. You can download it from here. This patch will allow you to run on the system Windows 10 terminal service.
Recently, the search engines Google and Yandex began to consider this file as a virus threat. In fact, the file lay on the site for two years, and not a single scanner ever considered it to be malware. However, the file is now stored outside of notOshibka.Ru - you download it at your own peril and risk.
Let's unpack the downloaded file to any location. For example on Desktop. Run as Administrator file install.bat

A successful result will be indicated by a black command line window with the following content:

Fifth In this paragraph, we will set a password for our user, and also add him to the group.
For this purpose on the icon Computer and right-click to select Control.

In the window that opens, on the left side, we need to expand the list Local users and groups, select sub-item Users.
In the list of users, you need to find yourself and right-click.

Enter your password twice, press

Now we need to add our user to the group Remote Desktop Users.
To do this:
Right click on the user - Properties.
In the window that opens, go to the tab Group Membership and press the button <Добавить…>

Next, do everything in the same order as in the screenshot: 
As a result of the work done - Remote Desktop Users should appear in the general list of groups to which the user belongs.

We would like to draw your attention to the following. The above describes how to assign a password to your user. But it’s better to create a new one and add it to the groups. Otherwise, you may end up losing some data. For example, we logged out wherever possible. I had to enter all the passwords again.
Let's check if we were able to gain remote access to the computer via the Internet using Remote Desktop.
We go to another computer, go to START menu => All programs => Accessories and run the program "Remote Desktop Connection".
Enter the IP address previously assigned to us by the provider into the window that appears, click the button <Подключить> .

If we did everything we did earlier correctly, then we will be asked almost immediately Name And Password user on Remote machine. Enter them and don't forget to check the box to remember your credentials.

And the last “security touch” will be checking the Remote Machine certificate. Here, too, you need to agree with everything. And also check the box.

That's all. If everything works as it should, you can go through the Remote Desktop program settings. Here you can turn on/off the sound, change the picture quality, connect local resources to the remote machine.