
Preparing automatic recovery in a circle. Windows System Restore
On a normal day I sit at the computer. Everything seems to be very good, there are no glitches. I browsed well-known sites, didn’t download any programs, in general, everything was as usual. Suddenly the laptop started making sounds as if it was rebooting. I felt that something was wrong, although the computer worked as before without any brakes. Here I think I'll try to reboot it...
This is where all the fun started
When I turned it on, it gave me a message, which you can see in the picture, that the computer was not started correctly. It says that you can reboot, perhaps this will solve the problem. I didn’t believe it enough that I still rebooted the computer, but there was no result.


My attempts to do something
Attempt 1. Well, I think this is not the first time with such stories. The first thing I did was try a system restore. It turned out that not a single restore point was created, so this method faded into the background.
Attempt 2. I decided to restore the system image. I followed all the steps, the whole process went through, but at the end it gave me some kind of error and the system was unable to restore. OK.
Attempt 3. I went to the boot options and select “Restart”. There was an option to enter safe mode. And in Windows 10, in general, you cannot enter safe mode if you cannot boot the system without it. And there was no luck.
Attempt 4. I went to the “Return to previous build” tab. In general, I don’t know exactly why, but I didn’t have the opportunity to return the previous version of the system.
Attempt 5. I went to the “Restore the computer to its original state” menu. There is an option to return the computer to the same state as if you had just bought it, but your data (which is stored on drives other than the system one) will be preserved. Well, I think it’s okay, I’ll install the programs I need with a new one, the main thing is that my data is not damaged. As a result, this process took a very long time, but soon an error appeared that “Windows cannot be installed for some reason (I don’t remember).”
At this point I just wanted to smash my laptop. After all, there were no failures, but then, out of the blue, some kind of hemorrhoid appeared. I already realized that Windows 10 is full of surprises, but here it is in general.
So how can you save all your data?
If you find yourself in the same situation (and I’ve seen a lot of them on the Internet), then you will need a flash drive or an external hard drive, where you “drag” the information you need, another computer (I’ll explain why later, and another flash drive (at least for 8GB).
- Extra options
- Then again additional parameters
- Command line
- Write “notepad” in it
- Then click "File"
- "Open"
Insert a flash drive or external hard drive, find the information you need and copy it to an external device (copying can take a long time, during the transfer there will be no graphs or percentages, only an hourglass will be shown).
How to reinstall windows 10?
After saving all the necessary files, you need to download the Windows operating system itself, this can be done from the official website: https://www.microsoft.com/ru-ru/software-download/home (we copy the link ourselves). There are 32 or 64 bit systems to choose from. Which one to choose? If the computer is less weak, then 32, if the computer has good parameters, then 64.
 Download and open the program, there select the second item (as in the picture). At this time, you need to insert a flash card; he will create a system image on it. The action will take a long time, so during this time you can figure out how to enter the BIOS. We return to the “broken” laptop or PC, turn it on and while the system is loading (usually when your brand logo is shown) press F2. And here we will find ourselves in the BIOS. Everyone has their own BIOS version, so I can’t explain it using the instructions. You will need to put the flash drive in first place when booting the system. In principle, this can be done even if this is the first time you’ve seen the BIOS.
After an image has been created on the flash drive on the second computer, we insert it into the PC that needs to be repaired. We reboot it, go to the BIOS (via F2). Experienced users will figure it out on their own, but if that’s not you, then just go to each section and look for the name of your flash card. You will need to put it in first place, here is an example in the picture, look for something similar in yours.

If you still can’t do it, you can send photos in the comments - I’ll help you right away. After you have managed to put the flash drive in first place, save the settings and the computer will reboot itself. To do this, look for “Safe”.

As soon as this kind of window appears (picture on the left), you will need to format the system disk. There on the right it says “system”. Click on this section, then on “Format”. Other sections (optional) can also be formatted if you do not have the necessary information there. If there is, don't touch it then. Then click next and the process will proceed without your participation.
20-40 minutes and the system will be completely installed. Now you will have a clean system and, of course, without drivers. You can find them on the official website of the developers. So write, for example, “Drivers for asus”, official sites are usually the first place in the search, select your model there and download the necessary drivers, mainly graphics, sound, network, for fn keys, touchpad.
Well, that's basically it.
So is it worth upgrading to windows 10?
I’ll say right away that before this I had Windows 7, over time a notification came out that Windows 10 would be released soon - reserve it. I left my email. The release date arrived - updated, no problems. I used it for a little over 2 months. During this time, compared to the seven, it works worse. Yes, she is prettier, prettier, maybe even more comfortable. But with prolonged use, it begins to “stupid” and “slow down” very harshly until you restart the system.
It has non-logical actions, for example: go to the program control panel to remove unused software. So, when you uninstall a program, the control panel immediately closes. For what? After all, maybe I want to delete several at once. And so you have to constantly re-login every time.
Plus, this “The computer is not started correctly” was not explained to me at all.
When problems occur in Windows 10, users try to log in to restore the Windows 10 system, but unfortunately, the SrtTrail.txt error message appears on the PC screen. Microsoft has provided its own handy, proprietary tool for repairing your system in case of serious problems, but it still has bugs. Automatic Repair comes with Windows and has the ability to fix startup errors. Thus, when the operating system does not boot properly, the Automatic Repair feature comes to the rescue and makes efforts to repair Windows on its own. However, this tool sometimes does not work and displays the below error. Many times it goes into a cycle of starting and shutting down again. The Windows 10 SrtTrail.txt error can also occur when using a blue screen (BDOS). The full error message is as follows:
Startup Repair failed to restore your computer. Click "advanced options" to try other recovery options or "shut down" to shut down your computer. Log file C:\WINDOWS\System32\Logfiles\Srt\SrtTrail.txt.
Ways to fix the error when loading recovery SrtTrail.txt
If you have this error, then let's try to fix it for Windows 10.
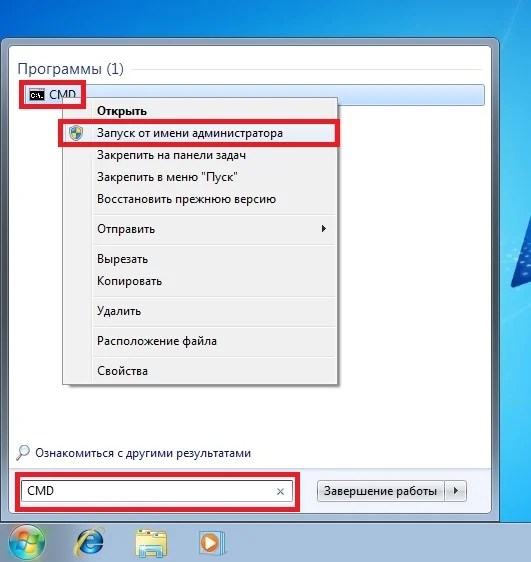
1 Method. Restore bootloader via CMD
Step 1. If you can get into Extra options When the system boots, then launch the command line by going through the parameters Troubleshooting > Advanced Options > Command Prompt. If you cannot get into the additional parameters, then follow the steps below:
- Press the restart button on the computer itself many times in a row to trigger an error and bring up the process diagnostic menu.
- Turn on the computer, wait until it boots as much as possible before the error occurs. Next, press and hold the power button on your computer to turn it off completely. Repeat the procedure 3 times, by the 4th time you should see a recovery menu.
- When you start the recovery environment, launch the command prompt in it.

On the command line, enter the commands in order by pressing Enter after each one. Alternatively, you can check out the full how-to guide. Keep Command Prompt open after the process is complete and continue to Step 2.
bootrec.exe /rebuildbcd
bootrec.exe /fixmbr
bootrec.exe /fixboot

Step 2. All in the same command line, we will use the command to scan and restore the hard drive. Enter the following command in CMD chkdsk C: /r. You must do this for each drive on your PC, replacing C to another local drive, for example D,F. Restart your computer and check if the error is resolved.
Method 2. Disable automatic start
This is the simplest solution to resolve the SrtTrail.txt error. Launch the command line through additional parameters, as you did in method 1. Enter the command bcdedit /set (default) recoveryenabled No and press Enter, then try to start Windows 10.

3 way. Launch Command Prompt in Safe Mode
The SrtTrail.txt error on Windows 10 can occur due to a bad driver, such as a Logitech wireless mouse. To shorten the writing, you can find out from another article how to get into it, but I will describe it briefly below.
1. Restart the PC several times using the button on the system case to bring up the “advanced options” menu. Next go Troubleshooting > Advanced Options > Boot Options > Restart and select an option Enable Safe Mode Using Network.
2. After starting the system in safe mode, go to Device Manager and try to identify the bad driver. Update it or download it from the manufacturer's website. If all else fails. then do not exit safe mode, but follow step 3 below.

3 . In Safe Mode, run Command Prompt as Administrator and enter the command DISM /ONLINE /CLEANUP-IMAGE /RESTOREHEALTH. The process may take a few minutes, after which restart your PC.

4 way. Repairing a damaged Windows registry
If you have a corrupted registry file on your system, it may result in SrtTrail.txt Windows 10 error. In this case, you need to repair your registry. Launch Command Prompt from the Advanced Options menu as described in Method 1 and enter the command copy c:windowssystem32configRegBack* c:windowssystem32config . Next, press Enter, close cmd and restart your PC.

5 way. Disable Early Launch Malware Protection
Early launch and anti-spam protection (ELAM) can also cause the SrtTrail.txt error in Windows 10. As usual, go to the advanced options menu, as described in method 1. Go to settings Troubleshooting > Advanced Options > Boot Options > Restart and select (F8). Restart your computer to check if the error goes away.

6 way. Identify and delete the problematic file
You may receive SrtTrail.txt error on Windows 10 due to problematic files. Let's identify this file and delete it. Launch Command Prompt from the Advanced Options menu as described in Method 1 and issue the following commands:
C:
cd WindowsSystem32LogFilesSrt
SrtTrail.txt
Step 1. It will open a file that shows something similar to this" Boot critical file c: windowssystem32driversvsock.sys corrupted". This means vsock.sys is a corrupted file and that is causing the problem. I am using this as an example only; you may get a different result according to your system.
Step 2. Next we will simply delete this file that is causing the error, but be careful, you must know what kind of file you are deleting. Otherwise, you can do even more damage if it turns out to be a system needed file. Enter the following command in the command line to delete the example vsock.sys file, where vsock.sys may be another file:
cd c:windowssystem32drivers
del vsock.sys
Restart your computer and remove the application causing the problem. In my case it was a VMware virtual machine.
7 way. Check device partition
If your device partition values are incorrect, you may encounter the SrtTrail.txt issue in Windows 10. Launch Command Prompt through the boot menu as described in method 1 and enter the command Bcdedit press Enter. Once the result appears, find device(device) and check the values. If the values are partition=C: then everything is fine. If the values are different, you must set them correctly. To do this, enter the commands below again and press Enter after each one.
bcdedit /set (default) device partition=c:
bcdedit /set (default) osdevice partition=c:
Now restart your computer to save the changes.
8 way. Check boot priority in BIOS
You can solve the SrtTrail.txt error problem in Windows 10 by using Device Boot Priority. When booting the computer, press the button continuously DEL to enter the BIOS. In this guide, you can find out which ones you need to press from different computer and laptop manufacturers. Now find the download section BOOT. Once you find the boot partition, check if the hard drive is set as "First Boot Device". If you are using multiple hard drives, install the drive on which Windows 10 is installed. I recommend that you quickly google and click on pictures so that you understand immediately, because everyone's BIOS is different. Don't forget to save the settings in BIOS and restart your PC.

9 way. Change the disk controller mode in BIOS
You can also get rid of the error by changing some settings in the BIOS. To do this, enter the BIOS and find the disk controller mode parameter SATA Mode and set it to standard IDE, instead of AHCI or RAID. Save the changes and restart your computer. If the error still exists, change the mode back to the way it was.

10th way. Connect the hard drive
A significant number of users have reported that they were able to bypass the SrtTrail.txt Windows 10 error by reconnecting their hard drive. Turn off the computer, disconnect the 220 wire, open the computer case or the back cover of the laptop, and disconnect the wires from the hard drive, then immediately insert them back. Reassemble everything else and check if the problem is resolved.
11th way. Remove the laptop battery
If you are using a laptop, then disconnect the battery for a while. It may seem stupid, but some users have solved the problem with this manipulation. To do this, simply remove the battery from the laptop and insert it back again. Now turn on your laptop to check if the problem is resolved.
12 way. Remove RAM
Removing RAM can also help with this issue. It's as simple as reconnecting the "hard drive". Simply turn off your PC, unplug the power cable and remove RAM modules. After that, reconnect the memory module and reverse the procedure to turn on the computer.
13 way. Disconnect additional USB drives
If you have several USB flash drives connected to your PC, then disconnect them to solve the problem with SrtTrail.txt. Just turn off all external USB and restart your computer. Check if the error is fixed.
Due to the presence of viruses, driver or software mismatches, the OS may malfunction. If your Windows crashes, don’t rush to panic. The situation can be corrected by returning the state of files and programs to the moment when the PC was working properly.
While running OS Windows 7, 10 or 8, certain errors and problems may occur. As a result of such failures, starting the operating system again in operating mode becomes impossible. In this case, it is not at all necessary to do a time-consuming reinstallation of the OS. All you need to do is perform a system restore.
Recovering the OS using the recovery environment
When working we use the following scheme of actions:
- Reboot the computer, press the F8 key while loading;
- Troubleshooting;
- System restore, selecting an OS restore point;
- Click "Further" and again "Further";
- Press the button "Ready", we reboot the system (in the Menu, select boot with the last successful configuration).
Windows 7 System Restore
There are several methods you can use to get your OS running again. Some of them rely on rolling back to saved settings. Others simply clear the data.
You can “reanimate” the OS in one of the following ways:
- by selecting restore points;
- using the command line;
- through safe mode;
- using a recovery environment;
- using an image/boot disk.
Restoring the operating system using system “resuscitation” checkpoints is one of the most affordable, effective and popular options. To apply it, you need to make a series of clicks:
- Panel "Start";
- "System Restore";
- "Further";
- "Select a restore point";
- "Ready".
With such an operation, problems with the computer will be corrected, changes will be canceled and the system will be returned to the operating state that allowed the PC to boot normally. There is no loss of data, files and documents with this type of recovery. All data is saved. The operation is reversible. You can roll back the system to a previous computer state and use a different restore point.
Many people wonder how to make a recovery point on their own (manually) in order to choose it in the future? To do this in the same menu "Start" - "System Restore" You can create such a point yourself at any time convenient and suitable for you. It will be saved indicating the current date, which you just have to remember.
From restore point
In computer engineering there is such a thing as a recovery point. These are saved PC settings. As a rule, saving occurs automatically with each successful OS boot. The easiest way to restore Windows 7 is to use this data.
Press F8 when your computer boots. This command will bring up a menu of system startup options. Next, you need to select the Last Known Good Configuration option.
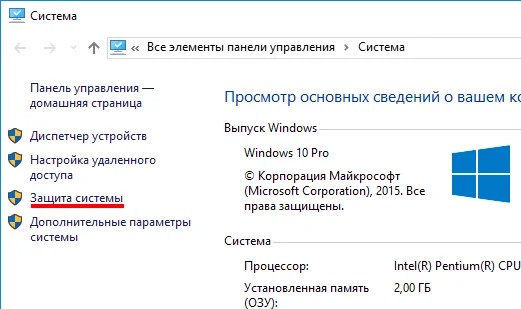
Another method can be used. Go to the properties of the My Computer folder. Find the line System Protection, clicking on which will open the dialog box of the same name. Click Recovery – Next. We set a target date, indicate the disks that need to be fixed, and confirm the actions. After rebooting, the PC should work normally.
No restore points
You can fix problems with the OS even without restore points. To do this you will need to resort to the LiveCD program. You need to download it and burn it to a flash drive with the .iso extension.
Further all actions will take place in the BIOS. You need to configure booting from a flash drive. To do this, in the Boot section, select USB-HDD in the First boot device line.
Before proceeding directly with the recovery, copy all the necessary files to a removable disk. The LiveCD program provides a special menu for these purposes.
We will fix the system error using an archived copy. Connect the USB flash drive, open the Windows\System32\config\ folder. Files with the names default, sam, security, software, system must be moved to any other folder. In their place, transfer similar files from the RegBack folder and restart the computer.

The described method will only help if the problem is related to the registry.
Command line
You can resort to “reanimating” Windows 7 from the command line if the PC begins to freeze or works slowly, however, the system still boots. Enter the menu "Start" and using the right mouse button, launch the command prompt as administrator. Run the rstrui.exe command, which will open the system restore program. Click "Further". In the next window, select the desired rollback point and click again "Further". Once the process is complete, the PC should work normally.
There is another way to access the utility. Let's go to "Start". To open the command line, click "Run" and enter the CMD command. We click on the found CMD.exe file and wait for it to launch. Next, enter rstrui.exe in the command line and confirm the action with the Enter key on the keyboard.
It is not always possible to play it safe and create OS restore points in advance. Problems may arise that block the option of such “reanimation” of the PC. Then you can use another, no less effective and easy option - restoring the Windows system using the system itself.
We rely on the diagram:
- Icon "My computer"- right mouse button "Properties";
- "System protection";
- In the new window click "System protection", recovery button;
- "Further";
- Select a restore point according to the date;
- Specify the system disks to be restored;
- We confirm the operations and reboot the system.
Restoring Windows 7 using Safe Mode
This method is preferred if the usual system boot is impossible. Then after pressing the PC power button on the system unit, hold down the F8 key to call "Start Menu". One of the "Menu" options is "Safe mode". Select it and press Enter on the keyboard. As soon as Windows boots, we carry out the algorithm of actions that we described earlier.
System recovery Windows 8/8.1
If you managed to start the OS, you can resume Windows 8 via "Options". Hover over the top right corner and enter them. Click on "Change computer settings" – . Chapter "Recovery" will offer several options:
- "Regular recovery with information preservation".
- “Deleting data and reinstalling the OS”.
- "Special option".
Decide what exactly needs to be done. Next, follow the menu prompts.
If you choose the latter method, in the window that opens, click on the diagnostics item. You will be offered the following options:
- "Restore";
- "Return to original state";
- "Extra options". This item includes the ability to roll back to the desired resume point.

To resume Windows 8.1, press Win+R and call sysdm.cpl. In the system properties window in the tab "Protection" specify the required system drive. Click "Restore". Clicking "Further", you will be able to see a list of rollback points. Select the one you want and click "Search for affected programs". Changes that have been made to the PC since the selected moment will be deleted. Complete the process by clicking "Ready".
If you work with Windows 8, problems may occur, the Internet may not work correctly, etc. To fix this, you can use the classic recovery method through restore points.
Another option is a system rollback. To do this, open the menu "Start" - "Control Panel" - "Windows Update". Select an item "Removing updates". The same can be done using the command line.
So, in the list of updates that opens, we delete those from the moment of installation of which (we look by date) problems and malfunctions began. We delete unnecessary files and reboot.
You can perform a factory reset on Windows 8.1. Important files will not be affected during this operation. The method is effective, but to implement it, the OS needs to boot without problems. We use the algorithm:
- Right side of the monitor - "Options";
- "Change settings";
- "Update and Recovery" - "Recovery";
- "Recovery without deleting files".
If you cannot log into the system in the usual way, you must use the disk with the system. Load the installation disk, select "System Restore". Press the button "Diagnostics", And "Restore".
Windows 10 System Restore
If you are having problems with Windows 10, press Windows + Pause. Go to "System protection" and press "Restore" – "Further". Select the desired indicator and click again "Further". When finished, click "Ready". The computer will automatically restart and the changes will take effect.
One of the advantages of the “ten” is the ability to return the settings to factory settings. This helps avoid having to install the system all over again. To reset your data go to "Computer Settings" – "Update and Security" – "Recovery" – "Return the computer to its original state". Click "Begin".
You can take care of the possibility of a rollback in case of failure in advance. You can create resume points yourself or configure their automatic creation at the desired frequency. To do this, in the settings, in the Update and security item, select Backup service. Specify where to save copies, click Add disk. After selecting the device, the function will be activated.
You can restore your Windows 10 system again by using restore points. In this case, the system will be rolled back to the moment when it loaded smoothly and worked without failures. This recovery method is described at the beginning of the article.
If the OS does not boot, a warning table with a key appears on the screen "Additional recovery options". Click it and select "Diagnostics" - "System Restore". We select a Windows restore point, wait for the system to roll back and reboot.
If such operations do not help and the computer continues to work incorrectly, you can roll back to the basic settings. Some programs and utilities, personal PC settings will be reset, and personal data will be deleted.
This technique is used extremely rarely if the other options described above do not help. The algorithm of actions is as follows:
- "Start" - "Selecting parameters"- tab "Updates and Security";
- Paragraph "Recovery"- button "Begin";
- We choose to delete all files or keep some of them.
Recovering the system after this will take 40-90 minutes.
Resuming using the installation disc
One of the radical methods of fixing the error involves using an installation disk. After launching it in BIOS, click System Restore. In the Troubleshooting section, specify the desired action. Next, follow the system prompts to complete the process.
Related Posts
The debate continues about which is better than Windows 10 or Windows 7. This phenomenon is not accidental. Developers from Microsoft claim that there is nothing better than Windows 10, but experienced users say the opposite, they say the system is more reliable than Windows 7 now...
Computer freezing is a rather annoying problem. This can happen both at the stage of system startup and in the middle of its operation. Let's figure out why this can happen and what to do about it? Why does my computer freeze...
Sometimes, when installing programs or applications, a message appears on the computer screen stating that Windows 10 error 5 has occurred. This means that the user is denied access. This happens if there are several accounts in the system...
Published 11/17/2017 04:36Automatic system recovery, as a rule, begins after a failure or exposure to viruses in which critical errors occur. However, you can often observe a situation where the message “Preparing automatic recovery” appears on the display in Windows 10, and after a reboot, instead of starting the system, only a black screen is displayed or the recovery is simply attached (the same window appears every time you reboot).
The sad thing is that no matter how hard you try, it is impossible to complete this process. However, if the system itself, not to mention the backup, has not been damaged to the most extreme extent, unless reinstallation does not help anything, there are several methods for resolving this situation to ensure that it is still possible. Preparing automatic recovery for Windows 10 black screen and reasons for the obsession with the process.
Be that as it may, despite all the statements of the developers that the new system is a little more stable, alas, it contains many errors that are constantly being corrected. And system failures are not always resolved in a normal sequence.
If we talk about the possible reasons for this behavior in Windows 10, it is quite difficult to say for sure that this is due to such an error. However, with a certain degree of probability, the following can be identified: backup corruption; missing system files; lack of space to save checkpoints from photos; incorrect settings of the main BIOS/UEFI system; problems with the hard drive and memory. Preparing automatic recovery of Windows 10: what to do first?
First, let's look at the standard scheme of actions. If, after notifications appear that Windows 10 is preparing an automatic recovery, nothing happens after a reboot, you can try using Safe Mode to start it.
If the user has activated the date to bring up the start menu, F8 key, in the standard version you need to select Safe Mode with Network Driver Support. If the use of this button is not provided, which often happens, it is quite possible that at the boot stage a window appears with a choice of either loading the system, or diagnostic tools (for the presence of Anniversary and Creation updates.
If the system was somehow loaded, you can try to rollback manually: To do this, you do not need to use the standard “Recovery Center”; it is better to use the shell in which the line rstrui.exe is entered. In the rollback window, you must select the moment that preceded the appearance of such situations. Please note that it will not be possible to stop this process as changes made during the recovery process will be reversed.
Sometimes, if you download network drivers and have an Internet connection, you can try to perform online recovery using the dism utility. It may very well be that such a solution will be much more effective. Using installation media
If safe mode does not work, and again a message pops up on the screen stating that automatic recovery is being prepared (Windows 10 does not boot), and this process continues, to start, you must use the installation disk or USB drive, having previously set it as the first boot device in BIOS.
On the main screen, with the installation prompt, you must select the hyperlink to “System Restore” in the lower left corner. Go to the diagnostics section, then apply a rollback.
But you should not use startup recovery, because in most cases, a message appears stating that the computer could not be returned to its original state.
After selecting normal recovery, the standard rollback procedure starts. It is possible that this method will yield results. Space expansion is reserved
Another point is when he brought up the “Preparing automatic recovery” window in Windows 10, but then the system does not show any signs of life, this is due to the fact that it is necessary to increase the disk space dedicated to saving backup copies. Once again, this only applies to situations in which you can download Windows in Safe Mode.
In this case, the best option would be to use a small and fairly simple Partition Wizard program from MiniTool or a similar development using the built-in charger, which is much preferable for cases when the system does not start at all. It’s easy to increase the space in it, you need to at least up to 250 MB (it’s better to set a slightly higher value), and then try to start the system in normal mode. BIOS/UEFI settings
Finally, the fixation of the “Preparing Automatic Repair” process in Windows 10 may be related to the parameters of the main system, which involves disabling the system of protection against hacker attacks at the hardware level (prohibiting the launch of executable files and codes). The cycle appears for this reason.
Therefore, to correct the situation, you need to: When you turn on your computer or laptop, enter the above parameters. Find a line like No-Execute Memory Protect or XD-bit and set the value to Enabled. After this, you need to save the changes (F10) and reboot the computer device .Hard drive and RAM
If the problem in your computer is “zero”, it may very well be that in order to start this, perform a disk check, start from removable media, using the command line, in which you entered the command chkdsk /x/f/r, and in At the same time, use checks of the main system components (sfc /scannow).
If you can make a safe start to check Victoria's ideal tool (hard drive) and Memtest+ (for RAM). In some cases, if the hard drive has begun to, as they say, “improve,” as they say, the HDD Regenerator hard drive inversion program can provide invaluable assistance. It’s difficult to say how effective the application is, but judging by the reviews, some hard drives can sometimes be restored in such a way. Conclusion
As you can already see, removing the constant cycle of messages indicating that the product is preparing automatic recovery for Windows 10 is sometimes possible. True, the system of tools, in some cases, is not particularly worth calculating. But if none of this helps, you will have to reinstall the system (and in some cases even change the hardware).
But in general, based on purely practical considerations, the first thing is that it is better to try to make a safe use of the beginning and perform additional actions, then the system works. But use with network drivers is mandatory.
If this option turns out to be fully functional, you will launch from removable media and try to restore in this way.
Windows automatic recovery is the first function that you should resort to if a critical error occurs in the operating system.
Opportunities for recovery
In the new Windows 8, Microsoft has introduced additional OS rollback tools. They are discussed in more detail on the official website and were even mentioned in passing at the presentation. Briefly about the possibilities:
- PC recovery without data loss. Used in case of reduced computer performance;
- Reset all settings (basic configuration). Allows the user to completely delete all files on the device and return it to its original state;
- Return to the restore point. They will allow you to roll back the system to a previously saved state (we’ll talk about this below);
- Recovering the system from disk. Not entirely new (it was already implemented on the “Seven”), but a more advanced function that allows you to restore the OS from a disk. Used when the PC freezes on a black screen.
Since we are not radical, we will not use the second option of deleting all files.
Windows 8 Recovery
Click the “Restore” button. After this, the long preparation for the rollback procedure will begin.
We are waiting for the window to start checking the disk for failures. This process is short-lived, but after it the characteristic message “The tool was unable to perform an automatic system recovery” may appear. If this happens, we move on.
- In the parameters window, select the “Diagnostics” section:
- Without paying attention to other functions, click on « Restore » :
Comment. In the same window, you can select “Restore to original state,” which will allow you to roll back the system to the time you purchased the device. This action will completely delete all files.
As soon as the preparation is completed and the OS rollback is completed, when you start the computer, a report will appear about all programs removed after the procedure.
The utilities were not lost forever; in the report they are presented as links, by clicking on which you can reinstall them.
The presented method is not bad, but is only relevant when Windows 8 partially starts. But if the computer has just begun to show signs of failure: performance has dropped, malfunctions have begun, then it is wiser not to wait for a complete system failure, but to roll it back using a restore point.
Creating a point
We follow the algorithm:
- In the right panel of Windows 8, go to the settings section, and then to the “Control Panel” (you can get to this section using the WIN+W search):
- In the control panel, go to the “Recoveries” section. Don't forget to set the "Small icons" option in the view, otherwise this item won't appear:
- Select the recovery point settings subsection and the disk on which the system is located:
- Click the settings icon. We enable system protection by selecting the appropriate section. Change the maximum usage rate to 15%:
The setup is complete, now you need to create a point and put it into practice.
To open the point, go to the recovery section on the control panel again, but now instead of settings, click create. Enter a description or name for the rollback point.
Comment. The system automatically creates points when the user installs third-party programs on the computer, updates drivers, etc.
Using a rollback point
If you notice that after installing programs there are glitches, a drop in performance, etc., then it’s time to use a system rollback. For this:
- On the control panel, go to the “Recovery” section and then to the OS rollback settings. Click on restore:
