
Install xp after windows 7. Easy setup of Windows XP. Hard disk allocation rules
Most often on the Internet you can find instructions on how you can install Windows 7, 8 or 10 as a second system when Windows XP is already installed on your computer. This is a relatively simple task that even an inexperienced user can handle, since a newer operating system always retains the bootloader of the old one and automatically creates a menu in which the user can choose when booting which system to boot - the new one or the previous one. In this article we will look at the opposite situation - when Windows 7, 8, 10 is installed on the computer, and the user wants to install Windows XP in parallel. The piquancy of the situation is that after installing Windows XP, the previously installed Windows 10/8/7 will stop loading and its bootloader will have to be restored.
Installing Windows XP as a second system after Windows 7/8.1/10
If you have a desktop computer, then it would be even better to use an SSD for modern Windows 7/8.1, and a classic hard drive for XP. In this case, you can temporarily disable the SSD with Windows 7-10 so as not to accidentally erase anything from it, calmly install XP and then proceed to configure the boot order.
METHOD 1. Installing Windows XP with a connected hard drive with Windows 7/8.1/10 or installing Windows XP on another partition of the same physical disk
This is a common situation that most users face. In addition, this method is suitable for inexperienced users who have several physical drives, but do not want or cannot disconnect the hard drive with Windows 7/8.1.
Attention! This method is not suitable for SSDs. If you want to install XP and 7/8.1 on an SSD, you will need to first prepare the drive for XP using the Alignment Tool, then install XP, and only then can you install Windows 7/8.1.
Step 1 Prepare the partition for the second operating system.
Create a partition on your hard drive where you will subsequently install XP. If you need to partition a disk or redistribute space between existing partitions, use the free MiniTool Partition Wizard Home program (Download from the official website).
Important! Prepare sections EXCLUSIVELY on Windows 7/8.1/10 BEFORE installing XP! We strongly DO NOT recommend partitioning the disk in the XP installer! All you have to do in the XP installer regarding partitions is select the partition you want and quickly format it!
Let's say you have three partitions on your disk:
- Bootable (capacity 100MB for Windows 7 or 350MB for Windows 8/10)
- System, where Windows 7/8./10 is installed.
For Windows XP, you create a fourth partition. Where it will be placed and from which section to cut off the area is up to you. Of course, it is more logical to arrange the sections like this:
- Bootable
- System, where Windows 7/8/8.1 is installed.
- Windows XP installation section
- Disk with user data.
Although you will format the partition in Windows XP Setup, you can format it in Windows 7/8/10 so that you can set a label. And the label will help you not to make a mistake in choosing the right partition in the XP installation program.
Step 2 Install Windows XP
Boot from the installation CD or bootable USB flash drive and install Windows XP on the prepared partition. Be extremely careful when choosing a section. Be guided by its size.
Select a section and click Enter:

Select an item Format partition in NTFS system (fast):

Further steps for installing Windows XP do not differ from its usual installation as the only operating system.
After installation is complete, boot into XP and install all necessary device drivers. Set up your network and internet (if necessary).
Step 3 Restore the bootloader of the first operating system and add an entry for the second previous generation system to it
A. Preparatory stage. Downloading support software
Click Register at the bottom of the page:

To download, just like it on behalf of your Facebook account or subscribe by email:

The program requires Microsoft .NET 2.0 SP2 Framework. You can download from the Microsoft website http://www.microsoft.com/ru-RU/download/details.aspx?id=1639:
- Install Microsoft .Net 2.0 SP2 Framework.
- Install the EasyBCD program.
B. Restoring the Windows 7/8/10 bootloader
During the installation of XP, the Windows 7/8/10 bootloader got lost. Therefore, the first thing we need to do is restore it.
Launch EasyBCD.
- Go to section BCD installation.
- Select the partition where the Windows 7\8 boot loader was located before installing XP.
In most cases, this is the very first partition, 100MB in size for Windows 7 or 350MB if your first system was Windows 8\8.1. - Select bootloader type - Windows Vista/7/8 in MBR
- Click the button Rewrite MBR

After this, the Windows XP bootloader will be erased, and a new type of bootloader will be installed in its place.
Restart your computer. Now, instead of XP, your copy of Windows 7/10 should boot again.
Now our task is to add a second entry to the bootloader - to boot XP.
B. Adding XP boot entry to Windows 7/8/10 bootloader
Install EasyBCD in the same way again - now on Windows 7/8/10.
Launch EasyBCD.
- Click Add a note
- Select OS type Windows NT/2k/XP/2k3
- Select a system name.
This is the name that will appear in the menu when loading. We recommend removing the word Microsoft. - Click the button Add:

Now go to the section Current settings and check that the second boot entry is added:

After this you can click the button Edit boot menu, select the time for displaying the menu with a choice of operating systems at boot and rename the OS names. If you make changes, don't forget to click the button at the end Save:

METHOD 2. Installing Windows XP when the hard drive with Windows 7/8.1/10 is disconnected
This method, as we wrote above, is more suitable for desktop computers and only some laptops where it is possible to connect several data storage devices. The advantages of this method:- You don't risk accidentally erasing an already installed Windows 7/8.1/10 while installing XP.
- If you unmount any of the physical disks, you will be able to boot from the remaining disk because this method places the boot loaders on different physical disks. You may only need to adjust the boot order in the BIOS.
Step 1 Turn off your computer. Disconnect the data cable from the hard drive on which Windows 7/8.1/10 is installed
Step 2 Turn on your computer and install XP on the remaining hard drive in the usual way - as if this Windows would be the only one. Install all necessary drivers.
Step 3 Turn off the computer and connect the hard drive with Windows 7/8.1/10 back to the previous SATA port.
Step 4 Download Windows 7/8/10.
If you haven't changed the boot priority in the BIOS, by default you should boot from the same drive into your old Windows 7/8/8.1.
A.Installing software for editing bootloaders
Install Microsoft .Net Framework 2.0 SP2 and EasyBCD (described in Method 1).
Now the only thing we need to do is add an entry to the Windows 7/8/8.1 bootloader about XP installed on another drive.
B.Adding the Windows XP boot entry to the Windows 7/8.1/10 bootloader
Follow these steps:
- go to the tab Add a note;
- select OS Windows;
- select type Windows XP;
- specify the desired system name in the OS selection menu;
- click the button Add for adding.
After this, restart your computer, select Windows XP from the menu and make sure that it boots from its hard drive.
Despite its hopeless obsolescence, the Windows XP operating system still remains very popular among users, thanks to the ease of working with it and its fairly high stability. In some ratings, it is even ahead of the “seven”. Next up for consideration is the question of how to install Windows XP from a disk and perform the initial system setup. It is believed that the installation of this particular modification should not cause any particular difficulties, but in reality it is necessary to pay attention to some important nuances, without understanding of which the installation of the system may be unsuccessful.
Create a Windows XP installation disk
At the first stage, we will assume that the user does not have the original installation disk. Windows XP can be downloaded as an image from the official Microsoft website or from another (necessarily trusted) source.
In this case, you should immediately pay attention to the contents of the downloaded distribution. It is recommended to download only the one that initially contains the second and third service packs, so as not to have to install them manually later.
It is not difficult to record an image onto optical media. To do this, you can use many programs for working with images (for example, UltraISO or Nero Burning ROM). If you need to create a multiboot Windows XP disk, it is best to use a tiny utility called WindowsSetupFromUSB, but to write the distribution onto a flash drive.
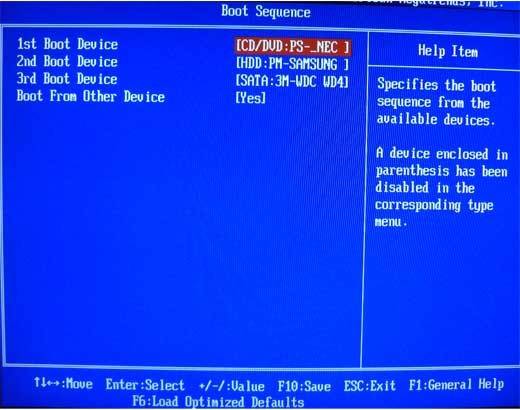
BIOS Presets
So, we assume that the installation distribution is recorded. Now you need to make it so that you can boot from it. To do this, you must use the primary I/O system BIOS settings. Typically on desktop computers, login is accomplished by pressing the Del key, but different laptop models may use other keys (F1, F12) or combinations thereof.

To be recognized as bootable, you need to find a partition with a name like Boot, Boot Priority, Boot Sequence and install the optical drive (CD/DVD-ROM) first in the list of boot devices by pressing the PgUp/PgDown key.
Start installation
After completing all the preparatory steps, you can proceed to solving the problem of how to install Windows XP from a disk directly. After turning on the computer and starting from the removable device, a black screen will appear with a prompt asking you to press any key to boot from the disk. Keep in mind that you will only have five seconds to make a decision. Otherwise, it will boot from the next device (usually a hard drive), provided it has a bootloader, installed or even a damaged OS.

Next, a screen will appear to preload the basic installation components and a line at the bottom prompting you to install additional SCSI and RAID drivers. In most cases, this is not necessary, however, if the computer has several hard drives combined into the same RAID array, the installation must be applied. But it will assume that the user has one hard drive.
Partition selection and formatting
At the next stage, a welcome screen will appear with options to choose from:
- immediate installation of the system;
- restoring a damaged system via the console;
- refusal to install.

Select the first item by pressing the enter key. Next, we agree to the license agreement and press F8 to continue the installation (hints will appear at each installation stage).
After this, previously installed copies will be scanned, after which you will need to make a choice in favor of installing a new system (Esc).
Now the most important thing begins with the question of how to install Windows XP from a disk. The first step is to decide on the system partition and its size. If installed on a new hard drive that did not have logical partitions, the unallocated area (full volume) will be shown.

It is undesirable to allocate all the space to the system partition (this can later play a cruel joke). It’s better to partition the disk right away by pressing the C key and specifying the required volume in MB (for the system you can allocate 40-60 GB, but not less than 20 GB). Please immediately pay attention to the fact that for the normal functioning of Windows XP, about 10-15% of its size must always remain free in the system partition both after installing the OS and after installing user programs. After returning to the partition creation screen, you can begin formatting (but more on that later).

If the hard drive has already been broken and has an old system, the user will be shown all available partitions. If necessary, all partitions can be deleted (press D when selecting a partition). If the user is satisfied with the disk structure, simply select the desired partition in which the system was installed previously and proceed to formatting.
In the case of new hard drives, you can immediately select quick formatting to NTFS. If the operation is applied to an existing partition, several options will be offered to choose from. It is best to perform a full format in NTFS. But to save data, you can leave the file system unchanged. Most likely, you will next receive a warning that the Windows system directory already exists, with a suggestion to overwrite the current copy or select a new folder. Here - optional (all the same, the Windows XP folders of the old version, if one was previously present, will be saved).
Now all that remains is to wait for the files to be copied, after which the reboot will occur and the installation of the system will begin in normal graphical mode.
Setting initial parameters
In the next steps in the question of how to install Windows XP from a disk, the user's actions are quite simple. When rebooting, be sure to remove the optical media from the drive, otherwise you will get the pre-start screen again.

After the installer starts, the language and region are selected (usually you don’t need to change anything if you have a Russian copy of the system), then, if required, enter the user name and organization name (optional), after which the product key is entered (without it, the installation will not continue ). Working keys, by and large, can be easily found on the Internet.
At the next stage, you need to enter the name of the computer and specify the administrator password (this can be done later). Next, the date and time are configured (usually nothing needs to be changed), and finally a screen may appear asking you to select network card settings. Feel free to select “Regular settings” and indicate that the computer is not participating in the network (it is better to select the group and domain after installation is complete).
Completing the installation
Only now will the device drivers begin. Upon completion, several additional windows may appear. For example, the system will ask for consent to set the optimal screen resolution. We must agree with this.
Then a welcome blue screen starts, in which most of the actions can be skipped (for example, deferring protection, checking the Internet connection and registering with Microsoft). Finally, all that remains is to enter the names of the accounts that will be registered in the system. You can enter only your data, after which a notification will appear informing you that the installation is complete.

Clicking the “Finish” button will cause the “Desktop” to appear with a familiar picture. At this point, the installation can be considered complete (if service packs were present in the distribution, they will be installed automatically, otherwise you need to install them yourself).
Typical errors when installing the system
Not often, of course, but you can also encounter Windows XP errors, moreover, precisely during the system installation process. The most common occurrence is BSoD (blue screen). The installation is impossible due to an incorrectly set mode for the hard drive.

If a message appears about a BIOS firmware mismatch, you must disable ACPI mode during installation.
It is possible that the disc itself is damaged or scratched. Just burn the distribution onto another medium and try installing the system again.
Initial setup of Windows XP
Initially, the system usually does not need any special settings. But to reduce the load on computer resources, it is advisable to disable some background services that are activated by default and start with the system.
In the Run console (Win + R), enter the msconfig system configuration access command, go to the startup tab and disable everything that is there, leaving only the ctfmon process, which is responsible for displaying the language in the tray and changing keyboard layouts.
Required additional software
Then be sure to install security software, since there is practically no protection in the “expert” itself. Antiviruses for Window XP are quite diverse and do not cause installation problems. However, based on the fact that this version of the system is usually used on relatively low-power machines, you should not install heavy packages like Kaspersky Lab software products. It is better to limit yourself to some lightweight versions (Avira, Panda Cloud, etc.).
However, if you look at antiviruses for Window XP from the point of view of providing maximum protection, you can use the NOD32 or Smart Security packages from ESET. True, they will have to be activated monthly using special keys that are freely distributed on the Internet.
Finally, all that remains is to install an archiver, a set of codecs, a flash player for the browser, an office suite and some other applications that the user may need while working.
In this article we will tell you in detail how to install Windows 7 on Windows XP. Late last year, Microsoft announced that XP would no longer be updated. In this regard, this issue remains very relevant.
What is needed for this
There are still many users who are loyal to XP. This is largely due to the fact that the “seven” is very demanding and cannot be installed on an old computer. In the era of rapid development of high technology, even software products have become very demanding.
Owners of old hardware have no choice but to use an outdated system. This allows the system to operate normally. Those users who decided to install “Seven” were sometimes dumbfounded by the terrible sluggishness of their computer.
Nevertheless, having updated their equipment, the lion's share of people immediately decide to update Windows. This allows you to take advantage of all the innovations of modern technologies.
- processor with a clock frequency of at least 1 GHz;
- 1 GB of RAM (for 32-bit) and 2 GB (for 64-bit);
- at least 16 GB of free hard disk space. If your version of Windows includes additional software (office, antivirus, drivers, etc.) you will need much more;
- Internet access (for further registration);
- a video card that is compatible with DirectX version 10 or higher;
Advice: this condition is only necessary for modern games. If you plan to use only office programs, then you can omit it.
- Some functions may require additional hardware (for example, a TV tuner or flash memory);
If you are confident that your equipment fully meets these requirements, you can proceed with installation. You can view all the parameters through the control panel, then the “system and security” item, in which we select the “system” tab.
BIOS setup
First of all, you will need to make some settings in the BIOS. To many inexperienced users, this seems like a complicated operation, but in fact, everything is quite simple.

We do the following:

That's all, now the next time you start the computer, the system will start from the desired device and the installation will begin. Also in the BIOS you can immediately make additional settings, for example, increase the intensity of coolers. However, if you are not very familiar with BIOS, it is better not to do this in order to avoid mistakes.
How to install Windows 7 if you have Windows XP
Before installation, you will need to transfer all files from your computer to removable media, because it is better to install the OS by formatting the disks. If you don't have enough space, you can upload some files to a file hosting service.
Having completed all the preliminary manipulations, it’s time to begin the main procedure. Almost all the latest versions of the OS are installed automatically, so this usually does not cause difficulties even for less experienced users.
Once the installation is running, you can go do other things. The system will do everything itself, and you will only need to specify some additional parameters.
Installation process
After turning on, the computer will immediately begin installing the operating system. Almost the entire process occurs automatically, so there are usually no problems with it.

The only thing you need to do is make some settings:
- the language in which the system will operate. However, it can always be changed through the control panel;
Important! Choose the full installation as it will save you some extra hassle
- creating partitions. You can divide the entire disk space into several parts. It is recommended to make a separate partition for Windows;

That's all. Now all you have to do is wait until the installation is complete. When finished, a window will appear in which you will need to enter your username and password (if necessary).
Some versions themselves enter the username at the end (usually the standard “Administrator”). If desired, you can edit this parameter.

If you did not format the partitions, then in one of them (most likely in C) all the XP files were saved. They need to be removed to avoid errors in the future.
This is done like this:
- Open Start and enter “Disk Cleanup” in the search menu. A list of found items will appear, among which you need to select the very first one;
- The disk selection window will appear. You need to select the one on which the previous OS was installed and click “ok”;
- in the window that opens, select “clean system files”;
- Next, you need to check the box next to “previous settings” and click “ok;
- When finished, click “delete files”;
- After a few seconds, the unnecessary folder will be deleted.
Install the drivers
Now all that remains is to install drivers for all existing devices (video card, chipset, network, sound, etc.). If you have a disk with drivers specifically for your computer (it is usually given upon purchase), then all you have to do is insert it and trust the instructions.

However, if it is missing, you will have to select drivers for all equipment.
You can do this in several ways:

Now you can judge with confidence that all the work is finished and you have completed the task. Don't forget that you will have to reinstall all software again. Therefore, get distribution kits in advance so as not to experience problems in the future.
In addition, software products that run on XP may not work on Windows 7. Therefore, before switching to this system, you should acquire more modern software products.

As you can see, this is a completely simple process and by strictly following all the instructions, you will certainly cope with it. If necessary, you can supplement the system with various additional utilities.
>This article discusses the procedure for installing Windows XP on a computer that already has Windows 7 installed and the sequence of steps required to create a dual-boot configuration where, when you turn on the computer, a menu is available to select the operating system to boot.
Introduction
It is generally accepted that the more correct Windows installation sequence is to install the minor version before the older one. In this case, it is possible to boot an older system, and after installing a newer OS, a menu for selecting a bootable system appears.
However, the sequence does not matter if you know the principles of loading operating systems. Let's consider a situation where Windows 7 is already installed, but you need to install Windows XP on your computer. The article is intended to help avoid pitfalls for those who plan to install Windows XP after Windows 7.
Initial data
Installing Windows XP
A lot of articles have been written about installing Windows XP, so there is no point in dwelling on this issue in detail within the framework of this article. The only thing is that you can install Windows XP if Windows 7 is already installed by booting from the Windows XP installation disk. During installation, you must specify a disk partition that was prepared in advance.
Figure 2 - Selecting a partition for installing Windows XP
Already in this figure you can see that the partition that does not have a letter in Windows 7 is assigned the letter C, and the partition with Windows 7 is assigned the letter D.
This is how the “disk management” picture looks after installing Windows XP
Figure 3 - Disk Management in Windows XP
After installing Windows XP, there will be neither a choice of operating systems at boot, nor, accordingly, the ability to boot Windows 7.
Pay attention to the changes that have occurred with the hidden “System Reserved” section: it has become visible (it is assigned the letter C). Let's see what is located on the active section (C). To do this, you need to disable hiding system files in the folder properties and allow them to be displayed:

Figure 4 - Enabling the display of hidden and system files
So, on partition C we see Windows 7 boot files: bootloader - bootmgr and folder Boot, in which the boot menu interface files are located, the boot data storage file - bcd, memory test program files - memtest.exe. In addition, it now contains the Windows XP boot files: ntldr, ntdetect.com, boot.ini.
Figure 5 - Boot files for Windows 7 and XP operating systems
Restoring the Windows 7 boot loader in Windows XP
To restore Windows 7 boot, you need to use the Windows 7 installation disc.
Insert the Windows 7 installation disk, find the file on it bootsect.exe in folder BOOT. Please note: the path to the bootsect.exe file is F:\boot\bootsect.exe. In your case, instead of F there will be a letter belonging to the CD - DVD drive

Figure 6 - Contents of the BOOT folder of the Windows 7 installation disk
Launch command prompt: click Start - Execute, enter in the field cmd. Once prompted, enter the following command
Figure 7 - Flow of the bootsect command
The result of the command will be the restoration of the Windows 7 master boot record and boot code, which transfers control to the Windows 7 boot manager.
Creating a Dual Boot Configuration on Windows XP
As you know, there is no utility for changing configuration data in XP, but it is in the folder with Windows 7 installed. To apply it correctly in XP, you need to enter the System32 directory of the Windows 7 operating system at the command line. After the transition, run the following commands in sequence:
Bcdedit /create (ntldr) /d "Microsoft Windows XP"
This command creates a Windows XP download store in the Windows 7 download store. Running this command may fail because the repository is already created by default, so you just need to rename it:
Bcdedit /set (ntldr) description "Microsoft Windows XP"
The following command will tell the Windows 7 boot loader the device location of the XP boot files:
The following command will point the Windows 7 bootloader to the Windows XP bootloader:
Bcdedit /set (ntldr) path \ntldr
The following command will add a line about selecting Windows XP in the boot menu and place it under the rest:
Bcdedit /displayorder (ntldr) /addlast
Figure 8 - Complete list of commands for creating a boot menu in Windows XP
You can check whether the commands are executed correctly and the presence of a boot menu by running the command in the command line window bcdedit or by analyzing the bootcfg file obtained by running the bcdedit >c:\bootcfg.txt command. The file will be located in the root directory of drive C.
Figure 9 - Checking for the presence of a Windows XP boot entry and boot menu
After running these commands, when you boot your computer, you will be given the option to select the OS to boot.
Figure 10 - Selecting OS to boot
It may be more convenient for many to reduce the OS boot selection timeout, which by default is 30 seconds. To configure this parameter, use the command
Bcdedit /timeout XX
Where XX is the timeout time in seconds.
Features of creating a dual boot configuration in Windows 7
If you are just going to install Windows XP, then you can create a dual-boot configuration in advance, while still running Windows 7. The same recommendations will help when you restored the Windows 7 bootloader while in Windows XP, and decided to create a dual-boot configuration later.
In this case, some features should be taken into account.
Commands, just like in Windows XP, are executed on the command line. On Windows 7, these commands must be run from an elevated command prompt. To do this, click the button Start, select item Standard, right-click the Command Prompt shortcut and select , or like this:
Click Start and in the search field enter cmd
On the found file, right-click and select the item in the context menu Run as administrator.

Figure 11 - Running command prompt with elevated rights (as administrator)
The order of execution of the commands is the same, with the exception of one. As you know, the Windows 7 and Windows XP boot files are located on a hidden partition that does not have the letter . Therefore, instead of the command
Bcdedit /set (ntldr) device partition=C:
Need to do
Bcdedit /set (ntldr) device partition=\Device\HarddiskVolume1
This note does not make sense if for some reason (for example, if your hard drive was partitioned before installation), the hidden boot partition was not created and the system boot files are on the same one as Windows 7 section.
Conclusion
Even if the installation sequence of operating systems is not entirely correct, it is not difficult to organize their correct loading without resorting to complex manipulations or third-party programs. Using the Windows 7 installation disc, you can restore the ability to boot into this operating system, and using the utility bcdedit configure the loading of two operating systems.
Greetings. I decided to write about it today how to install Windows XP. They just brought me a computer, it’s kind of old, it’s already old. 256 MB RAM, Celeron processor, 40 GB hard drive. Well then? But whatever, XP is just right for him.
It’s just that everyone is already writing about installing Windows 8, but something has gone wrong with me. Well, oh well, I think that XP will still live, because whatever one may say, it’s a good OS and many people still work with it. I would like to immediately apologize for the photos; I took the photos on a 15-inch monitor and also on my phone. Ideally, of course, you could install Windows XP on a virtual machine and take beautiful screenshots, but I have a living example :).
Preparing to install Windows XP
Important! Make sure that drive C (the drive on which you have or have installed the operating system) does not contain information that is important to you. Desktop and folder "My Documents" is stored on drive C. If there is information, it can be copied to drive D using a boot disk.
If everything is fine, then we move on. Insert the Windows XP installation disc into your computer's drive and restart your computer. If, after the download starts, you see loading at the bottom of the screen (the dots will move), then everything is fine. Quickly press any key (we didn’t have time:), restart the computer again) and you can proceed to the beginning of the installation.
Well, if you didn’t boot from the CD, but the computer started booting as usual from the hard drive, or an error appeared that caused you to reinstall the operating system, then it means that you don’t have boot from the drive set first in your BIOS. I already wrote an article about that, but in this computer the BIOS was different from what is described in the article.

Go to the “Boot” tab.

Click “Boot Device Priority”.

Using the “Enter” and “Top” “Down” keys, set CD/DVD first, then the hard drive, etc. Now press F10 and save the changes. The computer will restart and the CD will begin loading. Press any button and proceed to the beginning of the installation.
Windows XP installation process
As soon as you press any key, we see this:

Here you will have to wait, well, nothing can be done, we wait :).

In this window, press “Enter”.

We accept the license agreement by pressing the F8 key.

As you can see, I have already found an old version of Windows XP and you can try to restore it, but I think you also need a clean installation, so press “Esc”.

We select the partition on the hard drive in which we want to install the operating system. As a rule, this is C:, select it and press “Enter”.

Confirm the installation with the “C” key.

Here you need to choose how the partition will be formatted. I advise you to choose FAT and not fast. Press “Enter”. Confirm formatting by pressing the “F” key.

We wait until the partition on the hard drive is formatted.

Copying files from the disk will begin immediately, we wait again :(.

You can immediately set up the language and keyboard. Click “Next”.

Enter your name and organization name. Go ahead.

Setting the time and date. Click “Next”.

We're waiting again, just don't go too far :).

I left “Regular settings” and clicked “Next”.

We enter the name of the computer on the network. And we continue with the installation.

We read the greeting and, as usual, click “Next”.

Configuring automatic update settings.

We skip these settings, or you can configure the Internet.

You can register with Microsoft. But I refused. Let's continue.

We specify users by computer.

Congratulations! Windows XP installation is complete.
All friends, the installation is complete and you can start using your computer. I also want to note that I installed the simplest build of Windows XP. You may also have an assembly, for example from ZWER, where the installation process may be slightly different. For example, in this version I still entered the key, I forgot to take a photo. But in the assembly from ZWER there seems to be no such item. Well, if it asks for a key, then look for it in the text file that you most likely downloaded with the disk image.
Well, that's it. Good luck friends!
Also on the site:
How to install Windows XP? Guide with pictures updated: December 20, 2012 by: admin