
Recover disk using r studio. Data Recovery Guide
R-Studio utilities for Windows and Mac OS help to recover deleted files both on local drives and over a network using the TCP/IP protocol. This is an excellent solution in cases where files were deleted outside the Recycle Bin or it was emptied, when files were lost after a virus attack, or when there was a power failure. R-Studio performs quite well when restoring data after formatting a disk and even to another file system. Another feature of the program is the ability to create an entire image of a damaged disk in order to later work with a copy and try to recover files.
After launching R-Studio, a list of disks found in the system is displayed. The table shows the names of devices and logical drives on them, label, file system and capacity.
When selecting a disk or device, on the right side of the window we see additional properties of the selected disk.

To scan the selected disk, press the button . R-Studio will try to find all files deleted on the disk and display them in the list. At the same time, we can set the scanning range - from which byte (kilobyte, megabyte...) and to which. By default, the program scans the entire disk capacity, as indicated by the values already indicated. In advanced mode (button ) you can specify multiple ranges.
We also select the method of displaying data in advance:
- Simpled, fast mode, only the scanning process is displayed;
- Detailed, detailed mode, you can see both progress and a report on found files. This mode is slower than the previous one;
- None, the fastest mode, when no information is displayed at all during disk scanning.

The disk scanning process itself is displayed in the already familiar mode, when the entire disk capacity is conditionally divided into several zones, and during the process, those already scanned are marked with color.

After scanning, an additional entry appears under the disc name Recognized, when clicked, R-Studio opens a list of all files on the device, both existing and already deleted.

Deleted files are marked with a cross on the icon here. They can be viewed from the list in the same way as existing files on the disk. To do this, double-click on the file or right-click the context menu, where we select the item Preview. Of course, it will be possible to view a deleted file if it was recently erased and other information has not yet been written over it. If the file is severely damaged and cannot be viewed, a corresponding message will appear.

As an alternative to normal browsing, R-Studio in this case opens the hexadecimal code of the selected remote file, which in certain situations can help the user in identifying data.

Sorting tabs make it easier to view files on disk:
- Real, as is, in alphabetical order;
- Extensions, a list organized by file types (extensions);
- Creation Time, by creation date;
- Modification Time, sort by file modification date;
- Access Time, according to the time of last access to the file.
It is, of course, advisable to check the files for viewing before recovery in order to assess their damage. If the file is displayed without problems from the R-Studio list, then restoring it will be just as easy. We mark the files that need to be restored by checking the boxes next to their names, then click the button .

There is one rule to remember when recovering deleted files in any program. You should never restore deleted files to the same disk where they were recorded!
Before restoring, R-Studio will prompt you to configure additional settings. In particular, you must specify the folder where the files recovered after deletion will be written. Here you can specify what to do with corrupted file names, when the file names are the same, whether to restore the directory (folder) structure, or whether to restore file attributes.

After recovery, you can open the destination folder in Explorer or any file manager and check the recovered files for integrity. It may also be that even after recovery the file will not be readable or will partially lose data.
Characteristics:
Interface language: English
OS: Windows 95, 98, 2000, XP, Vista, 7
File size: 13.8 MB
License: shareware, registration from $49 depending on version
Every person who has any digital technology faces this problem - losing files. And, by the way, it doesn’t matter at all what is lost: a unique home photo, a favorite recording, a video clip downloaded from the Internet, an unfinished dissertation. No one will rejoice at such an event. What to do now? Experts recommend using one of the special programs. We will now figure out how to use R-Studio, one of the applications for recovering lost files.
general information
Regardless of the method of data loss, the manufacturers of this utility guarantee a high chance of saving your information. This does not apply only to cases where the carrier has received physical damage. Users, of course, have tried many different programs for file recovery, but judging by their reviews, R-Studio is one of the best, and it is also completely understandable to use for the most inexperienced user. During some experiments, only she coped with the task 100%.
Before we move on to talking about how to use R-Studio, you need to pay attention to two ironclad rules that you need to clearly understand before starting to work with any restorative product:
- Under no circumstances should you save the information you are recovering to the same section of the media, or even to the media itself. Do not perform any operations related to writing to it.
- If you are not confident in your ability to complete this work, it is better not to start it, but contact specialists. It may happen that they will no longer be able to help. In such situations, one does not learn from one's own mistakes.
R-Studio demo mode
In order for the user to experience all the capabilities of this program, he has a chance to work with the demo mode of R-Studio. The only difference from the full one is the limitation in the size of the restored file. The demo mode of this utility allows you to test and verify all the capabilities of R-Studio. This version can be registered absolutely at any time and at any stage during the operation of the program. To do this, you just need to buy an activation key for R-Studio and enter it in the specially designated field.

So, download the application for free, install it and launch it. After scanning and detecting lost information, you can immediately restore those files that are no larger than 256 KB in size. The rest can be viewed and the possibility of returning them back to the owner can be assessed. If you do not know how to use R-Studio, please read the User Guide first. If you are satisfied with its performance, you can immediately register the utility and continue recovering files of any size.
Getting started with R-Studio
And now, finally, let's start talking about how to use R-Studio. Having launched the program, we will see the main window in front of us, where we will see all the drives available in the system. Not only hard drives are supported, but also floppy disks, CDs, DVDs, USB flash drives, various flash cards, and some exotic media types. All this is conveniently located in a form reminiscent of a standard conductor. You can see all the necessary characteristics and parameters of the media.

If the files were simply deleted, and the system itself was not damaged, then you can restore them by opening the desired disk. As in Explorer, you will see: on the left side there is a standard directory tree, and on the right side there is a regular list of files. Those that have been removed are recognizable by the icon with a red cross in the list.
Continue file recovery
Keep in mind that some files may not be recoverable, no matter how well you understand how to use R-Studio. This depends on whether any other information was written to the same location. Let's continue further. Using the checkboxes, select the files we need to restore. Then click on the “Restore marked” button and specify the path to save.

If you are a very advanced user, you can select by mask and other attributes, such as creation date, name or size. If the file system is damaged or modified, the recovery process will be a little more difficult and much longer. A scanning operation will be added, which can last several hours. During it, the original location of the searched files is established and the ability to read them is checked. Often this is successful, but with the loss of the name. Many file types are supported.
Completing the scan
Once the scan is completed sooner or later, the user will be able to see a list of partitions that were recognized. The color coding shows whether there is a correct boot record and the same fragments in the media section. From this you can already see the possibility of recovering information. The R-Studio program, in addition to the basic functionality already described, performs some highly specialized tasks, for example creating a media image. This will be very useful for subsequent recovery, since it happens that information disappears right before your eyes when analyzing a directory.

This may be caused by viruses or bad sectors. Even a long-term scan, not to mention recovery, such media may simply not withstand. This is where a bitwise copy comes in handy. R-Studio also recovers information from partitions combined into a RAID array, which are automatically recognized and accessible as regular hard drives.
Final part
This program has a large number of different configurations. Some of them have additional functionality that is completely unnecessary for home use, but for a system administrator of a large company this is exactly what is needed. And their prices are different, so why overpay for extra bells and whistles? When you purchased R-Studio, the instructions will help you understand all the nuances of the utility.

There are separate versions that allow you to restore information even within any local network. But, regardless of the functionality, all deliveries include R-Studio Emergency - an application that works from a set of floppy disks or a CD, which is extremely necessary when the operating system cannot be started. Before deciding whether to buy a license or not, read the reviews. They are mostly positive. Users were often able to recover even those files that they had already said goodbye to. There are two disadvantages: weak capabilities in the demo version and the length of the scanning process when searching for files. Sometimes, according to reviews, it took up to three days. But the results that you get are worth it. So the choice is yours.
Read, review of data recovery program – R-Studio. As a result of formatting a computer's hard drive or external hard drive as a whole, and not just one of the partitions, all partitions created on it are deleted along with the saved files. Most data recovery programs can recover from such a disk, at best, only a set of files, often with an unsaved name, without preserving the folder structure and directory tree.
R-Studio has the ability to recover data from a lost partition while preserving the folder structure and file names; let's look at how to recover files using it.
Let's assume that our hard drive had four partitions with files: D:, I:, F:, E:. This disk was formatted during the reinstallation of the operating system, and one partition was created on it.
To restore one of the deleted partitions using R-Studio, launch the program and select the hard drive from which you want to restore the partition, click the button "Scan".

If necessary, make additional settings in the window that opens and click "Scanning".

We are waiting for the end of the scanning process. Scanning information is shown in a kind of window on the right, which resembles the disk defragmentation window, as in older versions of Windows. Also, during the scanning process, the program calculates its duration; pay attention to the status bar at the bottom of the program window.

The disk scanning process lasted about 4 hours. As a result, R-Studio displayed in the window on the left a list of detected partitions of the scanned hard drive: existing and previously deleted. If you look at the list of detected partitions and compare it with those that were deleted from the disk (screenshot 1), you will not be able to compare them all by size. Therefore, if it is necessary to restore a specific partition, it can be detected by checking each one.

Let's look at the contents of a partition whose volume matches the previously deleted Disk I:.

As a result, R-Studio displayed the contents of this section, in which no files were found that were deleted along with it. The same result was obtained when checking other recognized sections.

As a result of scanning the existing disk partition “New Volume”, which was created instead of the deleted four, the program still detected files from the deleted partitions.

Select the files and folders that need to be restored and click the icon "Restore" in the top menu of the program.

Specify the folder to restore files and click the button "Yes".


Files and folders have been restored.

In conclusion, we can say that the program coped well with the task. And in terms of data recovery quality, R-Studio is a direct competitor Hetman Partition Recovery: also recovers files from deleted or formatted disk partitions, creates disk images and restores data from them, has an adequate preview function for recovered files.
Where Hetman Partition Recovery surpasses its competitor is a simple, intuitive interface, much higher speed of operation (both scanning storage media and data recovery), ease of use, the latest update added to the program the function of recovering data from virtual disks and virtual machine disks.
With Hetman Partition Recovery, it is possible to restore data in two or three steps, which greatly simplifies the data recovery process and only has a positive effect on its result.
Most likely you came to this page because you need to recover data lost as a result of some incident with your computer. Sometimes such recovery can be a very complex task that only data recovery specialists can handle, but most cases fit well into the typical data recovery scenarios that we have included in the list below. All you need to do is select the most appropriate case from this list and receive detailed instructions on how to get your data back in your specific case. However, before proceeding, we recommend that you read our general data recovery tips.
General tips:
1. First and most important: Stay calm, don't rush, and don't make the situation worse. Do not allow any further changes to the data to occur on the storage device that contained the lost data.
2. Learn more about data recovery. We recommend reading our article. You will understand how data recovery works and what to expect from it in your case.
3. Analyze the affected disk. You should not work with disks with damaged hardware. Signs that your hard drive has hardware problems:
- The hard drive is not recognized by the operating system or is recognized under some unusual name.
- The operation of the hard drive is accompanied by atypical sounds, clicks, and it works very slowly.
- Bad sectors constantly appear on the hard drive.
- SMART hard drive condition assessment programs provide messages about significant hardware malfunctions. To do this, you can use our data recovery programs.
Attention! If you think that your computer's hard drive is faulty, then use the R-Studio Emergency utility only to create an image of it. DO NOT TAKE ANY ACTION WITH THE DISK YOURSELF! Do not attempt to start the scanning or file recovery process. Do not try to use any other data recovery software. Remember that any incorrect actions with such a disk will likely cause even more data damage. It is best to use the services of data recovery laboratory specialists, otherwise you risk, at best, incurring even greater financial costs, and at worst, permanently losing your files. Take the disc to specialists: they have special equipment and, most importantly, the necessary level of knowledge to work with such discs.
5. Prepare enough space to save the recovered files and, if necessary, images. Never try to save recovered files on the drives on which they were located.
6. Last but not least, do not buy any data recovery software until you are sure that it can recover the files in your case. All normal data recovery programs allow you to work in demo mode so that you can find lost files and evaluate the chances of their successful recovery. Please note that even if the program shows the correct file structure, this does not guarantee that the files can be successfully recovered. Only those files that are successfully displayed in the viewer can be successfully restored.
Typical data recovery cases:
Problems with computer programs. Signs that the computer hardware is working normally, and the problem is corrupted system programs: the computer turns on, the boot procedure begins, the operating system begins to load, but then the boot stops, and the computer either freezes or goes into reboot. Signs that the computer"s hardware works normally and the problem is in faulty system software:
. How to recover files from a Windows or Linux computer that won't boot.
. How to recover files from a Macintosh that won't boot.
. How to recover files from a non-booting computer over the network.
Problems with computer hardware. Signs that your computer won't start due to faulty hardware: the computer won't turn on, you hear unusual beeps when you turn it on, the boot procedure ends suddenly, the computer gives warnings about faulty components in the computer, etc.
No user is immune from data loss from a computer or external storage device. This can happen in the event of a disk failure, a virus attack, a sudden power cut, or mistaken deletion of important data bypassing the trash can or from the trash bin. It’s not so bad if entertainment information is deleted, but if there was valuable data on the media? There are special utilities to recover lost information. One of the best ones is called R-Studio. Let's talk in more detail about how to use R-Studio.
The main function of the program is to recover lost data.
To find a deleted file, you can first view the contents of the disk partition where it was previously located. To do this, click on the name of the disk partition, and click on the button in the top panel “Show disk contents”.
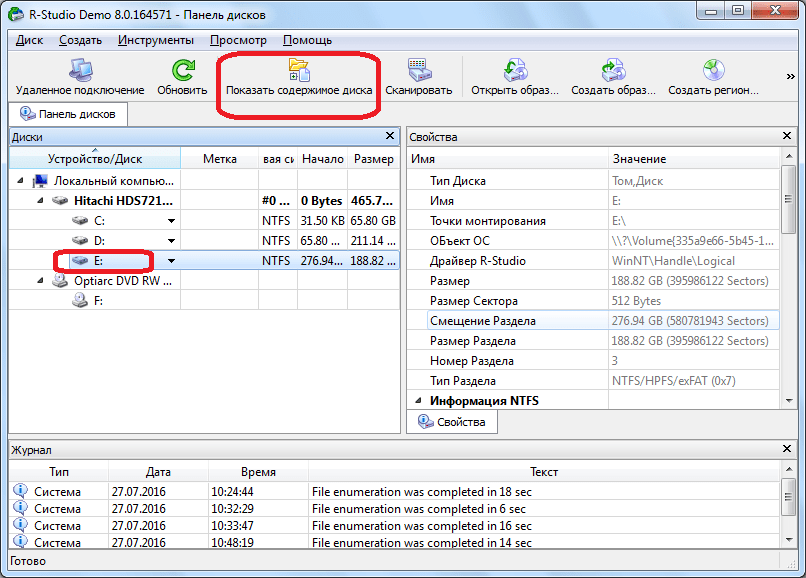
The processing of information from the disk by the R-Studio program begins.

After the processing process has occurred, we can observe the files and folders located in this disk partition, including deleted ones. Deleted folders and files are marked with a red cross.
In order to restore the desired folder or file, mark it with a checkmark and click the button on the “Restore marked” toolbar.
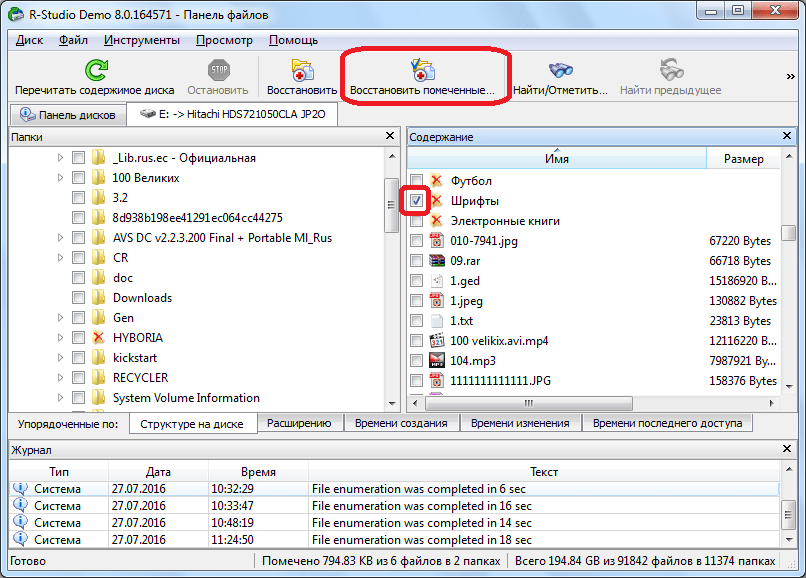
After this, a window opens in which we must specify the recovery parameters. The most important thing is to indicate the directory where the folder or file will be restored. After we have selected the save directory and, if desired, made other settings, click on the “Yes” button.

After this, the file is restored to the directory that we specified earlier.
It should be noted that in the demo version of the program you can restore only one file at a time, and then no more than 256 KB in size. If the user has purchased a license, then group recovery of files and folders of unlimited size becomes available to him.
Recovery by signatures
If, while viewing the disk, you do not find the folder or file you need, this means that their structure has already been damaged due to new files being written over the deleted elements, or an emergency violation of the structure of the disk itself has occurred. In this case, simply viewing the contents of the disk will not help, and you need to conduct a full scan using signatures. To do this, select the disk partition we need and click on the “Scan” button.

After this, a window opens in which you can set scanning settings. Advanced users can make changes to them, but if you are not very knowledgeable about such things, then it is better not to touch anything here, since the developers have set the default optimal settings for most cases. Just click on the “Scan” button.

The scanning process starts. It takes a relatively long time, so you will have to wait.

After scanning is completed, go to the “Found by signatures” section.

Then, click on the inscription in the right window of the R-Studio program.

After a short processing of the data, a list of found files opens. They are grouped into separate folders by content type (archives, multimedia, graphics, etc.).

In files found by signatures, the structure of their location on the hard drive is not preserved, as was the case in the previous recovery method; names and timestamps are also lost. Therefore, to find the element we need, we will have to look through the contents of all files of the same extension until we find the required one. To do this, simply right-click on the file, as in a regular file manager. After this, the viewer for this file type, installed on the system by default, will open.
We restore data as before: mark the desired file or folder with a checkmark, and click on the “Restore marked” button in the toolbar.

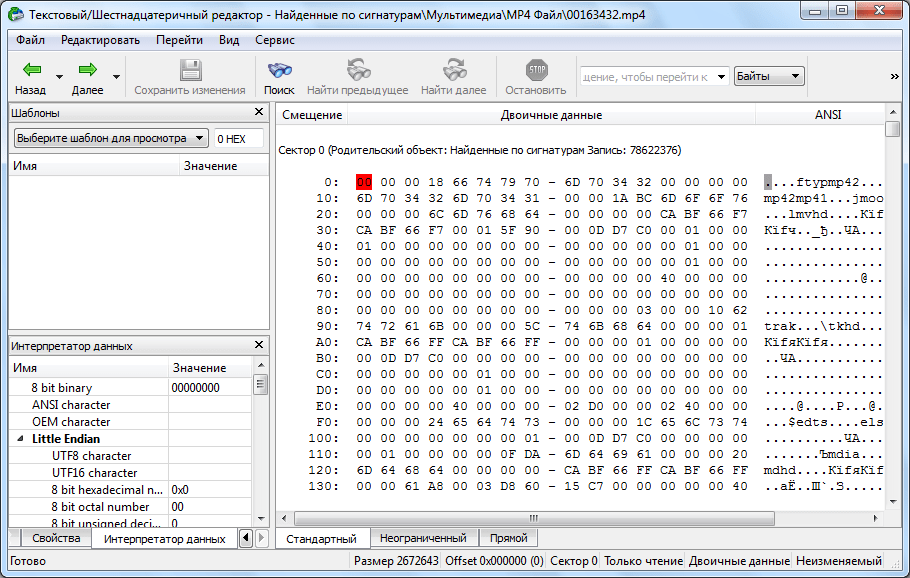
Editing disk data
The fact that the R-Studio program is not just an application for data recovery, but a multifunctional processor for working with disks, is evidenced by the fact that it has a tool for editing disk information, which is a hexadecimal editor. With it you can edit the properties of NTFS files.
To do this, left-click on the file you want to edit and select “Viewer-Editor” in the context menu. Or, you can simply type the key combination Ctrl+E.

After this, the editor opens. But, it should be noted that only professionals and very well-trained users can work in it. An ordinary user can cause serious damage to a file by using this tool inappropriately.
Creating a disk image
In addition, the R-Studio program allows you to create images of the entire physical disk, its partitions and individual directories. This procedure can be used both as a backup and for subsequent manipulations with disk content, without the risk of losing information.
To initiate this process, left-click on the object we need (physical disk, disk partition or folder), and in the context menu that appears, go to the “Create image” item.

After this, a window opens where the user can configure the image creation settings for himself, in particular, specify the directory for placing the created image. It is best if it is removable media. You can also leave the default values. To directly start the image creation process, click on the “Yes” button.

After this, the image creation procedure begins.
As you can see, R-Studio is not just an ordinary file recovery application. Its functionality has many other features. We focused on a detailed algorithm for performing some of the actions available in the program in this review. These instructions for working in R-Studio will undoubtedly be useful for both absolute beginners and users with some experience.