
Compress images in Photoshop without losing quality. Effectively reduce the size of an image without losing quality How to compress the size in Photoshop
Good day, dear readers. The heavy weight of website pages leads to negative consequences. The resource is not liked by readers and search engines. Such a seemingly insignificant thing, but it wasn’t, affects the conversion.
Don't rush to get upset. If it were not for the mistakes of inattentive developers, then specialists would have nothing to do. And competition is always good. Simple work on photos will allow you to speed up the work of the site, which cannot but affect the opinion of the audience, as well as search robots.
The benefits of small pictures
Every good webmaster worries about the weight of the images he uses on his site. They must be “correct” on all sides for two reasons.
The first is readers. Everyone's loading speed is different, but everyone wants the resource to open as quickly as possible. If you use 5 MB images, they will load very slowly. Remember, there were times when the drawing was revealed in small portions, stripes? This can be achieved now, you just need to put a heavy image on the portal.

The second reason to lose weight is search engines. Perhaps everything will change soon, but for now the robots only check the fat pages halfway. They analyze only part of the information, a certain weight.
If you uploaded a hefty picture, then perhaps the robot will not even pay much attention to the content, but will say: “Well, please, no need, well, I’ll go check something else, too much work for one day.” As a result, you lose the opportunity to take high positions.
Therefore, I recommend that you upload photos to your multimedia library - this is a good way to lose weight. If you do exactly this, then only a link is used on the page, and as you understand, it weighs pennies. This way you will solve the problem with search engines. The question is still open with readers. It's a way to go, but a heavy image will remain that way and take a long time to load. This is where . It will help “thinner” the picture. First, let's talk about formats.
Which format to use
The two most useful formats for a website developer are jpeg and png. Now I will explain why.
Here we have a drawing of a cow. Open it using Photoshop and save it in two formats.

This is what png looks like. As you can see, the background is transparent. You can embed it anywhere and the picture will look like it was cut out. This image weighs quite a lot - about 3 MB.

And this is jpeg format. Weight – 260 kb, very cool. But the background is white. You can't use it anywhere anymore. For pictures for publication, a rectangular image is perfect, but as a design element it’s a moot point.

What is the best format to store photos in? I think that now you can answer this question yourself. Mostly everyone uses jpg, and their favorite images are stored in png. There are a lot of other formats, but I don’t recommend you fool with them. The difference will be in color rendering. Somewhere the colors are better, somewhere worse. The ideal combination of quality and weight is jpeg. If only there was transparency, there would be no price at all.
Now let's move on to the main question, how to reduce.
The secret to reducing photos that you don't know about yet
So one day I needed to work on one. The site had been in existence for about a year, but the customer could only dream about the first page. One of the points of conquering search engines was working on images. There were an unreal number of them, simply huge! You can't imagine how many there were! I was ready to die under the weight of this amount. It was then that I came up with a wonderful model for reducing photos.
Each of us has Photoshop. When it comes to a mountain of photos, we don’t need it, use the online service! Of course, it's free.
This is the same Photoshop, but much easier and faster. Here is the link - pixlr.com/editor , You can view. The thing is that this service is a greatly simplified version, and therefore works many times faster. While you open Photoshop on your computer, while you open a photo, then a second, then a third. You can go crazy! Fuck it. Use the online service and you won’t regret it.
First of all, set the Russian language. Language tab.

Select all photos by simultaneously pressing the Ctrl and A buttons or simply select them with the mouse. Open it. The whole procedure takes much less time than when working in the program on your computer.


If it is png, and we don’t need it, choose jpg. Please note the size, it dropped instantly.

You can also play around with the quality. See what the image looks like and what its size is.

Up to 50% is an adequate combination, although see for yourself. Who likes it more? As for me, 10 looks pretty good.

Another way to make an image smaller
I don’t really like the second method, you need to act on instinct, and with a large number of images it’s too tedious, but... but it’s effective. Now I will show you how to compress a 5 MB photo to 60 KB in size while maintaining quality.
So, open the photo. In the navigator on the left (shown with an arrow in the picture) you can see the full image. In the main window we see only a small part of it. I intentionally increased it to 100%. You can open such a picture in full size just on a billboard or screen in a cinema. Well, why use such pictures on the site?

Go to the “Image” section and select “size”.


Now click on any arrow - either next to the length or width. Doesn't matter.

And we begin to pull the slider.
That's what I was talking about, you have to act on a whim. The optimal screen size is usually 1024 x 768. According to other sources, 1366 x 768. If you are going to use a photo as visual material for an article, then, of course, the size will be smaller. You can't open it full screen. Although some readers may be interested in the picture and want to open it in a new window. In short, you will have to think for yourself here. Based on the tasks.

See, it seems to me that the picture is still very big.

I reduced it further.

Ready. Now, the weight is only 60 KB.

If the topic seems relevant and interesting to you, I recommend you read more. Also useful information for developers. And in general, subscribe to my blog’s mailing list to receive the necessary information that will definitely come in handy.
There is no need to wait for the weather by the sea; learn about the nuances of the work before you encounter any problem. This is the secret of professionalism. No matter how experienced you are, all sorts of troubles still happen; only a specialist knows how to quickly find a solution to fix everything.
Well, for those who want to understand the magic of Photoshop, I will once again recommend Zinaida Lukyanova’s course - Photoshop from scratch in VIP 3.0 video format . This will significantly speed up your process of learning and understanding the technical part and allow you to move on to gaining experience.
Whatever you say, it rarely turns out great the first time. Be prepared that they will start paying you good money only after your projects become professional.

It's up to you to decide, of course. Now you have all the information to think and make the right decision.
See you again and good luck in your endeavors.
17.11.2014 27.01.2018
After studying this lesson you will learn in Photoshop:
- Reduce photo size
- Reduce the size of an individual object in the photo
- Transform photos and objects - twist, compress, flip and flip.
In this article I will tell you how to use Photoshop to reduce a picture, image, text, layer, individual object - everything that can be reduced in Photoshop. Photoshop allows you to quickly and easily reduce objects without losing image quality.
After all, it often happens that it is necessary to reduce a photograph or picture before sending it by mail or uploading it to any website in order to show it to people. The huge original sizes of photos are not suitable and therefore Photoshop comes to the rescue to make the photo smaller.
I will be using Photoshop CS 6 to perform the reduction operations.
How to make a photo smaller
First, open the desired photo in Photoshop. Click CTRL+O or File - Open (File - Open) and select the desired photo on the disk.
The photo was opened in Photoshop:
The photo is a huge size 1600x1200 pixels. But for example, we need 600x450 or so.
There is a way to reduce the photo proportionally, to do this, go to the menu Image - Image size (Image - Image Size). In English Photoshop this window looks like this:
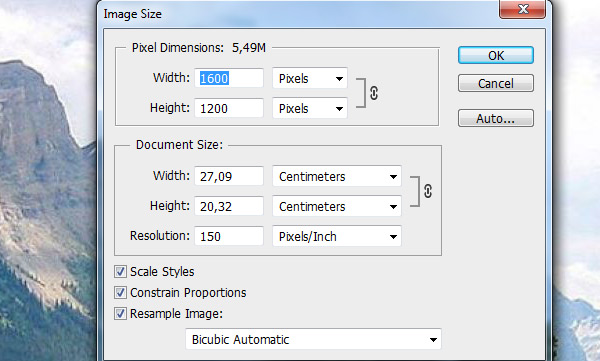
We see the meanings Width And Height (Width And Height), make sure the values are shown in pixels, but if you need you can view and change in centimeters and other measurements.
Enter the width instead of 1600 to 600 and you will see how the height is automatically adjusted to 450 so that the photo resize is proportional.

Click OK and that's it! Our photo has been reduced in size:

Select the desired area and zoom out
But what if we don’t need the whole photo, but part of it? And we need to reduce this part, but not proportionally and in our own opinion. The function we used before will not work for this.
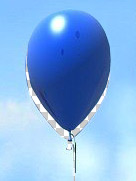
Let's say we have this picture with balloons and we opened it in Photoshop:

But we don’t need all the balls, we only need the blue one and we need to reduce it a little. To do this, select a tool Crop Tool(in the Russian version it is called Cropping) - using it we can select the area of the image we need and crop it. Namely the blue ball.
The tool itself on the panel looks like this:

Select the desired area:

Click Enter on the keyboard - we will cut out this ball and the rest of the image will be deleted.

Great. Now we need to make the ball smaller. You can use the function as in the previous step. Or you can do it differently, while maintaining the size of the image. First, let's get rid of the background and make it plain. To do this, we need to select the ball, cut it out and place it on a separate layer. And on another layer we will make the background.
Using a tool Polygonal Lasso Tool select the ball.
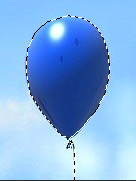
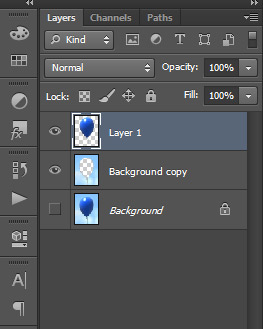
Click CTRL+X to cut it and copy it. After you click, it will disappear, and behind it there will be a transparent background. Press CTRL+V immediately to insert the ball. The ball is inserted a little to the side from the original place. And it will be immediately inserted automatically onto a new layer:
Now we'll quickly make a different background so that the ball doesn't seem cut out. But the old background is not suitable because there is a cut-out area due to the ball, and since we will make the ball even smaller, it will be even larger.
Create a new layer under the ball and fill it with any color:

Of course, the ball does not look neat, but the purpose of this article is to tell you how to reduce it in Photoshop, and not cut it out. Read about how to cut in Photoshop and in what ways in our other article.
Now let's make the ball smaller. Select the ball layer and click CTRL+T(or menu Edit - Transform - Scale(Edit - Transform - Scale)) and you will see how a frame appears around the ball to make it smaller:

Now drag the squares to scale the ball. You can make an image smaller as needed while maintaining the overall size of the document in Photoshop. You're scaling down an individual object that's on a separate layer, not the entire image document.

You can apply all these methods as you need, in any order. Knowing these techniques, you will cope with any task in which you need to reduce something in Photoshop.
Using Photoshop, you can easily reduce or increase the size of an image. Moreover, this can be done in different ways depending on what result you are striving for.
Before we start looking at the methods, first a little theory.
Firstly, what is reducing or increasing the size of an image? First of all, this concept should be understood as reducing/increasing the resolution of a picture, that is, its length and width and, accordingly, the number of pixels that make up any raster image. .
Secondly, what happens to the quality of the picture after resizing it?
- During the process of reduction, there is a loss of pixels, but the quality as a whole does not suffer, it remains quite clear.
- During the enlargement process, Photoshop stretches the pixels and draws them in accordance with its algorithm. Therefore, when enlarging, the picture quality always suffers. The higher the magnification, the more clearly the irreversible loss of quality is visible.
A similar issue was discussed in the lesson related to changing the layer size,
A clear example of how image quality changes:
In this article, we’ll look at 4 ways to change the size of a picture in Photoshop and look at when and what method is best to use.
Method 1 - Image Size Dialog Box
This is the classic and most universal way. It is suitable in most cases, especially when you already know to what size you should reduce and enlarge the image size.
Open the image in Photoshop.
Open dialog box Image - Image Size(or key combination - Alt+Ctrl+I). The following window will appear:

Pay attention to the fields immediately Width And Height. The values that will be indicated there are the current dimensions of the image. By default they are measured in pixels.
If you initially know to what size you need to resize the image, then enter these values in the above fields.
Proportions
If there is no checkmark in the window settings Maintain proportions, then you can enter any values in the length and width fields. But you risk that the picture will be stretched vertically or horizontally. It is very easy to make a mistake and choose the wrong proportions.
Example without maintaining proportions
Example with maintaining proportions
Method 2 - Resizing using Transformation
Transforming an image is a cool method that definitely needs to be added to your Photoshop knowledge base. This method is good in two cases:
- reduce or increase the size of the entire image;
- Reduce or enlarge the inserted image in Photoshop.
Size details for each case.
How to reduce or increase the size of an entire image
Step 1
Open the picture. Select a team Editing - Free Transform or press the key combination Ctrl + T.
Note
If this command is not active (grayed out), then your background layer is locked to change. This is indicated by a padlock icon directly on the layer.
To unlock the background layer, double-click on it. A window will appear New Layer, Press OK.
Step 2
A frame will appear around the image. There are markers in the corners and on each side that you need to pull to make the image smaller or larger.
After resizing, click on the checkmark at the top of the options bar. There is a bug in Photoshop CS6 and this checkbox is not visible. If you also don’t see it, then press the Enter button to accept the changes or Esc to cancel.
Step 3.1 Case with magnification
If you enlarged the picture in this way, then, as you can see, part of it became hidden, it seemed to not fit into the size in which it was opened. On the one hand, this is also not bad and can also be used in some cases.
But if you insist on showing the entire image, select the command Image - Show all.
Step 3.2 Case when decreasing
When you zoom out, you'll see a checkerboard background. This is emptiness, transparency. It will disappear when you save the image. But it would be correct to cut off the void in order to ultimately see what the final size of the picture is.
To cut off the void, select the Image command - Trimming.
In order not to disturb the proportions of the image in this method, when you drag the frame markers, simultaneously hold down the key Shift.
How to reduce or enlarge an inserted image in Photoshop
In any case, take the case described above into account. Namely, the ability to use a command Free transformation(Ctrl+T). This technique will be needed to carry out such a common operation, as reducing or enlarging an inserted picture, item, object(call it what you want).
So, a familiar situation: you inserted another picture into your main image in Photoshop, but it did not fit in size.
Select this image and use the transform command. Now, as described above, pull the markers in the desired direction.
Method 3 - Canvas Size
Not the most popular method, but nevertheless we will also consider it - the command.
The peculiarity of this method is that we change the size of the image resolution, while the picture itself does not change in any way. Photoshop simply cuts off part of the image (if we are talking about reduction), or adds a background color (if we are talking about enlargement).
That is, let's say your picture is 700x700 pixels. Through Image - Canvas Size you set the size to 500x500. As a result, Photoshop cuts off the extra 200 pixels in height and width. In the settings, you can specify where it cuts from: it is either evenly on all sides, or you can select a specific side.
How to reduce image size without losing quality
We looked at 4 ways to reduce image sizes. Of these, two methods: Canvas Size and Crop are not associated with loss of quality. In fact (width and height) the pictures become smaller, but the content itself remains the same size. To achieve this, you need to sacrifice part of the image, in other words, simply crop it to the desired size. For more details on how to do this, see the text above.
How to make a cropped image smaller in Photoshop
To reduce the size of a cut-out object in Photoshop, you need to be able to: cut out objects, manipulate the cut-out area (including reducing it).
Read about how to cut out objects in other articles. Let's look at reduction in more detail.
In this situation, you will also need to know how to use the command Free transformation.
When the object is cut out, you need to form a shape around it. After that, apply a transformation and, according to the instructions above, drag the handles in the direction of making this object smaller.
In any case, when reducing the cut fragment in the free space, Photoshop will automatically add a background color. Therefore, if you have a simple case, then take care first and choose the same background color that surrounds the object to be reduced. To do this, get a color sample using and .
If you notice an error in the text, select it and press Ctrl + Enter. Thank you!
How to reduce the size of a picture without losing quality, I became interested in the answer to this question when I wanted to make a miniature for an article from an image for my PC desktop wallpaper.
Entering a query into the search bar using my “favorite browser”, I began my journey through the sites, with the hope of quickly solving this problem.
But that was not the case, I’ll tell you, dear, in the words of a famous saying. In search of the right one for myself, I tried many of them. After all, high-quality images and design are the right path (read the previous article), and the search engine gave me many articles where, with the help of various programs, “our brother blogger” conjures his own and other people’s (read downloaded from the “net”) pictures.
Various ways to change image sizes and quality
- Among them are: multifunctional, shareware, such as Batch Picture Resizer. I provide a list of its capabilities: resizing photos, renaming files and adding watermarks, batch processing of photos, converting formats. It can be downloaded from this link: https://yadi.sk/d/g6eDFTyzAMob6
- And very simple ones, they include PicSizer.
But as always, searching in the distance, we forget or don’t know about what lies very close. After all, manipulations can be done using standard means of the operating system itself.
Let's say in order to reduce photo size in Windows 7 you need:
- Move the cursor over the object, right-click and select: Open using image and fax viewer and click Paint.
- Further: Menu-Properties and a sign pops up, and in the lower right corner there is a slider for changes. Use the slider or set the size and click OK.
- After that, “click "Save as…,here on the right are possible options for changing the picture format.
Changing an image in Photoshop
But today, using Photoshop program,I want to show you, How to resize an image without changing quality. Well, along the way, the format is at your discretion. Let me make a reservation right away that in order to obtain a high-quality image, it is necessary to gradually reduce the image. That is, we will do it in two times.
Open the program, load the image- File-Open.

After that we “click” -Image- Image Size, as shown in the screenshot above. When the sign for changes appears (screenshot below), first make resize changes to half the original format.

And in order not to lose quality, below we select: Bicubic sharper (best for reduction).
And as always, confirm the action by pressing the OK button. After doing all the steps again and getting the required size of the picture, you can improve its sharpness. This is so that it looks clearer and sharper on different browsers. We do as in the screenshot below, following the path - Filter-Sharpening- and choose which one we want.

I think that the information I provided to you will be useful to you. After all, the question How to reduce the size of a picture without losing quality interests all bloggers. Because loading images on a web page takes the lion's share of the time allotted for this action. And as you know, it is important for promoting your resource.
At this point I have run out of information on this topic. And to you, dear visitors, a small request, when leaving, press one of the social network buttons. By doing this you will express your gratitude for my (your) work. Thank you.
Yes, sorry, I also completely forgot to remind you that the site has an interesting article on the topic of making money on questionnaires, and
The need to reduce the size of an image arises in many cases - when you need to make an avatar out of a photo, or when you want to upload an artistic photo to a social network, or when you plan to use the image in the header of a personal blog. Professional cameras take pictures weighing up to hundreds of megabytes. It is inconvenient to store such photographs on a computer and post them on the Internet. Therefore, before publishing or recording on media, the size of images is reduced, and .
The most convenient way to reduce a photo is in Adobe Photoshop, since this editor has tools not only for reducing linear dimensions, but also for optimizing image quality. Depending on how the photo will be used in the end, you can choose the appropriate method.
0. Image analysis before downsizing
First of all, you should understand what it means to reduce the image. If a photo is to be used as an avatar, it must have a certain size and resolution (number of pixels vertically and horizontally) and low weight (volume in KB). These restrictions can be found on the site where the avatar will be uploaded. If you plan to simply upload a photo to the Internet, for example, to an album on a forum, its size and volume should be reduced to “reasonable”. This means that when opening the full version, the photo should not extend beyond the browser window. A “reasonable size” for publishing on the web is no more than a few hundred kilobytes.
Reducing the size in the case of an avatar and in the case of an album occurs differently. Only a small portion of the image is cut out for the avatar. An artistic photograph is often saved entirely, and then it is not cropping that is used, but a change in proportions. If the image initially has the right dimensions, but weighs too much, you can artificially degrade its quality. Each pixel will require less memory than before. Depending on the compression algorithm, the difference between the original and “degraded” images can be almost invisible to the eye.
1.1. Reducing by cropping
No matter how you edit the image, you need to open it first. In Photoshop this is done using the command File → Open. Then you should specify the location of the image on your computer.
When the image is loaded into the program, we evaluate whether all captured objects should be left in the photo. If not, and you only need to cut out some part of the picture (for example, the face for an avatar), you should use the Crop tool. There are two ways to crop out the desired area in a photo.
Crop using Crop
Select the Crop icon on the toolbar. It looks like a vertical strip with icons, and by default is located on the left side of the window.
The program will select a rectangular area of the photo. You will need to define the crop area and after pressing Enter, everything that was left outside the frame will be deleted.

Defining the crop area
Crop using the Rectangular Marquee Tool
The second way is to select the Rectangular Marquee Tool, which is also located on the same panel.
You can select an area using the Rectangular Marquee Tool in the same way as using Crop. After selection, open Image → Crop.
1.2. Reducing using Canvas Size...
To crop an image to precisely defined dimensions, while removing its outermost parts, you can use the Canvas Size menu. It is convenient if, for example, you want to remove a strip of light from the edge of the image. It can be found in the menu Image → Canvas Size.

Setting Canvas Size
It looks like a window that shows the current dimensions of the photo and the dimensions it will have after editing. The user sets the final dimensions and indicates which side to crop the image from. The units in which the dimensions are set can be changed - pixels, centimeters, inches, etc. are available. The cutting side is indicated using the arrow field in the corner of the window. After clicking “Ok”, the image is cropped.
2. Reducing size and proportion using Image Size...
When the photo takes the desired form, you can proceed to resizing it. This is done through the menu Image → Image Size(Image size).

Setting Image Size
Here you can reduce the linear dimensions of the image by changing their value in pixels, percentages, centimeters or other units. By default, changing one value results in a recalculation of another value. Thanks to this, the proportions of the photo are preserved. If for some reason you want to distort the proportions of the picture, you should click on the chain icon between the width and height values. You can also change the image size by decreasing or increasing its resolution (Resolution item). The lower the resolution, the worse the quality of the photo, but the file weight also decreases.
3. Saving and optimizing size using Photoshop
Finally, after reducing the photo, you can save it in the required quality. In addition to the standard “Save as”, Photoshop has the “Save for web...” tool, which is located in the File menu.

“Save for web...” setting (click to enlarge)
Most of the window is occupied by the photo display field. In this field it looks the same as it will look on the page on the Internet.
On the right side of the window you can select the saving format and image quality. The higher its value, the better the photo looks. Rough quality reduction is carried out using a drop-down list. Its values - High, Medium, Low - give a rough idea of the final look of the photo. Fine adjustments are made using the Quality numeric field. The weight of the file after saving is displayed below the viewing area.
In the Image Size field, you can specify the desired size to save or the percentage to reduce the photo. This is essentially the same menu as in the previous step, but with fewer settings.
Thanks to all this, you can select the optimal saving parameters, in which the photo will look almost like the original one, but weigh several times less.