
Windows can't be updated. I can't configure Windows updates - what should I do? Instructions, tips. Problems with March Windows updates
Judging by the text of the message, for some reason Windows 8 was unable to install updates correctly. As a result, the next time you boot, the “smart” system decides that its crash is caused by a problem in one of the installed updates and tries to roll them back, but for some reason it cannot do this.
Failed to configure Windows updates. Cancel changes. Don't turn off your computer
In English the error looks like this:
Failure configuring Windows updates. Reverting changes. Don't turn off your computer

In some cases, it’s really worth waiting a few minutes/hours, after which the system itself will correctly roll back the latest updates. But it often happens that this message appears at every boot and somehow it becomes impossible to remove it and log into the system normally.
In general, Microsoft described this problem in one of its knowledge base articles. The article suggests performing the following operations as possible methods of “treatment” (sequentially, starting with the first, moving on to the next solution if the previous one did not help):
- Restart your computer;
- Disconnect all removable media and external hard drives from the computer and reboot again;
- Check the system with the Windows Update Troubleshooter utility;
- Use the system recovery functionality (boot from an installation/boot disk and roll back to one of the previous restore points);
- Reset Windows 8 using the Refresh or Reset functions;
- Reinstall the OS
Methods 1 and 2, I think, do not need additional comments. They are worth trying first.
Windows Update Troubleshooter
Regarding method 3 - you can run the Windows 8 update diagnostic utility only from a running system, but since it does not boot, we will try to perform such a check in safe mode.
To do this, we need to boot from the boot or installation disk/flash drive for Windows 8. Then we need to launch the command line. If you are using an installation disk with Windows 8, the easiest way to do this is by pressing the Shift+F10 key combination on the system language/layout selection screen.
On the command line, run:
bcdedit /set (current) safeboot minimal

After the next reboot, the computer should boot into safe mode.
Launch the Update Service Diagnostic Wizard by running the command:
msdt /id WindowsUpdateDiagnostic

Then simply follow the wizard's instructions.
After the wizard finishes, disable booting Windows 8 in safe mode:
bcdedit /deletevalue (default) safeboot
We reboot the system and try to boot in normal mode. If it doesn’t help, move on to the next method.
System Restore
If applicable, try performing a system restore by booting from the boot/installation disk and see if the problem goes away.
If this doesn’t help, and you really don’t want to reinstall/reset Windows, try these tricks first.
Clearing the update cache
Again, boot into safe mode (described above), open the command line and clear the contents of the C:\Windows\SoftwareDistribution\Download\ folder (Windows downloads updates to this folder and starts installing them from here)). You can do this directly from Explorer or with the following command:
ren C:\Windows\SoftwareDistribution\Download Download.old
Note. The command does not delete, but renames the Download directory to Download.old
Disable automatic start of the Windows Update service:
sc config wuauserv start= disabled
We check whether Windows 8 boots in normal mode, if so, enable autostart of the update service and launch it:
sc config wuauserv start=auto
net start wuauserv
The system must download updates again and install them.
Restoring the Windows 8 Component Store
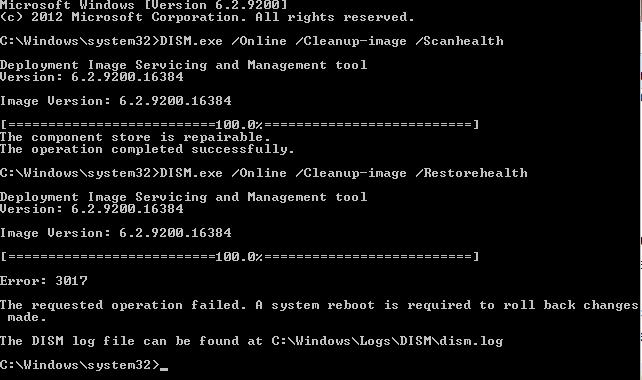
Let's try to restore the Windows 8 component store using DISM. To do this, boot into safe mode again and execute the commands sequentially on the command line:
DISM.exe /Online /Cleanup-image /Scanhealth
Note. The command can take quite a long time to execute, up to several hours, so be sure to wait for it to complete.
DISM.exe /Online /Cleanup-image /Restorehealth

Disable booting in Safe Mode and check if Windows 8 boots normally.
If this does not help, and the message “Configuring Windows updates. Reverting changes” does not disappear, you should probably think about resetting or reinstalling the system.
This problem is not something supernatural and insoluble. Any problem can be solved. First of all, you need to understand the cause of the system problems. In order to solve the consequences of a “breakdown”. There are two main reasons.
The first of the main reasons for almost all users is simple forgetfulness.
Users often forget about automatic system updates and simply turn off the computer when downloading the update. Which leads to a system error. Also in case of unauthorized power outage.
The second reason, the most common, is the use of pirated content.
When downloading updates to Microsoft services, the code is identified. Let's just say checking the Windows system license. Which leads to this problem.
Practical actions to solve the problem!
method one.
If, when you start Windows_7 or Windows_XP, the principle of operation in the systems is almost the same, when you try to install updates, the system writes that “it was not possible to configure windows updates” and “the changes are being canceled.” In this case, a reboot occurs and the system starts updating windows again. This can happen ad infinitum. The following actions must be taken:
You need to restart your computer, or, as in our case, wait for a reboot. Or press the “RESET” button. On a laptop, hold down the power button.
While loading the bios, you must press the “F-8” key. The system boot menu opens.
From the list, select “Safe Mode” and wait for the system to boot.
In Safe Mode, most system services are disabled. Therefore, this method allows you to disable the update download system. On the desktop, go to the start menu.
Click “Computer”.
Select “local disk (C)”. If the drive letter on which the system is installed is different, then select your local drive.
Then we follow the following path:
From:/windows/SoftwareDistribution/Download/
The "Download" folder contains Microsoft update files for windows.
The downloaded update files must be deleted from the package. Select files by date and time that were downloaded the last time they were updated. If this is difficult for you. Select all files and folders with the mouse and delete. After deleting, reboot the system and try to enable system updates.
If you have pirated Windows content installed, it is recommended to disable system updates in the system settings. In order to protect yourself from such problems.
Method two.
If the first case did not work for some reason. You can restore your system using a system backup restore point. We do almost the same thing.
When the system boots, press “F-8”. Select "Safe Mode with Command Line Support". Press “enter”. In the command line, enter the following command “msconfig”, press “enter”. You will be taken to the “system configuration” window
Select “service” at the top of the window. In the window that opens, select “restore the computer system to one of its previous states”
The System Restore window opens. Click “next”.
Confirm the restore point. Click “Finish”.
After which you need to confirm the restoration notification. Click “Yes”. After the system restore is complete. Try updating the system again or disabling the update in the settings.
method three.
If the previous two methods did not help you. And they didn’t bring you any closer to solving the problem. You need to do the following: As you probably already remember.
Reboot the computer. During loading, press “F-8”. In the download lists, select “Directory Services Restore Mode”.
Important: Turn off the Internet.
After the procedure, the system should turn on.After the procedure, the system should turn on. Go to the start menu. In the "control panel".
In the "control panel". If your control panel looks different, change it to the format you need in the “view” category in the upper right corner.
Go to Windows Update. In the window that opens, on the left side select “Parameters settings”.
In the settings, uncheck all the boxes.
We also change “Install automatically (recommended)” to “Do not check for updates (not recommended).” Then try restarting your computer.
If this article helped you solve your problem. So you didn't waste your time.
You are trying to install an update in Windows 10, but a notification is displayed that it cannot be completed, after which the system starts undoing the changes. Let's find out more about how to fix this error.
Errors that the installation cannot complete are not new to users. Many people have encountered an error in Windows 7 in which the system notifies that updates could not be completed, and then the process of undoing the changes starts. For some time now, more and more users have been seeing this problem in Windows 10.
The system downloads updates correctly and displays information that they are ready to install. If you ignore the installation, then after a while the OS itself will “throw out” a notification that you should update Windows, prompting you to restart the computer to complete the operation.
And this is where the problem begins. The update is theoretically installed, but at some point a warning appears about a possible failure. The notification “We were unable to complete the updates” appears, and the screen below displays “Undoing changes” - Windows 10 begins the uninstallation procedure and rolls back the system to the state before it was installed. And so again and again, every time you try to update the OS. How to fix?
Method number 1. Windows Update Troubleshooting Tool
To get started, you can use the automatic troubleshooter in Windows 10. This is an official tool that can be downloaded from the Microsoft website. The utility diagnoses the system area for faults, and then tries to solve them using basic methods. The effectiveness may be less or more depending on the problem, but it is always worth giving this program a chance when starting to troubleshoot problems.
Download the troubleshooter
Once downloaded, launch the utility and follow the on-screen instructions. The program will automatically search for problems and then try to fix them.

If you see a notification that "" has been restored, you can try updating the system.
Method No. 2. Clearing the SoftwareDistribution folder
The SoftwareDistribution folder contains update installers. The problem may be due to them being damaged or compatibility errors. Therefore, it is worth deleting the contents of this folder and restarting the service.
To be able to do this, you must temporarily stop the service, otherwise file deletion will be blocked.
Press the Win + R key combination and enter the command:
Find the service in the list, right-click on it and select “Stop”. The service will be suspended.

Again, simultaneously press the Win + R keys, enter the path to the directory below and press Enter:
C:\Windows\SoftwareDistribution

You need to delete all the contents of the SoftwareDistribution directory - it should remain empty.
After deleting all the files from the folder, open the list of services again (enter the command “services.msc” in the Run window), find, right-click on it and select “Run”.
Now try updating the system.

Microsoft regularly releases updates for Windows 10: some of them are global in nature and add new functionality to the system, others affect the operation of internal system components that are invisible to the average user. But what users always notice is notifications about a forced restart of the computer to install updates. Very often this process occurs at the most inopportune moment, which can lead to the loss of data and nerve cells of the user.
But this is half the trouble; the moments are especially wonderful when, after agonizingly waiting for an update to be installed, Windows reports that these updates were not installed. What to do in such cases?
The first step is to check the “Update Log” - this is a special log where information about all update packages that your computer receives is stored. Go to Action Center > All Settings > Update & Security > Windows Update > Update History.

Analyze the list that appears in front of you. You'll likely see numerous "Failed to install" errors next to most packages. Their reasons for each individual update package should be considered individually, but very often they are united by the fact that the elements for which Windows is trying to install updates are simply not in the system. This happens in cases where an unlicensed version of Windows is installed, where the authors of the “assembly” kindly deleted some system files, or if the user himself deleted system files in Windows 10. In such cases, only a complete reinstallation of Windows or disabling automatic updates will help so that the system I didn’t try to constantly update something that doesn’t exist.
If the version of Windows 10 you are using is guaranteed to be licensed, and no one has ever touched the system files, then you need to check the operating system for errors. Open a command prompt as an administrator and enter the command sfc /scannow. If Windows finds damaged files, it will fix them.

The second reason why updates cannot be installed may be that the update files themselves are damaged. This can happen due to a poor Internet connection, a Microsoft error, or due to a break in the update download session. You can delete downloaded files by going to the directory c:/windows/SoftwareDistribution/Download/. After deleting the files, it would be a good idea to clean the registry using special software, and then start downloading updates from Windows Update manually.

Windows is too complex an operating system to provide universal instructions for solving problems with updates. As mentioned above, a reliable assistant for finding the main reason for the inability to install updates is a log that will tell you which specific element of the system cannot be updated.
Our regular reader Serg I encountered this problem while loading Windows 8.
Good afternoon
Could you help me with my problem. While installing the latest updates on Windows 8, the electricity in the house unexpectedly went out. The laptop survived on an old battery for several minutes and, naturally, crashed. After the light was finally turned on and the system began to boot, a screen appeared with the inscription “”. I waited for several hours - no effect. A power reboot doesn't help either; every time Windows 8 loads, it stops at this message. The most interesting thing is that the system does not hang, caps lock and num lock wink cheerfully when pressed, the hard drive sometimes crunches, but it never reaches the desktop.

Have you encountered such a problem? Any ideas on what I should do? I really don't want to reinstall Windows.
Thank you in advance!»
So, in this article we will try to summarize the experience gained as a result of solving the problem on Serg’s laptop and the experience of other lucky people who encountered a similar problem.
Judging by the text of the message, for some reason Windows 8 was unable to install updates correctly (in Serg’s case, due to a power outage). As a result, the next time you boot, the “smart” system decides that its crash is caused by a problem in one of the installed updates and tries to roll them back, but for some reason it cannot do this. As a result, the computer booting with Windows 8 / Windows Server 2012 stops at a screen with the following message:
In English the error looks like this:

In some cases, it’s really worth waiting a few minutes/hours, after which the system itself will correctly roll back the latest updates. But it often happens that this message appears at every boot and somehow it becomes impossible to remove it and log into the system normally.
In general, Microsoft described this problem in one of its knowledge base articles - http://support.microsoft.com/kb/949358. The article suggests performing the following operations as possible methods of “treatment” (sequentially, starting with the first, moving on to the next solution if the previous one did not help):
- Restart your computer
- Disconnect all removable media and external hard drives from the computer, and reboot again
- Check your system with Windows Update Troubleshooter
- Use the system recovery functionality (boot from an installation/boot disk and roll back to one of the previous restore points)
- Reset Windows 8 via Features
- Reinstall the OS
Methods 1 and 2, I think, do not need additional comments. They are worth trying first.
Regarding method 3, you can only run the Windows 8 update diagnostic utility from a running system, but since it won’t boot, let’s try to perform such a check in safe mode.
To do this, we need to boot from the boot or installation disk / for Windows 8. Then we need to launch the Command Prompt. If you are using a Windows 8 installation disc, the easiest way to do this is by pressing the key combination on the system language/layout selection screen Shift+F10.
On the command line we will execute
Bcdedit /set (current) safeboot minimal

After the next reboot, the computer should boot into safe mode.
Launch the Update Service Diagnostic Wizard by running the command:
Msdt /id WindowsUpdateDiagnostic

Then simply follow the wizard's instructions.
After the wizard finishes, disable booting Windows 8 in safe mode:
Bcdedit /deletevalue (default) safeboot
We reboot the system and try to boot in normal mode. If it doesn’t help, move on to the next method.
System Restore
If applicable, try performing a system restore by booting from the boot/installation disk and see if the problem goes away.
If this doesn’t help, and you really don’t want to reinstall/reset Windows, try these tricks first.
Clearing the update cache
Again, boot into safe mode (described above), open the command line and clear the contents of the C:\Windows\SoftwareDistribution\Download\ folder (Windows downloads updates to this folder and starts installing them from here)). You can do this directly from Explorer or with the following command:
Ren C:\Windows\SoftwareDistribution\Download Download.old
Note. The command does not delete, but renames the Download directory to Download.old
Disable automatic start of the Windows Update service:
Sc config wuauserv start= disabled
We check whether Windows 8 boots in normal mode, if so, enable autostart of the update service and launch it:
Sc config wuauserv start= auto net start wuauserv
The system must download updates again and install them.
Restoring the Windows 8 Component Store
Let's try using DISM. To do this, boot into safe mode again and execute the commands sequentially on the command line:
DISM.exe /Online /Cleanup-image /Scanhealth
Note. The command can take quite a long time to execute, up to several hours, so be sure to wait for it to complete.
DISM.exe /Online /Cleanup-image /Restorehealth
Disable booting in Safe Mode and check if Windows 8 boots normally.
If this does not help, and the message “Setting up Windows updates. Reverting changes" does not disappear, you should probably think about resetting or reinstalling the system...